

This post is a part of the Warm Cool Quilt-Along! Feel free to join in the fun at any time!
Today we're going to talk about machine binding! Now, I will give you forewarning, this is a very photo heavy post! I need photos when I'm learning something new, so it seems only right to share lots of photos when I write up tutorials! I hope it all makes sense.

I prefer to attach my binding to the front and back by machine. This is not the traditional way. I think the most common binding method is to machine stitch to the front, then hand-stitch to the back. I'm going to show you the way I do it!
If you're interested in a great tutorial using the traditional method, I would highly suggest Christina's three part binding series!
It took me a while to decide on a binding fabric for my mini quilt. I knew that I wanted something neutral that wouldn't interfere with the contrast in the quilt. I also didn't want anything too distracting so I went with this fun dot from Basics by Basic Grey. Now lets walk through machine binding from start to finish.

1. Cut your binding strips 2.5" x width of fabric. Trim off those selvedges!

2. Join your binding strips using a 1/4" seam allowance. Most of the time I attach my strips with a straight seam. For how to join them with a diagonal seam, see this tutorial.

3. Fold your binding strip in half, press.

Yay, your binding is made! Now let's attach it to the BACK of your quilt!

1. Leaving a pretty good size tail (I usually leave between 10"-15"), start pinning your binding along the back of the quilt starting in the middle of any side. Don't forget to pin the raw open edge of the binding to the raw edge of the quilt!

2. When you get to a corner, fold your binding strip at a 90 degree angle as shown above, so that the raw edge of the binding strip lines up with the next edge of your quilt. Press fold with an iron or crease with a hera marker (my favorite way).

3. Unfold and mark along the crease with a water-soluble pen. Pin in place.

4. Start sewing near your first pin, leaving that tail unsewn. I like to use a seam allowance between 1/4" and 3/8". Be sure to backstitch at the beginning to secure. I like to use a walking foot when I bind. A walking foot ensures the top and the bottom layers move evenly through the machine. It just makes everything go a little smoother!

5. As you approach the corner, slow down and stitch right up to the line you made, but not past it. Backstitch a few times to secure your stitching.

6. Refold your binding strip like you did the first time, pin in place.

7. Now flip the strip back over onto the next quilt side and pin in place. Continue to pin that side, repeating the same corner preparation, sewing the other sides and corners the same way. This time, when you start stitching this side, start at the corner, all the way off the edge, and sew to the line marked in the next corner.

8. After you've rounded your last corner, backstitch and remove your quilt from the machine. Pin your binding until you're about 8"-10" away from your original starting place. (If you're binding something small like a potholder, give yourself as much room as you can.) Go ahead and sew up until that point, then backstitch and again remove your quilt from the machine.

9. Now we're going to join your two binding pieces with a straight seam. For how to join the ends with a diagonal seam, see this tutorial. Fold one end of your binding to the middle of your opening (approx 4"-5"). Press.

10. Repeat with the other end, making sure your two folds meet in the center. Press.

11. Using a ruler and your water soluble pen, mark 1/4" on each side of the folds.

12. Lift up your strip, and cut along the line you just made. Be careful to only cut through one layer of binding! Repeat on the other end.

13. Unfold both ends and put right sides together (make sure not to twist up your pieces).

14. Pin in place!

15. Sew using a 1/4" seam allowance.

16. Finger press your seam open.

17. Refold the binding down against the quilt, press. Now finish sewing the binding down, making sure to backstitch at the beginning and end. The binding is now attached to the back! Let's attach it to the front!

18. Before we start sewing again, first press the binding away from the back of the quilt. Press on all four sides, don't worry about the corners.

19. Flip your quilt over!

20. Starting on one side, fold the binding against the edge of your quilt, making sure to cover the stitching line created by attaching the binding to the back. Use clips or pins (you can use hair clips in a pinch, but I love wonder clips for this), to secure your binding in place.

4. When you reach a corner, carefully use your fingers to push the quilt corner into the binding. (Put a finger on the corner of the quilt top and with your other hand tug on the binding.). Flatten out the binding side you're working on.

5. Fold over the next side of binding and secure with a clip. Continue in this manner until you've finished pinning down the whole quilt. Be sure to move in the same direction (I always do this in a clockwise direction) around your quilt top in order to get nice corners.

6. Now we're going to topstitch your binding in place. Align the inner edge of your binding with the edge of your presser foot (mine is lined up with the left side of my presser foot). Move your needle over until it is about 1/16" from the edge of the binding. (This doesn't need to be exact!)
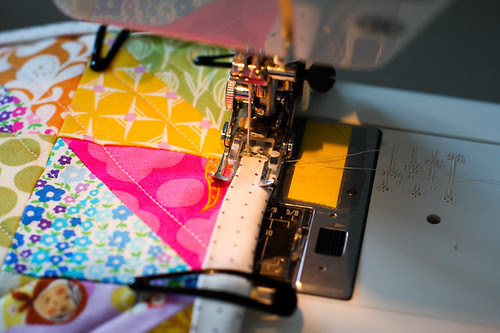
7. Backstitch and start sewing. I recommend lowering your needle so that when you stop, it stays in the quilt. This will be vital for the corners. There is not a lot of room for error here, so sew SLOW! Slower than you normally would.
8. When you reach a corner, slow down, and sew until you have a stitch into the next side of binding. Now lift your presser foot and turn your quilt. Start sewing again. Continue until you've finished your binding!

As you can see, the back ends up a little messy. If this is NOT what you want, I recommend binding the traditional way. Personally, this doesn't bother me, but it might bother you, so do what you are most comfortable with! If you get it all folded under just right with the right seam allowance, there won't be any stitching on your binding, it will be all on the quilt back.

The back may be messy, but the front is perfect! I love they way this method makes the front look. For me, this method is the least painful with the best results. Which for binding, is a must! ;)

Happy Quilting!
I am not a quilter, but doing the binding on the few quilts I've made have made me so nervous. You explained this quick, painless method so clearly. I feel totally able to make a quilt now! Thank you so much.
ReplyDeleteThanks so much for these set of tutorials! I'm fairly new to quilting, but made a mini wall quilt and have been sewing for a few years ;) I'm limited in space, so it was great to see how you basted your quilt! The least favorite thing of mine is joining the two binding ends on the quilt, egh!
ReplyDeleteYour quilt is so gorgeous! Love the fun colors and prints! Awesome!
Thanks, Jeni, for all the photos in your quilt instructions! I've read and re-read all of your quilt instruction posts, and I'm really excited to attempt to make my first one. Living in FL year-round gives me lots of time in the summer to stay inside and sew, so I'll start looking for fabric this week!
ReplyDeleteGreat tutorial! I love the quilt, too!
ReplyDeleteHi Jeni..I really do like the idea of machine binding, it is a lot quicker than traditional methods and just as neat...I think!
ReplyDeleteI think that's why I like the "traditional" method of sewing on binding (thanks for the link, by the way)...because I am so bad with machine sewing it down. I don't like the stitching to show outside of the binding. I'm too "picky" about that stuff after all these years. But your right, it is barley noticeable, and probably only when you point it out. Such a quick and effective way of binding. Great tutorial, Jeni!
ReplyDeleteThanks for the tutorial...I personally love machine binding my quilts ... as it saves so much time. I came across Rita's tutorial for machine bindings at RedPepperQuilts...she has come up with a method that gets rid of that "messy back" as you put it - check it out..it is brilliant!
ReplyDeleteFunny, I have just decided recently that with my next quilt I'll attach the binding to the back first and then stitch from the front, like you did. I agree, it seems like machine-applied binding is never going to be perfect, but I still think it's worth the time savings because "perfect" is not really such a big deal!
ReplyDeleteMachine applied binding may not be perfect but I've seen some "traditional" (hand stitched) that was as bad or worse!
Deletelove the way you explain . So very easy to follow!! Keep using the pictures, I nee them!!
Deletevery neat & pretty! I usually do my bindings in bias and sew the endings in angles. I thought your method looks cool too!
ReplyDeletei hate the binding step. i'm so impressed that you did your own tutorial. i would have referred readers to someone else's tutorial :)
ReplyDeletei've done machine sewing the binding on front and back for some quilts for donation, but why did i never think to iron the binding to make it fold over smoother? thank you for that reminder. and the fabric you chose for your binding is SO perfect. i would never have chosen it next to your bright quilt front and back, but it works so well. great job all around.
I so want to make one of these quilts and am saving all of your tutorials to favorites!! I really needed this lesson on binding as apparently I thought I knew how to do it but didn't!
ReplyDeleteI'm so pleased I'm not the only person in the world that binds quilts this way!!!! Thank you for posting this great tutorial, it's bookmarked ready for when I finish the 2 projects I'm working on right now.
ReplyDeleteA few years ago I learned how to attach bindings with this method, however, I usually pin the the front first then flip over to the back so the "messy" side ends up on the front. HELLO!!! Now I'm going to pin to the back first :o) and keep the front messy free!!! Thanks!!!
ReplyDeleteGreat tutorial and great photos! Thank you!
ReplyDeleteThank you SO much for posting this quilt along tutorial series! I have never quilted before- always wanted to, but was so intimidated about where to begin. When I found this tutorial series, you made it seem so easy and I just had to try it! I just linked up my finished quilt to your link up, and I am so excited to start my next quilting project! Thank you so much - you are awesome! :)
ReplyDeleteOh, I just found your blog today and this binding tutorial with all the great pictures is the first one that I actually understand and makes sense. I am working on "Christmas Pants" for my tree and I was so worried about what to do when I get the binding part. Thank you so much!
ReplyDeleteOh I love that drawstring bag too, now have to make one of those.
Good tutorial! The only suggestion I would personally make is to leave about 1/4 inch of the batting and backing when you trim yout quilt down instead of trimming it exact to the quilt top. That way your binding is not empty but has something in it. That makes it feel nicer and I am told it does not wear out as fast. (You would still attatch the binding the same way.)
ReplyDeleteWhat a great tutorial! Thank you for the clear explanation and instructions. It was almost enjoyable to do the binding...what I once felt was a chore. Thanks for making it easy!
ReplyDeletebest. binding. tutorial.
ReplyDeletethank you!!
Love this tutorial! I hate binding... will try this method to ease my pains! Thanks!
ReplyDeleteJust had to say, this is the best binding tutorial i have found !
ReplyDeleteWell done and thanks...i think ive finally cracked it !
This is the best Tutorial I have ever Seen!
ReplyDeleteHi Jeni,
ReplyDeleteThanks so much for this tutorial :) I love your method of joining the fabric together at the end and the accurate way you do the corners.
Thanks!
Everything about this tutorial is wonderful! After doing the "diagonal cut thing" for years, I am going to try the other way. I think it's a lot more accurate. Thank you for sharing. Definitely bookmarked!
ReplyDeleteI believe the reason for the diagonal seaming was to prevent too much bulk at the seamline.
ReplyDeleteI agree that sometimes (esp. on "grid" type designs such as dots and plaids) the straight seam looks better, but overall, there is less bulk to deal with if all the seamlines aren't stacked on top of each other like they are with straight seams.
I sometimes sew the binding to the back, too, but it was more because I liked the idea of my "hand-sewing" to show on the front.
Very clear tutorial--a great reference!
Elizabeth E.
opquilt.com
thanks so much for sharing this tutorial! i used it today on a mug rug and i love it!
ReplyDelete. JENI,;;;; PLEASE CLARIFY THIS FOR ME PRETTY PLEASE, (Refold your binding strip like you did the first time, pin in place.) After you flipped the bias tape back over and pinned, did you sew over that to the edge or just pick up the needle and start on the other side of the corner???? thanks, I dont like the slated binding either.
ReplyDeleteevery i did the binding i always like that. the back messy. by the way i loved your tutorial
ReplyDeleteThis tutorial was soooo helpful!! Thank you for creating it. I also blogged about it!
ReplyDeletehttp://twentysomethingquilter.blogspot.com/2012/08/tutorial-tuesday-binding.html
Thank you so much for this tutorial and ALL your pictures. I am making baby blankets for twin grand babies coming soon and have been looking for an easy to understand tutorial. Yours is perfect. Thank you so much for sharing.
ReplyDeleteHi Jeni I'm new to your blog. I found it on VintageRicRac one evening. You are one talented gal and thanks for sharing your experiences. I've been quilting for a little over a year. I always find that when I machine bind, I have trouble keeping my work straight under the needle (grrr).
ReplyDeleteHowever, for stitching down binding, I have been taught to use the needleturn appliqué method which gives such a neat finish - mostly invisible stitches. I also use the flat method for a lot of quilts. It saves having to worry about those pesky mitres that might not play well.
Again, thanks for sharing!
Thank you sooooo much! I'm about to start binding a Christmas tree skirt using this method (except with bias cut binding since, you know, the skirt is round). I'm so nervous, but this is going to be super helpful!
ReplyDeleteI love the idea of using hair clips! :) It's tough to pin through so many layers of fabric.
ReplyDeleteThank you, thank you, thank you for this tutorial! I have zero desire to hand sew anything! haha!!! I love the simplicity of your instructions and the easy-to-follow pictures as well.
ReplyDeleteThank you for the excellent tutorial, it really makes it so much more simpler. I have also started doing a second stitch on the front which adds to the finished look.
ReplyDeleteThis is how I bind my quilts; however I learned recently about the back and how to not make it "messy" looking. When binding on the front, you want the edge of your binding just SLIGHTLY over where the thread like is for where it was binded on the back... it ends up where all the stitching are at least in the binding and it alleviates a lot of that "mess". :)
ReplyDeleteFinally have my courage up to try this method! Ironically enough, on my "Fly Home" quilt! Thanks Jeni!!
ReplyDeleteThank you jenni for the brilliant tutorial, just tried your method and it was so easy to follow, keep them coming Regards Valerie x
ReplyDeleteexcellent
ReplyDeleteI have been doing it this way for years but I first sew it on the front, press to the back. Fold it over to the back slightly overlapping the stitches created the front. I then put a small bead of Elmer's Washable School glue under the binding, ironing into place to dry. No pins needed. Then just sew on the front binding side about a 1/16" from edge. Looks nice & neat on both sides.
ReplyDelete