Wonderland Log Cabin Quilt

Monday, September 24, 2018


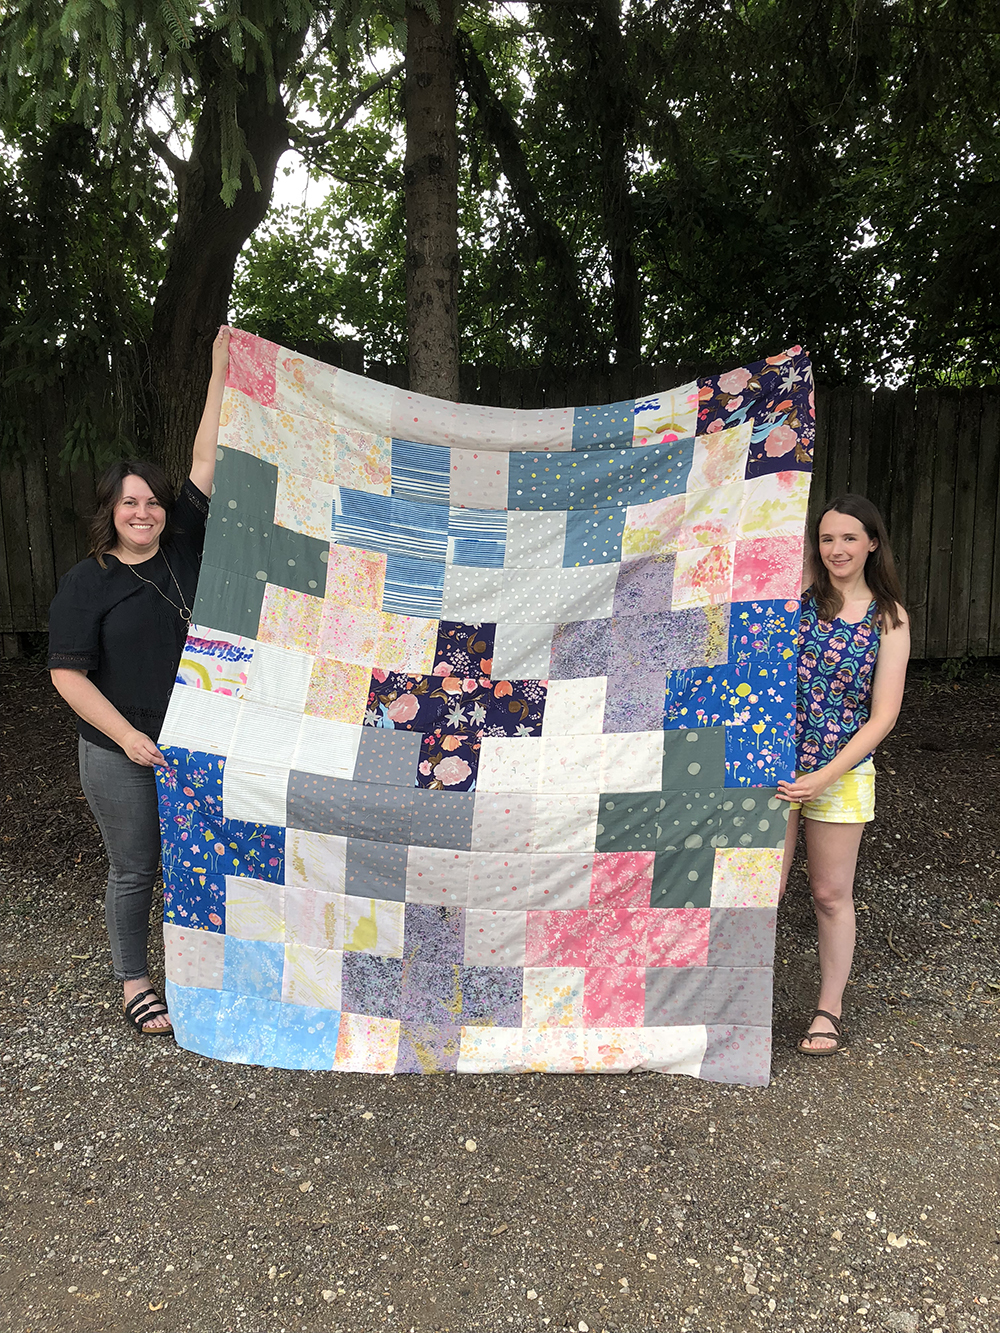
Happy Monday! I'm excited to share a finished quilt with you today. This quilt has been seven years in the making!


I started this quilt when we first moved to Wisconsin in August 2011, making it one of my oldest works in progress for many years. It features the collection Wonderland by Momo, which even at the time had been long out of print. Thankfully, I still love the fabric just as much as I did then!


The plan for this quilt was based around the limited fabric I had to work with. I had managed to find a charm pack and a honeybun of this collection, plus some yardage and fat quarters of a few prints, mostly the scissors. I cut out the entire quilt before starting it, only making one complete block.

It was one of those projects that I just couldn't really get going. I'd pull it out every couple years, but never made much progress. Finally, in January I decided it was time to really work on it. I had thinned out my works in progress before the move, and the list felt a bit more manageable. I knew it would feel really good to get this one done.

I had to spend some time ironing all the strips and partial blocks before I could get started again, but once I started sewing, I was determined.

The quilting was done by Melissa of Sew Shabby Quilting. I chose the Malachite pattern, which I wasn't super sure about, but ended up loving. It looks like a topographical map to me, and I think it's a great match for this quilt!


I wasn't sure what I was going to use for backing, until a friend swooped in and saved the day. She had seen my progress and offered to share her remaining Wonderland stash with me. It ended up being the perfect amount to piece together a back.


The binding came together right at the last minute. I got lucky and found someone destashing a half yard of this print on instagram, yay! I've been really bad about using my labels lately, but I remembered to pull them out for this quilt.

Read more about them here: My Custom Woven Labels


This quilt was in progress for such a long time, I honestly wasn't sure when I'd ever finish it. I'm thankful that I never stopped loving the fabrics, and that I was able to keep all the pieces and my notes together all this time. It felt really satisfying to cross such an old project off the list. It's motivated me to tackle another old project, hopefully I can get to finished this year too!

Happy Quilting!

August Monthly Report

Friday, September 7, 2018


Happy September! It's time for August's monthly report. See past reports here.


This is going to be a pretty short update! I'm taking a much needed social media/blogging break for the next week and a half, but wanted to get this report up before the month gets away from me.

It was a busy month over here, starting with our annual cabin weekend in Wisconsin! It was my first time back in WI since we moved, and it was really nice. I love getting together with my retreat friends, we always have a good time together. This year I made little thread catcher bins with indigo that I dyed at camp a previous year! I used this tutorial to make them.


I set myself up for success at camp and came with the squares all cut and ready for my double gauze plus quilt! It felt so good to whip up a quilt top in a few days. This is the biggest square size in the arithmetic pattern. I'm so excited to continue working on this project. Thanks to my friend Brianne for posing with me :)


Always making drawstring bags! This time it was a tiny one, which I don't make enough of. It was fun to use a print from Anna's Forage collection! The tiny size is in the pattern version.


To keep myself accountable for my stash goals, I'm tracking my yardage for fabric and yarn each month. Read more about how I track my here. Here is how I did in August:

August Fabric
Used up: 30.5 yards
Brought in: 13 yards
Net: -17.5 yards
Year to date: +3.5 yards

August Yarn
Used up: 0 yards
Brought in: 0 yards
Net: 0 yards
Year to date: +218 yards

Ahhh! I'm so close to being in the negative in fabric! I was able to finish a few projects this month, but I also took a big stack of fabric to our annual summer retreat. Not as much as I usually do since I had to fly, but still a good amount. And I only brought back 2.25 yards! I was pretty proud of myself for that, since there are always lots of goodies on the fabric table. Other yardage in this month was a backing for my pineapple quilt.


My Mom came to visit in August and we got into all kinds of stuff, including a little thrifting. Super pleased with this haul! The jello molds are going to become pincushions.


We also planted a few things while she was here. A few hours after we planted this butterfly bush, a monarch was checking it out! Looks like it works!


George turned 9 in August! I don't know how that's possible, since he's clearly still a baby bunny. Here he is wearing a basil hat!

Have a great month!

Using Tucks to Add Structure to Your Bag

Thursday, September 6, 2018


Happy Thursday! Today I'm sharing a video of the tucking technique used to add extra structure to your tote bag and a more boxy shape!

This was originally posted as part of the Workshop Tote Sew Along. Want to make a tote too?
Find all the posts here: Workshop Tote Sew Along
Pick up a copy of the pattern here: Workshop Tote Pattern
Share your progress here: #workshoptote on Instagram

This technique is also used in the Sew Portable Travel Set Tote.


Half-Square Triangle Workshop Tote made using Mariner's Cloth and Kaleidoscope by Alison Glass.


This is the last step in the Workshop Tote Pattern, and it's totally optional. You'll still have a lovely bag without this step!


Happy Sewing!

8 Top Stitching Tips + Tricks

Tuesday, September 4, 2018


Happy Tuesday! Today I'm going to share my tips and tricks for achieving beautiful looking top stitching.

This was originally posted as part of the Workshop Tote Sew Along. Want to make a tote too?
Find all the posts here: Workshop Tote Sew Along
Pick up a copy of the pattern here: Workshop Tote Pattern
Share your progress here: #workshoptote on Instagram


Half-Square Triangle Workshop Tote made using Terrestrial and Bird's Eye View collections by Sarah Watson.

1. Press Well

As always, good preparation goes a long way. Taking the time to press your piece before top stitching will ensure that everything lays nice and flat. This sets you up for nice looking stitching.

2. Use a Sharp New Needle

If it's been a while since you changed your machine's needle, now's the time! I typically use 90/14 size needles for bag projects.

3. Up the Stitch Length

I typically set my stitch length to 3.0 when I top stitch.

4. Use a Light Colored Thread

I get the neatest looking top stitching when I use a light colored thread on both dark and light colored fabrics. The hole where the needle goes through the fabric gives the stitching extra definition, resulting in neater top stitching.

5. Slow Down

Take your time! It can be easy to get into a groove and veer off course. 

6. Hide Back Stitching

If possible, I like to find a spot in the fabric to hide my back stitching. On this tote I was able to hide it in this wide flower that was near one of the sides. If I can't find a good spot, I'll skip back stitching, pull the threads through to the lining and knot the ends.

7. Use Your Presser Foot as a Guide

I recommend using the side of your presser foot to line up your top stitching if you can. I love using this little narrow stitching foot when I top stitch. If you can move your needle, move it to the right so that you can use that side of your foot to line up your piece and get a nice 1/8" seam.

8. Tuck as You Go

It can be hard to get your lining to stay tucked in as you top stitch around the top of your bag. I like to press it in place as best as I can, but I also tuck it as I stitch. I pinch the top edge, pushing the lining further inside the bag as I stitch to get a nice top edge.


Happy Sewing!