Dyeing Webbing for Custom Bag Handles

Thursday, August 30, 2018


Happy Thursday! Today I'm going to share instructions for how to dye webbing to make custom handles for your totes! I love using webbing in my tote bags for a few reasons. It's sturdy, it's fast, and it's easy to customize with dye! I'm going to show you how dye with RIT dye, which is readily available at craft stores, big box stores like Target or Walmart and even some grocery stores. It doesn't take a lot of supplies, and doesn't take long either. So if you've never dyed anything before, this is a really great beginner dye project!

This was originally posted as part of the Workshop Tote Sew Along. Want to make a tote too?
Find all the posts here: Workshop Tote Sew Along
Pick up a copy of the pattern here: Workshop Tote Pattern
Share your progress here: #workshoptote on Instagram


Plain Workshop Tote made using Outback Wife by Gertrude Made.

1. Gather Supplies

First up, the webbing! You'll get the best results if you use 100% cotton webbing. I usually buy mine from JoAnn Fabrics (it's in the notions area), but your local quilt shop may carry it, and you can always find it on Etsy.

RIT dye can be used a few different ways, but my preferred method is on the stove. I find that I get more intense, even colors. I also like the liquid RIT Dye versus the powdered, because it's much less messy. Plus it's easier to save and store the leftover liquid dye (which you'll have plenty of!). I also recommend picking up a bottle of RIT ColorStay Dye Fixative.

It is important to use a pot and tools that are only for dyeing. I picked up this little pot at the thrift store for a few bucks, and my measuring spoons from the dollar store. In this tutorial I used a small electric burner (from Walmart), but you can of course use your stove!

You'll also need some plastic gloves, dish soap (I love original blue Dawn for dyeing), table salt, a plastic container or small bucket and a spoon to stir with. And don't forget to protect your workspace! Plastic drop cloth or butcher paper works great.

2. Prep Your Webbing

Before dyeing, it's important to wash your webbing. This will remove any dirt or chemicals that might interfere with the dye. I like to do this in a small bowl or sink. Warm water and a little dawn dish soap goes the trick. Rinse well and squeeze out excess water. No need to let it dry, now we can move right into dyeing!

3. Prepare Dye Bath

The liquid RIT dye amount you'll need is based on weight. One bottle (8oz) will dye up to two pounds of fabric. 1 1/4 yards of webbing weighs just under 1 oz. I've broken down how much dye you need per 1 oz below:

For 1 oz of fabric or webbing:
- 1/2 Tablespoon of liquid dye*
- 1 Tablespoon of salt

*I usually double this and use 1 Tablespoon as per RIT dye recommendations, to achieve a more intense color.

Fill pot with enough water for webbing to move freely and be completely covered. Heat until just below boiling. Add dye, salt, and a drop of dish detergent to pot. Stir to incorporate.

4. Dye

Wet your webbing in clean water, squeeze out excess water. Carefully add webbing to dye pot, keeping the dye bath at a low simmer. Stir continuously for the first 10 minutes. This helps achieve an even color. You can keep your webbing in the dye bath for up to an hour, stirring regularly. Darker colors may require longer dye times. I pulled my webbing out after 15-20 minutes. Don't forget, the webbing will dry lighter.

5. Set Dye

This step is optional, but since this webbing will become handles that will touch your clothes, I don't recommend skipping it. Fill a small bucket or plastic container with 2 quarts of hot water. Add 2 teaspoons of RIT ColorStay Dye Fixative, mix well. Add webbing straight from the dye bath, without rinsing. Let webbing soak for 20 minutes or more, stirring occasionally.

6. Rinse + Wash

Remove webbing from fixative and rinse under running water until water runs clear. Start with warm water and then cool water. Hand wash with a little dish soap. Rinse well and air dry.

A note on dyeing: There are a lot of factors that play into the final color of your dyeing. As you can see above, my webbing is not an exact match to the dye bottle. It's actually closer than it looks (I had a hard time getting a good photo of this color!), but dyeing is often a magical mystery. My webbing started as a natural color rather than plain white, so that can change the final color. Just something to keep in mind when choosing your dye!


Happy Dyeing!

Simple Steps to Great Looking Gussets

Tuesday, August 28, 2018


Happy Tuesday! Today I'll be sharing the simple steps you can take to get great looking gussets! Plus a little video of the entire process if you need a refresher.

This was originally posted as part of the Workshop Tote Sew Along. Want to make a tote too?
Find all the posts here: Workshop Tote Sew Along
Pick up a copy of the pattern here: Workshop Tote Pattern
Share your progress here: #workshoptote on Instagram

Simple Steps to Great Looking Gussets
1. Cut Corners with Scissors

It can be tempting to make all straight cuts with a rotary cutter, but this is one place where it is worth the extra it takes time to pull out your scissors. When cutting those corner squares out of your piece in preparation for sewing the gussets, it's important to be accurate. With a rotary cutter, it's really easy to go past your cut lines and into your seam allowance.

2. Proper Backstitching

Make sure to backstitch at the start and end of your side and bottom seams. This will ensure that the seams don't want to come apart while you're trying to get your gusset lined up!

3. Nestled Seams

Nestling your side and bottom seams really helps keep those seams locked in place while you sew your seam. Push one seam to the right, and the other to the left. You may choose to press with an iron, or simply with your fingers.

4. Plenty of Pins

Stick a pin on the diagonal through both halves of your seam. This will keep it in place as you sew!

5. Extra Security

Want your gussets to be extra strong? Add in a little backstitching as you sew over the seam intersection to keep it secure.


Voila! A great looking gusset! You'll be doing this for both the lining and the exterior. This will give your bag a nice flat bottom, allowing it to hold all your goodies!

Happy Sewing!

How to Add An Interior Slip Pocket to Any Tote Bag

Thursday, August 23, 2018


Happy Thursday! Today I'll be showing how you can easily add a simple slip pocket to the inside of almost any tote bag pattern in just a few short steps. You'll want to add your pocket before the lining of your bag is put together. It's much easier to do while everything is still flat.

This was originally posted as part of the Workshop Tote Sew Along. Want to make a tote too?
Find all the posts here: Workshop Tote Sew Along
Pick up a copy of the pattern here: Workshop Tote Pattern
Share your progress here: #workshoptote on Instagram


Patchwork Workshop Tote made using Checkers Gingham by Cotton & Steel.


For the Workshop Tote, add pockets to your lining before Step 4 of the Tote Construction. If you're making one of the Elemental Totes, do this before step 1 of instructions for the Easy Tote Bag and before step 2 of instructions for the Simple Tote Bag.

1. Choose Your Pocket Size

When choosing how big to make your interior pocket, it's important to consider it relative to the finished size of your bag. You want to make sure there is room on all four sides of the pocket and that it won't interfere with the bag construction. My go-to pocket size for tote bags is a finished size of 6" tall x 7" wide. Cutting your proposed pocket out of a piece of printer paper can give you a better idea of how it's going to fit on your lining pieces. Once you have settled on a size, add .5" to each measurement for seam allowances.

For this tote, we'll be cutting (2) 7.5"x6.5" pieces for the pockets. If you'd like to add a little extra strength to your pocket, consider interfacing one piece with a light-weight interfacing like Pellon SF101.

2. Sew Pocket


Place pocket pieces right sides together, lining up any directional prints with the top of the print towards the top of the pocket. Sew around all four sides, leaving a small 2" opening along the bottom edge. Backstitch at the beginning and end of the opening and pivot at the corners.


Trim corner seam allowances to 1/8" to help reduce bulk.


Before turning, press the opening seam allowances under by 1/4" to make it easier to close. Turn pocket right sides out, gently poking out corners with a dull pencil or chopstick. Press well.


If you'd like, you can add a line of top stitching to the top edge of your pocket for a little extra detail.

3. Choose Your Placement

Typically, I  place the top edge of my pocket approximately 3" down from the top edge of my lining piece. I recommend finding a bag you like and measuring how far down the pockets are to get an idea of where you want yours to be. I also prefer my pocket to be centered, but that's up to you too! Consider what you'll be putting in the pocket when deciding on placement. Pin pocket piece in place, with the open edge towards the bottom of the tote bag.

4. Topstitch in Place

Using a 1/8" seam, topstitch along the two sides and bottom of your pocket, to secure to the lining piece.


Pull threads through to the wrong side of the lining piece and tie off for a neater look.

5. Optional: Create Dividers

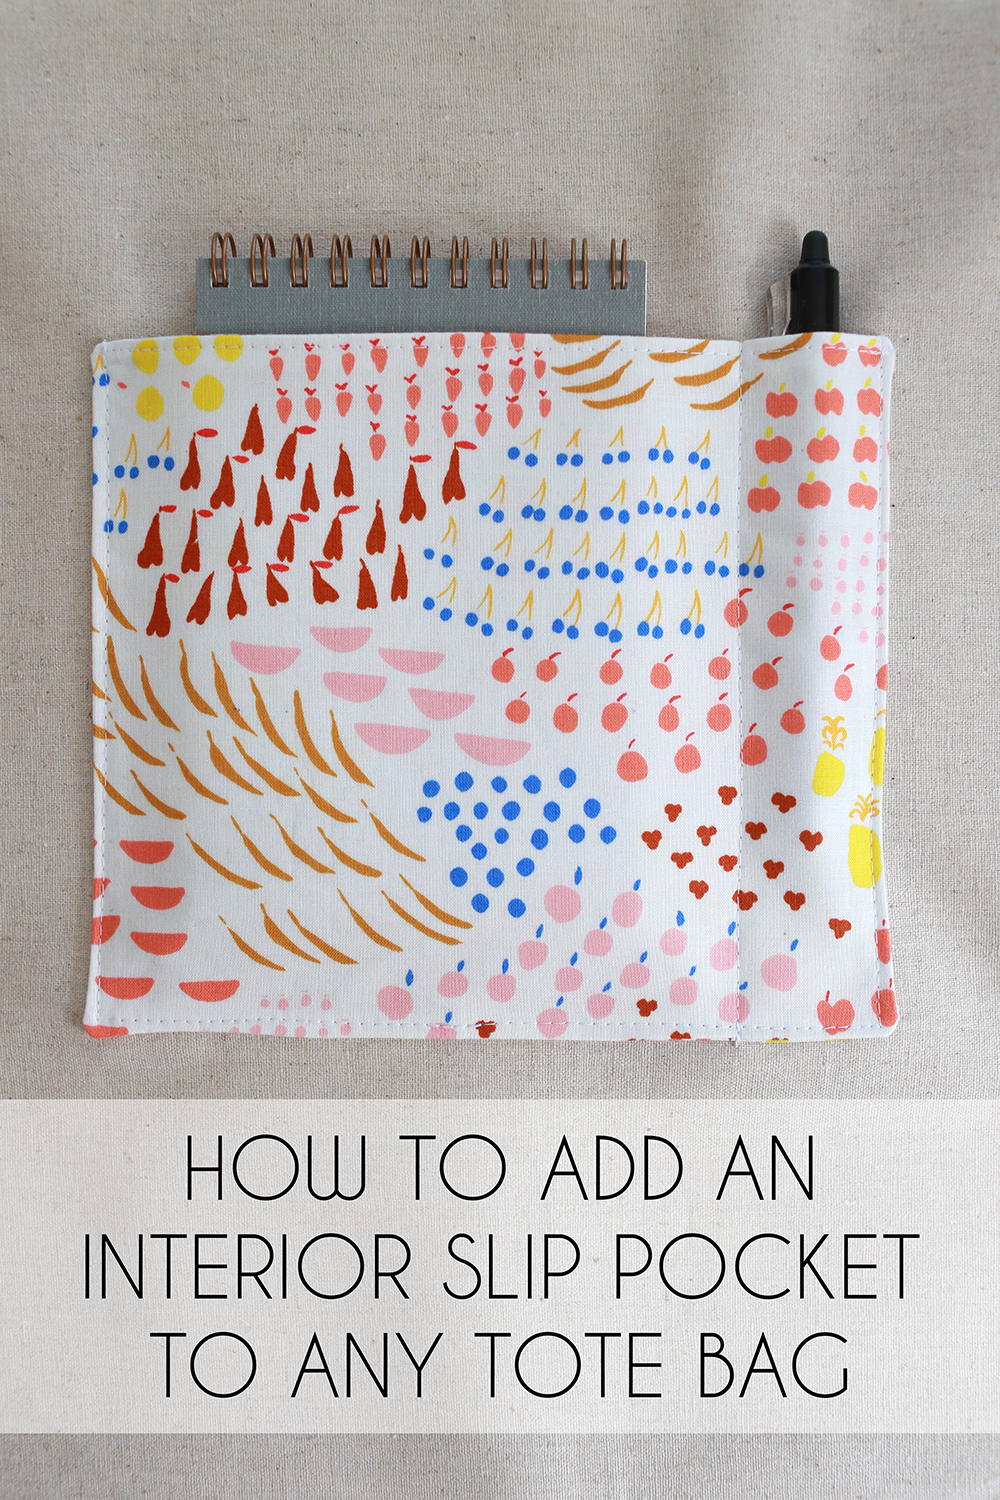
If you'd like you can divide your pocket in to several sections. Mark a line down the pocket where you want the divide. I used a hera marker to mark my line.


Starting at the bottom of the pocket, topstitch on the marked line, back stitching carefully when you start and stop. Slow way down when you get to the top of the pocket to be sure you don't go too far past it. Again, pull your threads through to the back of the lining pieces and tie off for a neat finish.


Voila! A quick little pocket! My divided pocket is just right for holding a small notebook and a pen.

Pocket fabric is from To Market, To Market by Emily Isabella.


Happy Sewing!

8 Tips for Precise Piecing

Tuesday, August 21, 2018


Happy Tuesday! Today I'm going to be sharing some tips and tricks for improving your piecing accuracy. Once you've got the basics down, it's the little things that can push your project to the next level. These are my favorite techniques for achieving precise piecework in my projects.

This was originally posted as part of the Workshop Tote Sew Along. Want to make a tote too?
Find all the posts here: Workshop Tote Sew Along
Pick up a copy of the pattern here: Workshop Tote Pattern
Share your progress here: #workshoptote on Instagram

1. Proper Fabric Prep

Precise piecing starts with a good foundation. Spending some extra time getting your fabric ready for cutting can make a big difference. Press your fabric well before doing any cutting. If you're working with stretchy fabrics, use spray starch or a pressing spray like Flatter by Soak, to stabilize your fabrics. Trim away any loose threads that could get in your way. Finally, clear off your mat so you have plenty of room to cut!

2. Square Up Fabric

It can be tempting to use a straight-ish edge on your fabrics to line up your first cut. Taking the time to square up all of your edges before cutting out your pieces will help ensure that everything is square. I like to start by using the selvedge and factory fold edge as a general guide for making my first straight cut along the edge of my piece. Then I line that fresh cut up on my mat or up against my ruler to cut my strips. When cutting strips down into squares, I trim off the selvedge and start cutting my squares. Now each square has a nice clean edge to work from!

3. Over cut Half-Square Triangle Squares

The common formula for making half-square triangles is to cut squares 7/8" larger than the finished half-square triangle size. This leaves almost nothing to trim off, which can result in some slightly out-of-whack blocks. I like to cut my squares a full 1" larger than my finished half-square triangle size to give a little extra room to trim them square. All of my patterns, including the Workshop Tote give you that full 1". If you're new to half-square triangles or want even more wiggle room, you can always cut your squares even larger and trim to size. Just know you may need a little extra fabric.

4. Use a 1/4" foot or Stitching Guide

Make it easy to maintain a consistent seam allowance by using a 1/4" foot or a stitching guide for your machine. This may mean investing in a new foot or tool, or can be as simple as a piece of masking tape on your machine bed. I love using my 1/4" foot, but those little edge guides can get in the way when half-square triangle piecing. Thankfully the guide on mine can be removed with a small screw. If you make a lot of half-square triangles, a guide-less 1/4" foot can really come in handy!

5. Complete Piecing on a Single Machine

This may seem silly if you only have access to one sewing machine, but try to complete your project all on the same machine if possible. Every machine is a little bit different, and your seam allowance and tension may be slightly different between machines. Sticking with one machine throughout piecing a project will help ensure that everything stays consistent! Same goes for thread too, not all threads are the same weight, so using the same thread for all your piecing in a project is a good idea.

6. Keep Your Machine Clean

Speaking of machines, keeping your sewing machine in fine shape will help you avoid hiccups while working on your project. Make sure the bobbin and feed dog areas are free of dust and stray threads. If your machine requires oil, give it a little before you start a new project. It's probably time for a fresh needle too! Make sure it's an appropriate size for your project.

7. Pressing Matters

When it comes time to press those half-square triangles or newly constructed rows, make sure not to over press. Use your fingers to gently press your seams before hitting them with an iron. Avoid sliding your iron around room much so that things don't get stretched out of shape.

8. Plenty of Pins

I'm an advocate for using lots of pins when piecing. It may sometimes seem like time wasted, but if it keeps you from having to rip out a few seams, it's worth it! No matter how small, I like to place a pin at every seam intersection. I place my pins on the diagonal through the intersection, with the pin going through both pieces of a pressed-open seam. This makes them easy to remove and keeps both squares (or half-square triangle blocks) secure.


I hope these tips will be helpful to creating your tote bags, or in any of your current projects! Tune in on Thursday for a detailed tutorial on adding an interior pocket to your tote!

Happy Sewing!

Patchwork Essentials: Radiant Quilt

Wednesday, August 15, 2018


Time to share another quilt from my book, Patchwork Essentials: The Half-Square Triangle! You can find all the posts about my book, Patchwork Essentials: The Half-Square Triangle, in the MY BOOK link at the top of every page, or here.


I'm slowly going to share each quilt, in order, with the exception of a few that I've already shared. So, first up we'll be looking at the quilts in the color chapter, the last one to share is Radiant!

For more on how the book is structured see this post.

https://incolororder.bigcartel.com/product/patchwork-essentials-the-half-square-triangle-book-signed
Need a copy of the book? Find one here: Patchwork Essentials: The Half-Square Triangle


Photo © 2015 Lauren Hunt for Lucky Spool Media.

This quilt was such a fun one to pull fabrics for. I made it back in 2014, before low-volume and black and white prints were super popular. I had to slowly build up a collection of enough prints for this quilt! Seems hard to believe now. I paired all the black and white prints up with a rainbow selection of blender prints.


This quilting is a simple edge-to-edge geometric design done by Melissa Kelley of Sew Shabby Quilting. Since there is a lot going on with the colors and prints, I knew I wanted the quilting to be pretty neutral.


For the backing and binding I pulled for more black and white prints, including some beloved yardage of Seed Catalog from Lakehouse and a geometric from Minimalista.

https://www.incolororder.com/2017/05/radiant-baby-quilt.html
You may remember last year I shared this baby quilt that I made from an alternative colorway of this quilt! See more about this quilt here.


Photo © 2015 Lauren Hunt for Lucky Spool Media.

Happy Quilting!