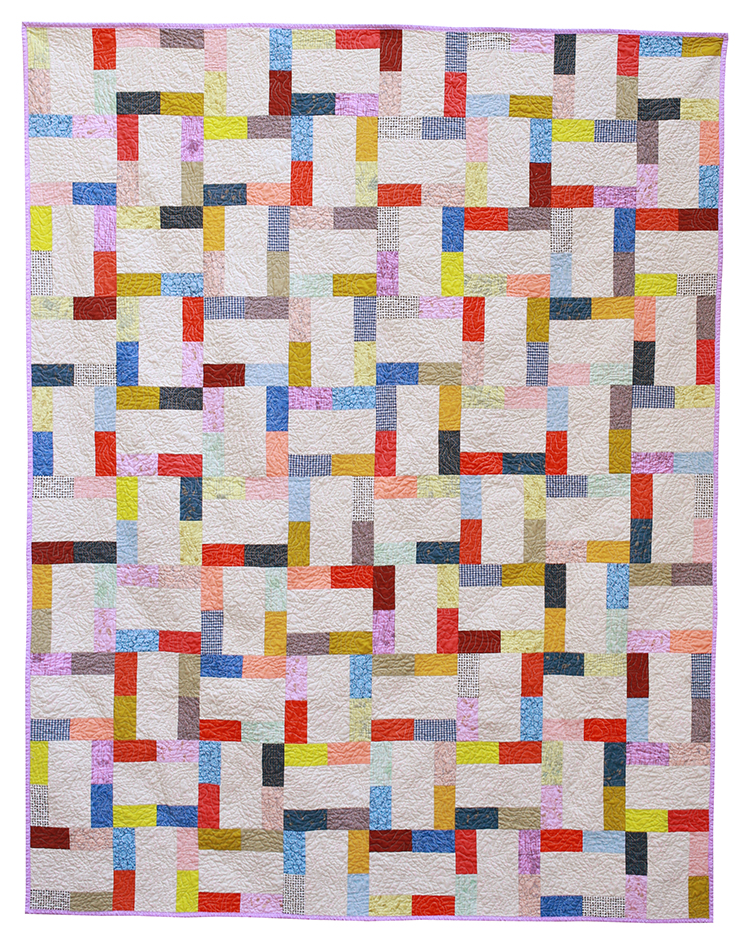
Finished: Night Sky Quilt

Wednesday, September 23, 2026


I am so happy to share this finished quilt today! This one took me 10 years to make, start to finish.


It all started with a few lovely things that were given to me! First, the fabrics are from Morning Walk by Leah Duncan which she designed for Art Gallery when I was designing there too. And secondly, the ruler I used to make this quilt. I met Julie Herman of Jaybird Quilts at one of the first quilt markets I attended and she gave me one of her Sidekick rulers. I picked up one of her quilt patterns that utilizes it, Night Sky.


I'll be honest, this type of piecing is not typically my cup of tea! I also don't make a lot of quilts that require templates for cutting. The process of making this quilt top reminded me a lot of making my Tula Pink Kaleidoscope Quilt. No part of it was particularly difficult, it just required me to be a bit more organized with all the pieces and do more precise piecing.


This quilt languished in my works in progress storage for many years without being worked on. Finally in 2025 I decided I needed to either finish it or pass it on! I still loved the fabrics so I pushed forward and got the top put together. I ended up arranging the blocks using equilateral triangles of the background fabric rather than with sashing like the pattern instructs. I really wanted to finish this quilt and I knew this layout would help me get over the finish line.


Ta-da! I need to work on a better lit spot to do flat shots, but for now this will have to do. I am so happy that it is done! And my husband claimed it right away so it's staying here! It's been our sunroom quilt all summer.


The quilting was done by Katie of Autumn Moon Quilting. The design is called Moon Phases.


For the binding I decided to use the background color from the top! And I remembered to add one of my labels.


I am so glad I held onto this backing for all these years. I picked it up from a store closing. It's a print from Morning Walk too.


Pattern: Night Sky by Jaybird Quilts
Fabrics: Morning Walk by Leah Duncan, Sweet Mint Pure Solids by Art Gallery Fabrics.
Notions: Sidekick Ruler

Happy Quilting!

Ice-Dyed Sheet Set

Wednesday, September 16, 2026


We have been ice dyeing pretty regularly lately and one my of favorite things I dyed this Summer is a set of sheets! I love the work of Anna Joyce and her hand dyed duvet covers are stunning. We don't use a duvet, so instead I decided to dye myself some sheets.


I started with a simple white 100% cotton sheet set. For now I only dyed the fitted sheet and the two pillowcases. I will probably dye the flat sheet at some point and cut it up to use as fabric for a project. I did everything I usually do when ice dyeing (dharma trading tutorial), but I did try to be light handed with the dye so that there would be some undyed areas.


I am absolutely thrilled with how it turned out! There are so many cool bits and colors.


This was such a fun project for me. I love the mystery and magic of ice dyeing and it's always interesting to see how a project will turn out! I definitely want to branch out in the type of items that I dye and will absolutely be dyeing another set of sheets someday!

Happy Making!

Scrappy Workshop Tote

Tuesday, September 1, 2026


Happy Monday! Today I want to share a tote bag that I made for my friend Amanda earlier this Summer.


This past Spring, I went through all my works in progress and found a small quilt top that I'd put together with offcuts from making this Large Keep Turning Quilt. I searched my archives and cannot find a single photo of said quilt top, but it was pretty simple. It was also pretty small.


I decided it would be best to chop it up and turn it into a bag! I had to add a little extra fabric to the bottom to be able to cut out the tote pieces. I used my Workshop Tote Pattern to make this tote, I just love the size. I was so happy to use up every last bit of these scraps. So satisfying!


For the lining I struggled a bit on what to use. I didn't have any large cuts of the quilt top fabrics, so I knew I'd have to use something else. Knowing I was making it for a friend who'd like it, I decided on some ice dyed fabric! I think it's a really fun surprise when you open up the bag. For the handles I ended up making some from a woven stripe instead of using webbing. Just felt a little more special!


Pick up a copy of the pattern here: The Workshop Tote Pattern

I also have a Sew Along for this pattern, which you can find here: The Workshop Tote Sew Along

Happy Sewing!

Vintage Sheet Drawstring Bags

Thursday, July 30, 2026


Hello! I'm back to share a couple recent lined drawstring bags I have made from vintage sheet scraps. These were both made with my Lined Drawstring Bag Sewing Pattern.


For the first bag, I pieced together some scraps I've held onto for 10 years! These were once offcuts from making my Vintage Sheet Scrappy Trip Quilt. I have been thinking about making another one of these quilts. If I did make another I think I would make it a little less scrappy. We'll see!


I chopped up most of the pieced scrap panel into two exterior panels for a Project size drawstring bag! I love how many different fabrics ended up in this bag. It makes me want to go through my stash of small quilt tops and extra blocks and turn them into bags!


For the accent and lining I chose two multicolored floral sheets.


I thought the antique ruler twill tape was a nice finishing touch for this bag!


One bag size I never seem to make often enough to build up a good stash of is the Snack size bag. It's great for small gifts and it seems I tend to make them and give them all away! I was wrapping my Mom's birthday presents and needed this size, so I pulled together this bag. I have a lot of low volume sheet scraps organized from making my Soft and Subtle Candyweb Quilt, and that's what I used for this bag.


Went with purple for the accent on this one, because why not! And a colorful print for the lining.


Another fun twill for this bag, this time the yellow measuring tape twill.

That's the scoop on these two bags. Still not tired of working with sheets or of making these bags!

Pattern: Lined Drawstring Bag Sewing Pattern
Fabrics: Vintage Reclaimed Bedsheets
Notions: Cotton Twill Tape

Happy Sewing!

Falling in Love with English Paper Piecing (EPP)

Wednesday, July 15, 2026


Hello! Long time no see. It's been a very busy Spring/early Summer (mostly wrangling a toddler) and I have a lot to catch you all up on! I wanted to start with something I never expected to be working on so much, english paper piecing! I've dabbled in it many different times over the years, but it just never stuck. I have very little time to sit at the sewing machine right now, so having a hand project going has become essential.

I love having this space as a documentation of what I make, so I do intend to be back more regularly. Preschool is on the horizon, which means more time for my work and life outside of being a mom coming soon!


My journey to falling in love with hand sewing actually started because we needed to have some tree work done. We spent two days in our sunroom watching the tree work unfold and I found I really wanted something to work on. I usually grab knitting, but knitting in the warmer months just isn't appealing to me. I knew I had a bunch of random english paper piecing projects that I had started and abandoned over the years, so I dug through those and found a big stack of already basted hexagons. This project started in 2010, so it was long overdue to be finished!


I had enough hexagons to make 21 flowers, but decided about halfway through the project that I wanted to make 24 instead. I managed to find some of the original fabrics I used (whoa) plus supplemented with a few newer fabrics to come up with enough colors. These are 1" hexagons.


I stored everything for this project in a small zipper pouch, which worked okay! As I worked on other projects however, I realized I need something with a bit more room and organizing potential.


I am currently at the stage of this project where I'm putting the blocks together into a small quilt! I love how it's turning out, and I'm going with a very maximalist approach in terms of the colors and fabrics. I'll leave it here for now and share more once I've finished the quilt.


After I finished stitching that first set of hexagons, I found another small group that I had received in a swap with my friend Jess on Flickr, also from 2010! I was a few shy of being able to make four hexagons, so I basted a couple more and started stitching. These are 1" hexagons.


I am stitching these to a piece of ice-dyed fabric and making some drawstring bags. They're currently stitched down and waiting for me to choose lining and accent fabrics!


My current project is brand new! I'm not sure what I'm making, I'm just going to keep making hexie flowers until I get tired of making them. So far I've only cut from my scrap bins, which is fun. I'm using low-volume prints for the petals and gold/mustard yellow prints for the centers so they look like little white flowers. I love how they're turning out. For these ones I am glue basting. I am conflicted on whether I like glue or thread basting better, but it's hard to argue with the speed of glue basting so that is winning for now! These are 3/4" hexagons.


For this project I quickly outgrew the zipper pouch I was using and upgraded to this tackle box! It's a vintage caboodles/plano tackle box I thrifted a few years ago (or last year?). It's been working great! I can keep all the stitching and basting stuff all in one place and can easily move it around the house with me to stitch wherever I want. And it's so cute, which is a nice bonus.


I'm really enjoying this project and I am excited to see what all these flowers eventually become. I'm so glad I gave english paper piecing another chance. It's allowing me to sew when I otherwise wouldn't be able to sew much. It is giving me to the same meditative experience as knitting does, and I certainly need that!

I hope to be back soon with some other kind of update, maybe on the garden? See you later!

Finished: Waypoint Quilt

Saturday, May 2, 2026


Hi there! It's been quiet in this space lately, but today I'm back to start sharing a backlog of finished quilts with you all! I think this is the first of 5? I was able to get a bunch photographed recently so I can finally share them!


Photo © 2015 Lauren Hunt for Lucky Spool Media.


We're starting with what I think is the last quilt top that I made in the process of writing my book, Patchwork Essentials: The Half-Square Triangle. For each quilt pattern in the book I made either an alternate block or entire quilt top. This quilt is the alternate I made for the Waypoint Quilt. Above you can see the version that was photographed for the book!


This one was simply an alternative color way! To be honest, I don't remember what the jumping off point was for this color palette, it's been so long ago. I do remember I was excited to use that Momo scissor fabric that I had long stashed.


When I am trying to finish up old works in progress, I try to make the finishing steps as easy as possible for myself. This quilt top lingered for so long, I was not about to do anything fancy for the quilting. At this point my eye was on the prize! So I chose to do my signature wavy quilting. I did however use a fun thread color, a light aqua! This quilting style is relaxing for me to do and it's forgiving too. Win-win! You can find a tutorial for how I do it here: How to Quilt Wavy Lines with a Walking Foot


With the backing and binding, again simplicity was key. I chose one fabric to use as both the back and the binding. One of my prints from curiosities happened to perfectly match the front, yay!


This quilt ended up going home with my younger brother for his condo!


It's a bit hard for me to believe that my book came out OVER 10 years ago, wow. So much has changed in 10 years! I know I still have a few quilt blocks kicking around from the process, but I am glad to have finally finished up all the quilt tops!

Happy Quilting!

New Sewing Room Tour

Wednesday, March 18, 2026


I'm excited to share a look into my new sewing room! We moved into a 70s split level home in November and I've been slowly building out a space for crafting. The room is part of the main living area of the house, which makes it really convenient to pop in and out of all day. I believe the previous owners used it as a formal living room. For us, it has become a room that we spend a lot of time in, especially my daughter and I. Either sewing, crafting, coloring or just playing; we are in here all day! I'm sure it will continue to evolve as we settle in, but I wanted to share how we've arranged the space for now!

See tours of my previous sewing room here: 2019 Sewing Room Tour, Big Sewing Room Changes


This room is quite a bit larger than my previous sewing room, so I've been working on adding a few more pieces of furniture. I have been able to find two great pieces for this room from a local thrift store called Centre Peace. Lucky for us, they deliver! And they have a great mission, it's a win-win. My most recent acquisition is this wood dresser! It's holding most of my art and craft supplies: paper, paint, stickers, washi tape, stamps, etc. There is a lot crammed in there!!


My fabric cabinet moved just fine and I got my quilting cotton all organized by color again. To be honest, I'd love to replace this cabinet at some point with something wood. For now though, it's what I've got! I'm really making it a priority to buy furniture that we need secondhand, which just means being patient and always having a list! I am happy to have room for my yellow vintage store display stand again. It was stored in our attic the last few years. Right now it has mostly vintage pillowcases and scraps in it!


Another thrifted piece of furniture for office supplies and pattern shop inventory. I believe this was a dresser originally, but I'm using it as more of a credenza or sideboard. A little feed-n-wax brought this piece back to life and it's been working great at containing my online shop stuff!


My two wooden schoolhouse tables fit perfectly under this big bank of windows. I immediately filled the window sill with plants and set up a cat bed for Dusty. Definitely still need to work on this corner a bit, but it's coming along!


Machine is up and running! I set up my sewing machine in a pretty similar orientation as my last space. I am missing my wall shelves behind it though, it was nice to keep the table space behind it open. We'll see if I do anything to change that in future. I am using this wooden organizer from ikea to store tools and notions for now. It was a relief to get my ruler storage pegboard up! It needs a fresh coat of paint, but I can't decide on the color!


Ironing set up is pretty basic, just my board and an ikea cart to hold my iron and water.


The previous owners left lots of ceiling hooks near the windows, so of course I had to take advantage of that right away! I ended up making all the hangers from thrifted materials or stuff I already had. They're all a bit different. They're made from colanders, plastic pots, baskets, and tins. I've never had space for hanging plants before, so this is fun for me! I used nylon paracord for the hanging part.


We repurposed the table from our office/library in our last home as a coloring table for our daughter! I swapped in adjustable legs and set them to the lowest height. We keep a sheet of paper on it all the time so she can color anytime she wants. It's been great having a dedicated space for her to play in here too.


The expedit shelf survived another move, relatively unscathed! I'm using it in basically the same way as my last space. Storage for notions, patterns, interfacing and my vintage sheet collection.


Last but not least, I hung up my thread shelf! At first I wasn't sure I'd like having it so far from my machine, but honestly it's been fine. I sew with white thread like 95% of the time, so it's really not a big deal. I am just happy to have my thread out of a box! I do have a tutorial for this shelf if you're interested: My DIY Thread Storage Shelf

That's it for now! I know this space will continue to change to fit our needs, but for now we're loving it! I am very lucky to have such a beautiful space. I think I'm most excited about all the empty floor space. I love being able to spread out on the floor and I was missing that in our last home. Plenty of room for basting quilts here! We'll see if that translates into more quilting by me!

Happy Sewing!