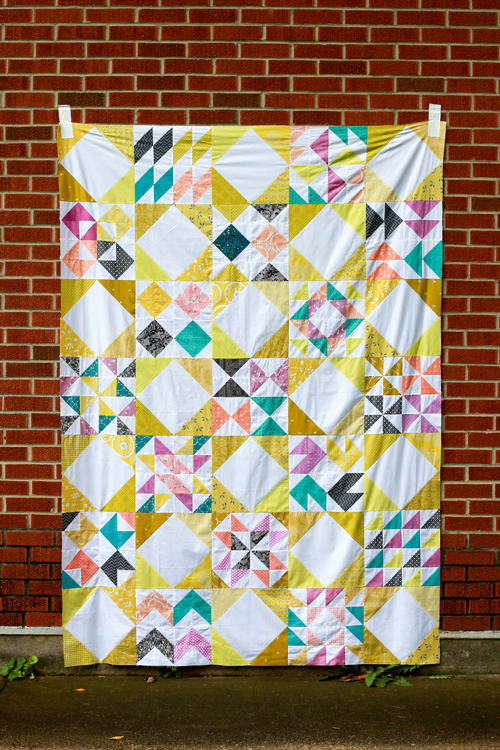
Amanda's Fantastic Quilt Voyage

Tuesday, May 31, 2016


Happy Tuesday! Today I have a special quilt finish to share. For the past year and a half I've been a part of a traveling quilt bee with some really lovely ladies. Our bee is called Fantastic Quilt Voyage, and you can see the blocks we've been making in the hashtag #fantasticquiltvoyage on Instagram. We each started our own quilt, and then it is passed along to each member and they add to it. I haven't posted any of the blocks I've made, but I did share my quilt start last February, in this post. I need to do a catch-up post with all the blocks I've made for each person's quilt at some point.


When my sweet friend Amanda became unable to finish her quilt, I offered to put it together and finish it for her. I happened to have her quilt to work on at the time, so it just made sense. Her quilt had a Buffy theme, so vampires and Amanda's signature black, white, red, navy, and a pop of aqua color scheme. You can see some of her inspiration here.


I brought the blocks that had been made so far with me to the retreat I attended at Stitch Supply Co. in January. I made a few blocks that weekend and a few friends made some blocks too.

Putting this quilt together was pretty outside of my comfort zone. I arranged the blocks out on the floor of my sewing room and started putting blocks together, adding to blocks and making more blocks to eventually put together a top with no obvious grid. I didn't remember to take photos of the blocks I made until the quilt was done, but that's okay! Here are my blocks:


I drafted up this interlocking plus block, I needed something big to fill that space!


I made a few blocks using Carolyn Friedlander's Sessoms pattern.


Some simple wonky cross blocks.


I made a Monty Python inspired crazy-eyed bunny using Elizabeth Hartman's Bunny Pattern.


I made use of scraps and made a few scrappy improv blocks.


I drew up with cross made from half-square triangles early on and was glad I could squeeze it in.


Extra pointy star block from my Shining Stars Sampler Pattern.


And finally some funky striped half-square triangle blocks.


In an effort to use my stash, I pieced the backing. I used a favorite print of Amanda's (from Luxe in Bloom by Sarah Watson) for the binding. I sent the top to Melissa of Sew Shabby Quilting for quilting. The crackle pattern seemed like a perfect match for the theme of this quilt.


I needed a way to transport the quilt and decided to make a set of pillowcases to go with it. This is my favorite way to gift quilts. Most quilts can fit comfortably folded up inside a pillowcase! I use this tutorial when I make pillowcases.


Jacey and I went out to visit Amanda this past month and we were able to give her the quilt in person! It was so fun to surprise her with the finished quilt! I have to admit, it was a bit nerve wracking working on this quilt. I wanted to make sure that I did everyone's blocks justice and that I stayed true to Amanda's vision. Based on her reaction when we gave it to her, it was a success! :)

Happy Quilting!

Favorites

Friday, May 20, 2016


1. Bee Adventurous Quilt by GreenandBell, 2. Cirque16 by campbellhe1, 3. Mother Goose Quilt by Melissa, 4. Picnic Plaid by Marta Jost, 5. Transparency Quilt by Melissa, 6. Mighty Lucky Jan by Louise Wackerman, 7. Retirement Quilt by Carol, 8. Center Arrow Blocks by Lotje, 9. Striped Log Cabins by Debbie

Periodically, I go through my favorite photos on Flickr, and choose nine sewing/quilting related projects to showcase here. These photos and projects are not my own, you can find the original images and creators by clicking the coordinating links! If for any reason you do not want your project featured here, please email me and I'll remove it!

Happy Weekend!

Blockade Quilt Setting Tutorial

Wednesday, May 18, 2016

Blockade Quilt Setting Tutorial - In Color Order
Happy Wednesday! I'm excited to bring you the second installment of a series of quilt settings to accompany my book, Patchwork Essentials: The Half-Square Triangle. I wanted to share something that would be a good add-on to the 60 Block Chart included in the book! The blocks in that section can be used in many ways, including in the final chapter of quilts in the book. You can find the first setting tutorial here: Over and Above Quilt Setting Tutorial.


See this quilt finished here.

Blockade Quilt Setting Tutorial - In Color Order
As I mentioned in the first tutorial, over the next few weeks/months I'll be sharing additional quilt settings (layouts!) that you could use with the 60 blocks from the block chart in my book, blocks from my Simply Sampled or Half-Square Triangle Sampler patterns, or any 12" finished quilt blocks! The quilts will be different sizes, and take a different number of blocks. I'll be sharing instructions for the quilt setting only, not the blocks. I will however be sharing fabric requirements to help guide you on making the half-square triangle blocks from the book needed for each setting!

After such a warm response to my Blockade Mini Quilt that I designed for last month's Quilty Box, I super sized the design for this quilt setting! Thank you to those who chimed in about your favorite quilt sizes, I took that into account when sizing this quilt!

Blockade Quilt Setting Tutorial - In Color Order
Still need a copy of my book? Pick one up here!

Blockade Quilt Setting Tutorial - In Color Order
Sewing Level: Intermediate/Confident Beginner
Finished size: 72"x72"

Materials:
- (16) 12.5" unfinished quilt blocks
- 1 1/3 yards of accent fabric
- 1 3/4 yards of background fabric
- 4 1/2 yards of backing fabric
- 80" x 80" piece of batting
- 5/8 yard of binding
- Coordinating thread

Notes:
WOF = Width of Fabric (42")
Fat Quarter = 18" x 21"


Cutting:
From accent fabric:
- Cut (6) 7" x WOF strips
- From each strip, cut (6) 7" squares for a total of 32

From background fabric:
- Cut (6) 7" x WOF strips
- From each strip, cut (6) 7" squares for a total of 32

- Cut (3) 6.5" x WOF strips
- From each strip, cut (6) 6.5" squares for a total of 16

From binding fabric:
- Cut (8) 2.5" x WOF strips

---------------------------------------------------------------------------------------------------------------------
To make 16 half-square triangle quilt blocks, you'll need:
2-at-a-time HST method 4-at-a-time HST method 8-at-a-time HST method
Print fabric 7 fat quarters 8 fat quarters 8 fat quarters
Background fabric 1 1/2 yds 1 5/8 yds 1 5/8 yds
Cut print and background fabric into squares for 3" finished half-square triangles. Reference charts on pages 15-17 of Patchwork Essentials for cut square size and trimming information. Make a total of 256 half-square triangles. Sew half-square triangles into 16 blocks, use block chart on pages 85-99 for block layouts.
---------------------------------------------------------------------------------------------------------------------

Instructions:
*Use a 1/4" seam allowance unless otherwise noted.*

Blockade Quilt Setting Tutorial - In Color Order
1. Using a marking pen, draw a diagonal line across the wrong side of 7” background squares. Place one 7” background square and one 7” accent square right sides together. Stitch 1/4" on both sides of the marked line. Press and cut apart on the marked line to create two half-square triangles. Press seams as desired. Repeat with remaining 7” squares. Trim half-square triangles to 6.5” square.

Blockade Quilt Setting Tutorial - In Color Order
2. Arrange four half-square triangles created in step one, plus a 12.5" block and one 6.5" background square as shown in the block diagram. Sew elements together in each row, press seams open. Sew two rows together to complete block. Press seams open.

Blockade Quilt Setting Tutorial - In Color Order

3. Arrange blocks using the diagram.

4. Sew blocks together in each row. Press seams in one direction, alternating direction every other row.

5. Sew rows together. Press seams open.

6. Cut backing yardage in half. Press. Trim off the selvedges and sew your pieces together lengthwise. Press seam open.

7. Basting: Using masking or painter’s tape, tape the backing to a clean, hard surface, right side down. Spread out your batting on top of the backing. Smooth out any wrinkles. Carefully spread out your quilt top on top of the batting, right side up. Pin your top, I like to use curved safety pins, spacing the pins a few inches apart. Make sure that your pins are going through all three layers.

Blockade Quilt Setting Tutorial - In Color Order
8. Quilting: Quilt as desired, by machine or by hand. Trim away excess batting and backing fabric.

9. Binding: Trim off selvedges and sew your binding strips together to form one long strip, press seams open. Fold in half lengthwise, pressing with your iron as you fold. Attach binding using your preferred method. For a detailed tutorial on attaching your binding to both sides by machine, see here.

Blockade Quilt Setting Tutorial - In Color Order
Enjoy! Share your progress and finished quilt photos using the #patchworkessentials hashtag on social media or add it to the In Color Order Flickr Group!

Check out the other free quilt setting tutorials in this series:
Interlaced Quilt Setting Tutorial - In Color Order
Interlaced Quilt Setting Tutorial

Over and Above Quilt Setting Tutorial - In Color Order
Over and Above Quilt Setting Tutorial

Happy Quilting!

Rayon Date Night Dress

Thursday, May 12, 2016


Happy Thursday! I'm back today to share one of my garment finishes from earlier this year! I have been sewing and cutting a lot of garments lately, it's been nice to work through some of my garment fabric stash and pick up a few new fabrics as well.

First and foremost, thank you for all of your support on my last post. I wish I could respond to each of you individually, but know that I've read and cherished all of your comments, messages, and emails. I look forward to whatever the future brings!


This was my first experience working with rayon. The Sewcial Lounge had this print from Cat Lady by Sarah Watts in both colorways in rayon, and it's so pretty in person. I ended up buying a cut of each (and made a shirt from the purple!), including enough to make a dress. I've had The Date Night Dress Pattern by April Rhodes in my pattern stash since 2014. I knew I needed a flowly pattern to go with the rayon, so this was a good match.


The dress came together surprisingly fast! Lots of hemming and some french seams finish off all the edges. A box pleat in the back gives it a little shape.


I ended up making a belt from the leftover fabric, it's 1/2" wide. This makes the dress a lot more flattering. The pattern also includes a slip pattern, since this dress has really deep arm holes. Instead of making one to match I just bought a black slip!


I wore this dress on my longest day of teaching at QuiltCon and it was really comfortable. The fabric is cool to the touch and was very easy to wear on a busy day!


This was a fun pattern to make! It has been satisfying sewing up all of these garment patterns I've had stashed away. I really enjoyed working with the rayon. I've now made three garments with rayon, and am looking forward to working with it more, it makes garments that feel and look professional.