
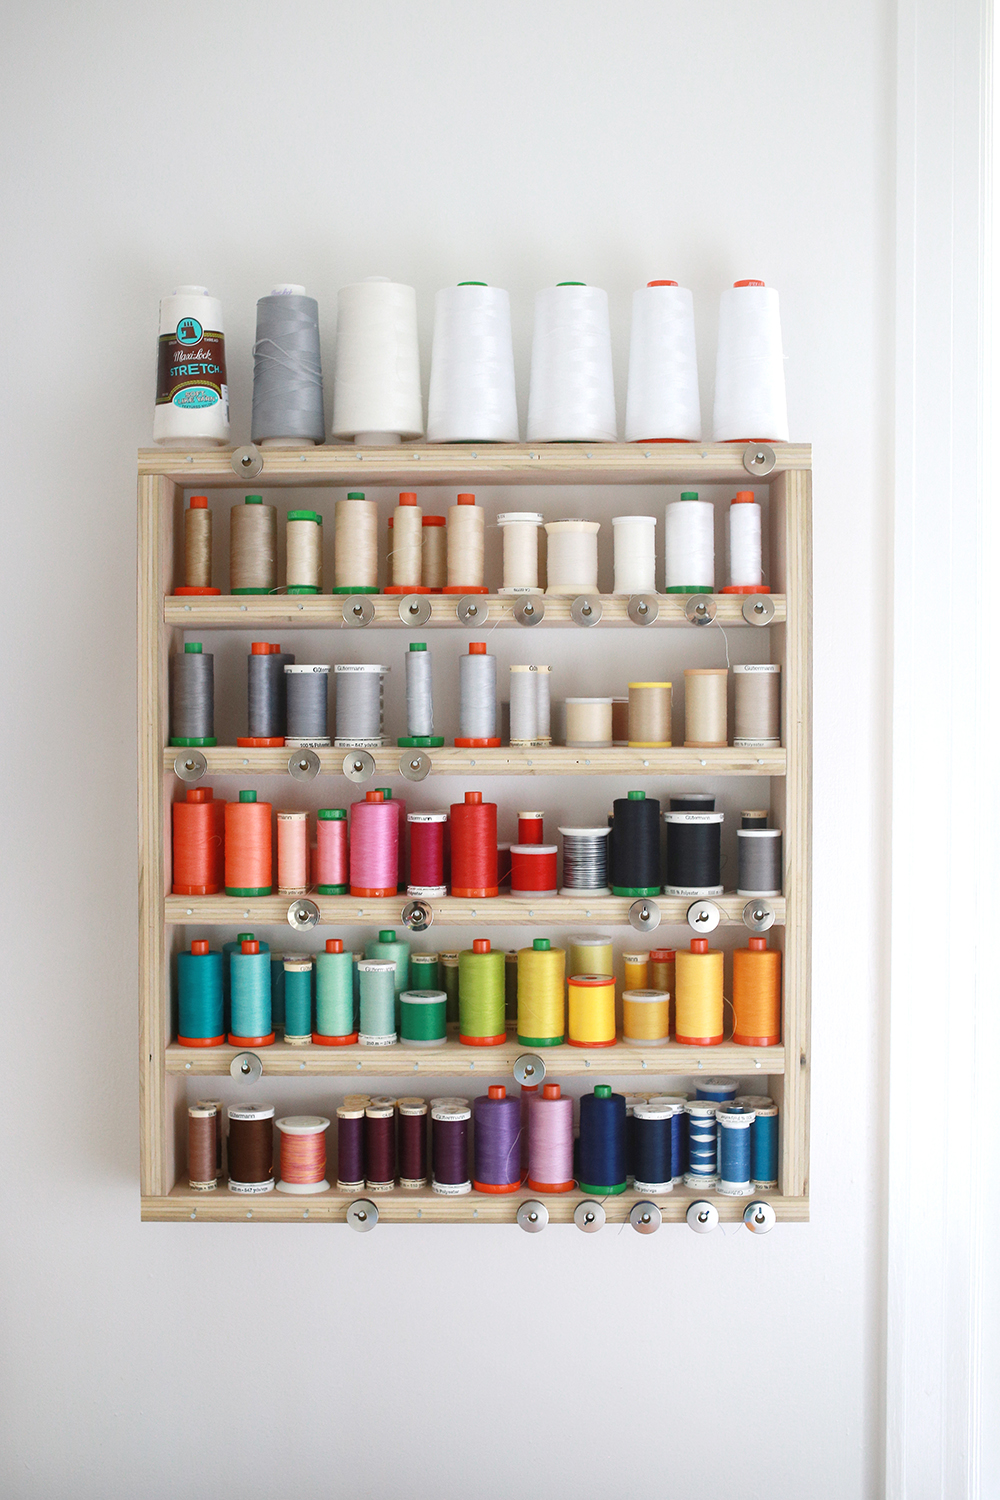
Happy Tuesday! Today I wanted to share a recent project that I finished for my sewing room, a thread storage shelf! In years past, I've used a small thread rack to store some of my threads, but never had enough room for them all. I knew I wanted to make something customized to my needs and thread collection, so I set about coming up with a simple solution.
Looking for more sewing room posts? Check out my new series: Sewing Room Organization Series

I was inspired by this shelf my friend Christina made for her longarm thread storage. I knew I wanted my shelf to be a simple design like hers, and that it needed to solve a few problems for me. It needed to be slim enough that it fit beside my machine, for easy access. It needed to easily store small spools and have room for cones. And finally, it needed to have bobbin storage. I really wanted to be able to store the bobbins right with their coordinating thread.

I managed to use plywood that I had leftover from a previous project, but you could definitely make one of these from sized lumber (like 1x4s or 1x3s) from your local home improvement store. I cut my plywood down into strips that were 3" wide. For my space this was as wide as I could go without inching too far into my sewing machine space, but you could use something wider or skinnier to work in your space. Here are a few quick measurements if you're thinking about making a shelf too:
Final Measurements: approx. 18" wide x 20.75" tall
(4) shelf pieces 16.5" long
(2) side pieces 19.25" long
(2) top/bottom pieces 18" long*
*I highly recommend waiting to cut these until the very end if you can, that way if your other measurements are off at all, you can cut these to fit!
I put my shelf together with a little wood glue and some 1.5" long screws. My plywood was .75" thick. The interior shelves are spaced approx. 3.25" apart, which easily fits the taller Aurifil thread spools. To finish it off I evenly spaced little 1"picture hanging nails along the shelf edges to hold bobbins. This is my favorite feature for sure! I had seen this done on a few other shelves like this one.

I'm so happy with how this turned out! Not only is it super useful to have all my thread stored within reach, it's such a pretty and cheerful piece in my sewing room. I can see right away what colors I have, and don't have to spend time digging through my bin of thread to find what I need. Yay for practical projects!
I hope you've enjoyed this tutorial! I have lots of other tutorials for everything from quilts, pillows, bags, and holiday items to informational series and techniques. Find all my tutorials here: Tutorials. My online shop is filled with patterns for quilts and bags. Find my patterns here: Jeni Baker Patterns
If you make something using one of my tutorials or patterns, I hope you'll tag me @jenib320 and use my hashtag #jenibaker on instagram!
Happy Making!
Nice work.
ReplyDeleteHey Jeni! Your thread shelf is great! Thank you for the deets on it! I sure need this in my studio too! I have a big thread holder box and I have to drag it out and search for the thread I want, then put the box back when I am done. A shelf system like yours would be much simpler. Oh, and that pink lamp!!! Do you remember where you found that?!?! :)
ReplyDeleteThanks, it's been really handy! The lamp is vintage, I found it at a thrift store. Ikea has some in a similar style though!
DeleteThank you!! I will check out Ikea!!! xox
DeleteI really like this thread shelf unit. I like that the threads are on a shelf. I think they get less dusty and I love filing my supplies too.
ReplyDeleteI am going to try to make on of these. Another cool thing to do would be to find old drawers from dressers (I salvaged a few) and make hanging shelves with them.
Great idea jeni
Thank you for this post. It inspired me to tackle my own. I just got it hung up and am super pleased. I would love to share a picture. Thanks again!
ReplyDeleteHey Jen. I love this shelf and got my other half to make one for me for Christmas.
ReplyDeleteUnfortunately, it’s still not hung up, because we couldn’t work out how you managed to hang it without the hardware showing.
I’d be really grateful if you could share how you managed to hang the shelf!
Many thanks,
Donna
Hi Donna!
DeleteI used keyhole hardware on mine (like these: https://www.homedepot.com/p/OOK-20-lb-Large-Keyhole-Hangers-2-Pack-50236/100018911). You just have to drill out a little space behind each piece of hardware before you attach it to the back of the shelf. You could also use something like this: https://www.homedepot.com/p/HangZ-50-lb-1-Hole-D-Ring-Hanger-4-Pack-10008/206471227
I'd take a photo of mine, but I'd have to take all the thread off of it!
Hi Jen,
ReplyDeleteThanks so much for your very quick reply!
And thanks also for the links. I live in the UK, so I should be able to use those to find something similar at our local hardware store.
No need to take all your thread off!
Thanks again -- and for all your lovely inspiration!
I love this shelf! My favorite part is that the bobbins go right in front of the thread GENIUS! I'm going to try to find time to tackle making one tomorrow, and while I'm at it, I'm going to make a matching one (albeit a slightly different size) for acrylic paint. I think I'm going to use these https://www.homedepot.com/p/OOK-75-lb-Large-Steel-D-Ring-Hangers-2-Pack-50207/100058482 to hang the paint shelf since it'll weigh a lot more than the thread does. Thanks for taking the time to post. I'm super excited to give this a try!
ReplyDeleteI made one this week. It is 32"X33 1/2" and I love it! The nails to hold my bobbins are a little crooked, but they still hold the bobbins. It's so much easier to find the right color and not having to look through my drawers. It also looks great on the wall. I painted the wood light grey and the backboard is white. Thank you for the idea!
ReplyDelete