1. New plan, 2. Stacked Coins for Kristy (GWNB), 3. Project Special Delivery, 4. makes me want to make a huge one for our bed, 5. 74/365 - Mini Hexie Quilt in Progress, 6. [59:365] Mug Rug Swap 3 -- Sent!, 7. party napkin quilt top , 8. Sonnenschein, 9. Scrappy Stripes Baby Quilt
Every week I go through my favorite photos on Flickr, and choose nine sewing/quilting related projects to showcase here. These photos and projects are not my own, you can find the original images and creators by clicking the coordinating links! If for any reason you do not want your project featured here, please email me and I'll remove it!
Happy Friday!

Favorites


Thursday, March 24, 2011
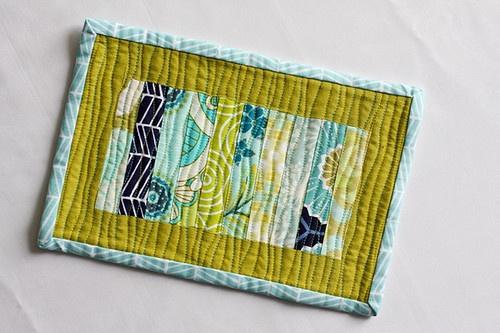
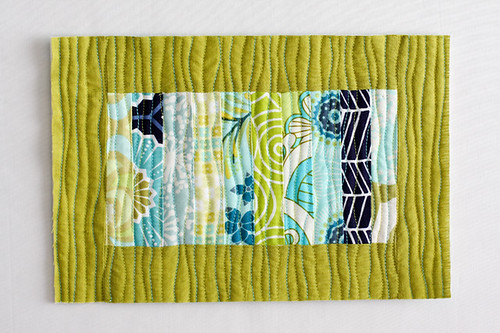
Today I'm sharing a mug rug tutorial with you that will help bust your scrap stash! This little mug rug is a great way to use up long skinny scraps. Let's get started!
Sewing Level: Intermediate
Finished Size: Approx. 10"x7"
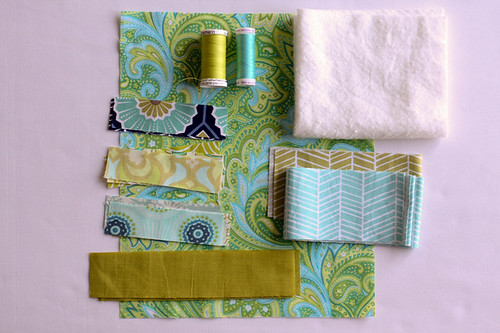
Materials:
- 10 print strips 4.5"x1.25"
- 2 sashing strips 8"x1.75"
- 2 sashing strips 6.5"x1.75"
- 1 binding strip 2.5"x44"
- Backing fabric 12"x9"
- Batting 12"x9"
- Coordinating thread
Looking for supplies? Check out my Pattern Supplies and Resources post.
Instructions:
*Use a 1/4” seam allowance unless otherwise noted*
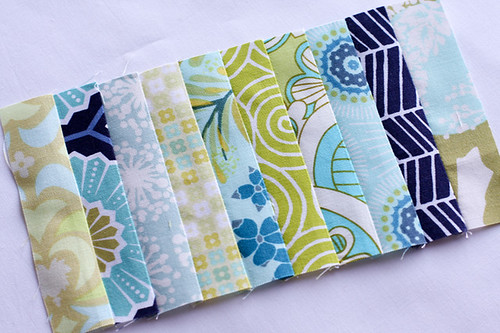
1. Take your 10 print strips and sew them together to create a little patchwork rectangle! Press your seams however you'd like!
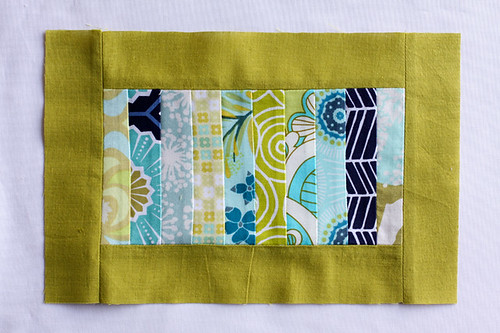
2. Attach your 8" sashing strips on the long side of your pieced rectangle. Press your seams open. Attach your remaining sashing strips to the short ends of your rectangle. Press your seams open.
3. Make a little quilt sandwich with your backing fabric, batting, and pieced top. Baste!
4. Quilt as desired using coordinating thread. I quilted mine with wavy lines using my walking foot, purposely wiggling the quilt as I stitched. I stitched using green thread every 1/2" or so, then went back and stitched with turquoise thread in between my previous quilt lines!
5. Trim your backing and batting and square up your mug rug. Create your double fold bias tape and bind away. I bound mine by machine stitching it to the front and hand stitching it to the back.
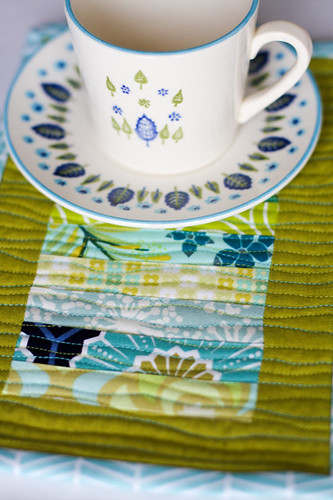
Voila! Now go get some tea and a cookie and test it out! ;)
Happy Sewing!
Sewing Level: Intermediate
Finished Size: Approx. 10"x7"
Materials:
- 10 print strips 4.5"x1.25"
- 2 sashing strips 8"x1.75"
- 2 sashing strips 6.5"x1.75"
- 1 binding strip 2.5"x44"
- Backing fabric 12"x9"
- Batting 12"x9"
- Coordinating thread
Looking for supplies? Check out my Pattern Supplies and Resources post.
Instructions:
*Use a 1/4” seam allowance unless otherwise noted*
1. Take your 10 print strips and sew them together to create a little patchwork rectangle! Press your seams however you'd like!
2. Attach your 8" sashing strips on the long side of your pieced rectangle. Press your seams open. Attach your remaining sashing strips to the short ends of your rectangle. Press your seams open.
3. Make a little quilt sandwich with your backing fabric, batting, and pieced top. Baste!
4. Quilt as desired using coordinating thread. I quilted mine with wavy lines using my walking foot, purposely wiggling the quilt as I stitched. I stitched using green thread every 1/2" or so, then went back and stitched with turquoise thread in between my previous quilt lines!
5. Trim your backing and batting and square up your mug rug. Create your double fold bias tape and bind away. I bound mine by machine stitching it to the front and hand stitching it to the back.
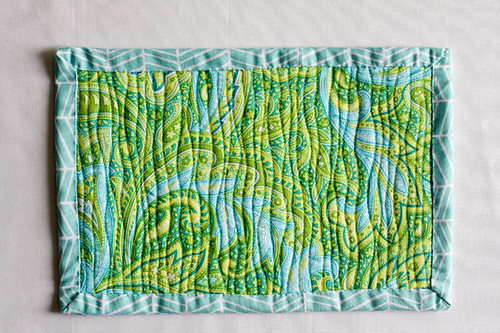
Voila! Now go get some tea and a cookie and test it out! ;)
Happy Sewing!
Tuesday, March 22, 2011
1. Recognizing a Fabric's Overall Color
2. Folding
3. Stash Storage
4. Organizing Your Stash by Color
5. Building a Well Rounded Stash
6. Supplementing a Fabric Line
7. Reader Stashes
8. Building a Scheme Around a Single Fabric
9. Building a Scheme Around a Photograph
10. Light vs. Dark
This Week: Warm vs. Cool
This week we are going to talk about how to build one of my favorite schemes, a Warm vs. Cool Color Scheme!
I first started playing around this concept after a happy accident. My first two quilts were a warm color quilt and a cool color quilt. After finishing both, I ended up with a lot of scraps. Playing around with little triangles I made the block above and thus started my love for warm vs. cool! :)

I'm going to lay things out a little differently this time! First I'm going to show you my initial fabric pull, then we're going to look at warm and cool separately and finally the fabrics that didn't make the cut and my final stack!

1st Pull
These are the fabrics that I grabbed to put together my stacks. This is without any "edits" yet! Lots of different value and accents! There isn't really anything wrong with these stacks, but not let's simplify and streamline them!

Warm Colors
For my warm color stack I choose red, light pink, fuschia, orange, and gold. I could have opted to include more colors like peach, traditional yellow and additional shades of orange.

Cool Colors
For my cool color stack I choose lime green, turquoise, plum and light purple. I could have included a wide range of other greens and blues.

1st Edit
These fabrics got pulled pretty quickly after my first pull. Many of them at distracting accents and a few had tones that simply didn't match with the rest of the colors.

2nd Edit
These fabrics didn't make it for a variety of reasons! I paired down my color palette to focus on certain shades, ditched a few darker shades, and also set a limit of 27 prints per stack.

Final Stack
I finally ended up with this pair of stacks! I choose a variety of light and dark prints but tried to stick mostly to medium shades. In general avoided fabrics with white or really light backgrounds, as they don't necessarily read well as a single color. I used mainly tone on tone and color + white fabrics.

I think the most important tip for putting together these stacks is taking care when choosing fabrics with accents. When I did use a fabric with an accent, I stuck to fabrics that have generally warm or cool accents. For instance, in my warm stack I used a pink Martini print by Amy Butler (9th from the top!). It has mostly pink, but has gold accents. Both are warm colors! Similarly with the cool stack, I choose a green Hopscotch print by Erin McMorris (8th from the top!). It is mostly green with turquoise accents. Both are cool colors!
Well, there we go! We've now made it through the bulk of this series! Don't worry, there are still going to be weekly posts for a while longer! There have been a few topics requested in the comments (now is your chance to make additional suggestions!) and a few topics I've realized I should have covered in the beginning! Then, in May, something else is going to finish this series off properly...
A Quilt Along! I'm working on a Warm vs. Cool quilt using simple patchwork! The quilt along will kick off sometime in the beginning or middle of May after I graduate! School is about to get super busy, don't want to bite off more than I can chew! However, you will see little sneak peaks of the quilt you'll be making here and there! I hope you'll join in the fun! :)

Sunday, March 20, 2011
Phew! It's been another busy week around here! Happy Spring Day everyone! In addition to it being the first day of spring, it's also my birthday! I am now 22! ;)
My Mom and I hit up the monthly flea market in my hometown today! I found the large Cathrineholm pot (on the bottom!) this morning! It matches the little one I found with Sandy this past summer! :)
We also found this Dansk Kobenstyle brown baking dish! It's my first piece of brown! Neither pieces were very "thrift" priced, but still much better than current ebay prices!
I am having a love hate relationship with my Single Girl quilt. I love the fabrics and colors. I hate the piecing. It's going to be put away until after school is over!
Did manage to start quilting up my Dream On quilt!
The most wonderful birthday package arrived from Amanda on Friday! :D Thank you again dear!!
Amanda knew I had been lusting after a pair of these Gingher handsewing scissors, and got me a pair for my birthday! Yesterday I made them a little cute holder with Folksy Flannels scraps. Christina showed us one this style the night before, it was the perfect quick project!
George bunny is just so sleepy!
Thank you for all your sweet comments on my business card! I'm so pleased with how it turned out! I think a few of you maybe asked what font I used? It's called Cursive Standard! :)
Today I love the..
Smell of: Rosemary mint perfume
Sound of: Keane
Taste of: Japanese food
Sight of: Sunshine!
Feel of: George bunny
Good Things about Today:
- Gorgeous spring weather!
- Good thrifty finds!
- Bunny kisses from George!
- Apartment is still semi-clean!
- Michael got me the cutest bike for my bday!

My Mom and I hit up the monthly flea market in my hometown today! I found the large Cathrineholm pot (on the bottom!) this morning! It matches the little one I found with Sandy this past summer! :)
We also found this Dansk Kobenstyle brown baking dish! It's my first piece of brown! Neither pieces were very "thrift" priced, but still much better than current ebay prices!

I am having a love hate relationship with my Single Girl quilt. I love the fabrics and colors. I hate the piecing. It's going to be put away until after school is over!

Did manage to start quilting up my Dream On quilt!

The most wonderful birthday package arrived from Amanda on Friday! :D Thank you again dear!!

Amanda knew I had been lusting after a pair of these Gingher handsewing scissors, and got me a pair for my birthday! Yesterday I made them a little cute holder with Folksy Flannels scraps. Christina showed us one this style the night before, it was the perfect quick project!

George bunny is just so sleepy!

Thank you for all your sweet comments on my business card! I'm so pleased with how it turned out! I think a few of you maybe asked what font I used? It's called Cursive Standard! :)
Today I love the..
Smell of: Rosemary mint perfume
Sound of: Keane
Taste of: Japanese food
Sight of: Sunshine!
Feel of: George bunny
Good Things about Today:
- Gorgeous spring weather!
- Good thrifty finds!
- Bunny kisses from George!
- Apartment is still semi-clean!
- Michael got me the cutest bike for my bday!

Subscribe to:
Posts
(
Atom
)