Showing posts with label Crafts. Show all posts

Dried Strawflower Wreath DIY

Friday, October 18, 2024


Happy Friday! Today I want to share a recent crafting project that I finished, a small wreath made from dried strawflowers!


One of the hobbies that my grandmother enjoyed was making dried flower arrangement. She bought a lot of the dried flowers that she used (I remember going to a craft fair with her at a school to buy some!), but she liked to grow her own strawflowers. She had a great garden, and the strawflowers fascinated me. Right on the plant, they are dry and crunchy like straw. So different to most flowers!

I started growing strawflowers in my own garden five years ago. I go about this two ways. I nearly always buy a pot or two of short strawflowers from a local nursery to grow on the driveway in a pot. The bulk of what I grow I start from seed. Strawflowers need a long time to get going, so I start my seeds in very early March. They are a time investment for sure!


This has been one of my best years for strawflowers! I have a couple plants that are easily 8 feet, which is so cool. I harvest flowers a couple times a week. It can be a challenge to figure out the right time to cut them, since they continue to open after they are cut. I cut mine while they're still mostly closed. This shoe box sized tub is flowers I harvest just this season!! The seeds I grew this year came from Select Seeds and Johnny's Seeds.

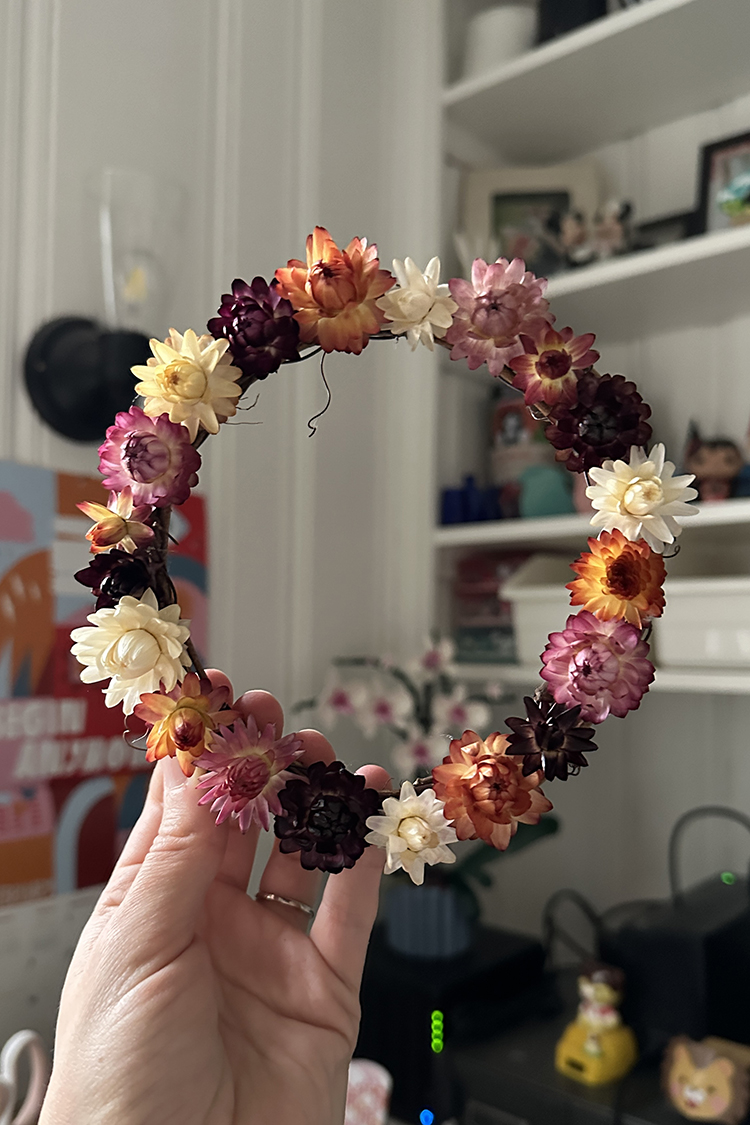
I like to use simple grapevine wreath forms from the craft store. A straw form might be easier now that I think about it, maybe I'll try one of those next! This wreath is around 6".

I like to used hot glue to affix my flowers to my form. I'm using a battery operated hot glue gun (which I LOVE), but it is a little overkill for this project in terms of heat.


I started by adding flowers to the front of the wreath, and then slowly building up the sides.


It's so fun digging through all the flowers and finding just the right size/color for the spot I'm filling. I found these two while making this wreath and they might be my favorites. The colors are just so good!


All done! I don't know how many flowers I ended up using to finish this, but it did take me a few days. I am so happy with how it turned out. I've made a few of these wreaths and I can confidently say this is my best one! I bought some tiny wreath forms a few years ago, I'm excited to cover those too!


Here is a view from the side, it looks like it's encrusted with flowers. :)


Strawflowers are one of my very favorite flowers to grow and they're so fun to craft with. I highly recommend trying them out in your garden next year! Even if it's just a pot from your local nursery!

Happy Crafting!

2023 First Quarter Report

Wednesday, March 29, 2023


Happy Wednesday! Instead of doing monthly reports this year I've decided to mix it up and do quarterly reports! Now that March is almost over, it's time to look back on the first quarter of 2023. See past monthly reports here.


I made some adjustments that allowed me to finish the arcs for my double wedding ring quilt (finally!). Next I need to choose background and cornerstone fabrics, which is no small task! You'd think after all this time I'd know what I wanted, but a do not. I also need to make a small tester, because my curved piecing experience is very limited.


This month I picked up the Hinterland Dress pattern by Sew Liberated and last weekend I got my muslin cut and sewn. I'm not sure how much I'll wear it, as the fabric didn't drape the way I expected it to (I used a vintage sheet!). I still need to choose a fabric for my next one, we'll see if I have something on hand.


It still needs photographing, but I finished my all lawn indigo quilt! I sent it off for longarm quilting in early 2023 and got it bound this month. I'm excited to have another large all lawn quilt around for Summer so that Michael and I both have one we can use when it gets a bit warmer. I still love this voile one I made years ago: Little Folks Voile Summer Quilt. It's so lightweight and has the most amazing drape.


I started the year by finishing up my tea advent calendar, made with tiny lined drawstring bags! I had grand intentions to finish it in time to use last December, but that didn't quite happen. Regardless, I'm happy with how it turned out! And thankfully it's not holiday-themed so I can use it anytime I want. Read more about that project here: Rainbow Drawstring Bag Advent Calendar


I also made a Valentine's themed drawstring bag last month, with a fun heart appliqué detail. This was a fun experiment, and a good excuse to just play around with different techniques. Read more about that project here: What I'm Working on Right Now


My one scrappy project this quarter was making these two pincushions. I used leftover blocks and scraps.


I've been having fun doing some just for fun crafting this year. I have made a few things with a kit from Concrete Geometric (paired with this mold set from Michael's). So far I've made a couple of ring dishes and some lidded boxes.


I am finally using my stash of dried strawflowers to make a few wreaths. I have been growing strawflowers and saving my blooms for 4 years I think? Can't wait to grow more this year!


To keep myself accountable for my stash goals, I track my yardage for fabric and yarn. Read more about how I track here. Here is how I did in the first quarter of 2023:

First Quarter Fabric
Used up: 20.25 yard
Brought in: 0 yards
Net: -20.25 yards
Year to date: -20.25 yards

First Quarter Yarn
Used up: 0 yards
Brought in: 0 yards
Net: 0 yards
Year to date: 0 yards

Checking in with my crafty goals, here is how I'm doing in 2023 so far:
- Haven't purchased any fabric or yarn this year, so I'm meeting my stash goals at the moment.
- I finished all the arcs for my double wedding ring quilt!
- Finished one color work mitten.


It hasn't been a very productive start to the year in terms of making to be honest. During these first few months of the year I have spent more time focusing on things in my life outside of sewing/knitting. That is probably how the rest of the year will be as well, and that's okay. Some years I've made tons of things and other years hav been slower. Just trying to give myself grace and not feel too guilty about that.

Happy Making!

Tutorial: Easy DIY Row Markers for Quilting

Wednesday, May 25, 2022


Happy Wednesday! I have a fun crafty tutorial to share with you today, for reusable row markers!


I made a set of these for myself when I first started quilting many years ago and I've used them on almost every quilt I've made since then. Just safety pin your marker to the first block in each row when you lay it out. I try to keep it centered in the block so that it doesn't get in the way when I put the rows together.

Having a physical marker on the rows also helps simplify the pressing step for me when I'm nesting seams. I'll press odd numbered row seams away from the marker and press even numbered row seams towards the marker. Easy to keep things straight!


I think these would make a great gift for a friend or to put in a swap package! You could use a fun washi tape, colored markers or even stickers to dress them up!


Skill Level: Beginner Friendly

Materials:
- Plastic floss bobbins*
- Washi tape or stickers (optional)
- Permanent marker
- Safety pins
- Small tin or container for storage

1. Decide how many markers you want to make! This is up to you and what kind of quilts you make. My bobbins came in a pack of 28, so that's how many I'm going to make.


2. This step is optional, but I love to decorate the flat section of the bobbin! If you're using washi tape, cut it into strips at least 2.25" long (check for your actual markers, tape should be a little more than twice the width of the flat section). My washi tape is 7/8" wide. Wrap the tape around the flat section and press to secure to the bobbin.


Tip: An easy way to cut the tape is to lightly stick it to your cutting mat and cut with an old rotary blade or an exacto knife.


3. Use a permanent marker to number each marker.


4. Hook each marker onto a safety pin, through the hole at the top.


That's it! Super simple and easy DIY, but so handy!


And here is a set made with stickers instead of washi tape! The numbers follow the rainbow color order. These came in a recent month of a Pipsticks subscription* that a friend gave me!


I usually keep my set in a small tin or plastic box, but you could also store them on the ring that often comes with the floss bobbins.


I hope you've enjoyed this tutorial! I have lots of other tutorials for everything from quilts, pillows, bags, and holiday items to informational series and techniques. Find all my tutorials here: Tutorials. My online shop is filled with patterns for quilts and bags. Find my patterns here: Jeni Baker Patterns

If you make something using one of my tutorials or patterns, I hope you'll tag me @jenib320 and use my hashtag #jenibaker on instagram!

Happy Quilting!

*Note: Any links marked with an asterisk in this post are affiliate links. This means if you click through and buy something, I make a small commission, at no extra cost to you.

Tips for Dyeing Raw Eggs

Monday, April 11, 2022


Happy Monday! I have a crafty how-to post to share today!


I really enjoy dyeing eggs every Spring, but we don't eat a lot of hardboiled eggs. So a few years ago I tried dyeing raw eggs, and it worked great! Just a little extra care when dyeing and I've got a fridge full of colorful eggs to use for baking and breakfast for dinner! I took some photos while I dyed this year so I could share with you all. Let's dive in!


I like to use the simple egg dyeing kits from the grocery store (or Target). Some years I've found a kit that has purple, but this year I picked up just a standard color kit. The kit I used was just the dye tablets, egg dipper and some stickers, so I used my own containers to dye the eggs. One of these days I'm going to try dyeing them with food coloring, but I also love to buy the kits!


I find wide mouth mason jars work nicely, since they're tall and not too wide at the base. Follow the instructions for disolving the dye tablets with vinegar and then diluting with water.


There is no prep needed for working with raw eggs! You just need to be extra careful when lowering the eggs into the dye cups as well as removing them. I wouldn't necessarily recommend dyeing raw eggs with small children, I think it would most likely result in some broken eggs!


I used one dye kit (6 tablets) to dye two dozen eggs. First I dyed a dozen white eggs! These get nice and bright. I let them sit in the dye for five mintues each. After I lower the eggs into the cups, I like to add an extra splash of water if needed to cover them completely to help avoid undyed spots.


To keep the colors from getting muddy, I keep a small dish of clean water and a paper towel at the ready. I quickly rinse the egg dipper after each dip into dye and blot it on the paper towel.


I dry the wet eggs right in the cardboard carton. Make sure to let the extra water drip off into the cup after lifting it out of the dye. It doesn't take too long for them to dry, and I find it easier than using the cardboard container that the dye kit came in!


Here are the white eggs all dyed up! I dyed these first, and I did each egg for 5 minutes in the dye cup.

After I'm done dyeing white eggs, I love to dye a dozen brown eggs too, right in the same dye liquid. These I let sit in the dye cup for 10 minutes each.


The two different eggs take the color so differently! Hard to believe these two sets of eggs were dyed with the same kit, right? Now I will smile every time I crack an egg until these are gone! Do you prefer the bright white eggs or the muted brown eggs? I think I like the brown a little bit more!


I hope you've enjoyed this little how-to! I have lots of other tutorials for everything from quilts, pillows, bags, and holiday items to informational series and techniques. Find all my tutorials here: Tutorials. My online shop is filled with patterns for quilts and bags. Find my patterns here: Jeni Baker Patterns

If you make something using one of my tutorials or patterns, I hope you'll tag me @jenib320 and use my hashtag #jenibaker on instagram!

Happy Crafting!