Showing posts with label Curiosities. Show all posts

Knit Stuffed Animals

Monday, January 18, 2016


Happy Monday! Today I want to share some more gifts that I stitched up at the end of last year. One was a Christmas gift, and the other two were "congratulations!" gifts, but were given at Christmas.

When I was at Quilt Market in Houston this past Fall, I saw these softies sewn up in knit fabrics in the Cloud 9 Fabrics booth (see them here). They were so cute and soft, I could not get them out of my head. The patterns are all from Shiny Happy World, and I'll link them individually below. I think I bought the patterns in my hotel room after the show closed one of the nights. I thought it was such a fun way to use knit fabrics and I love stuffed animals, so it was the perfect match!


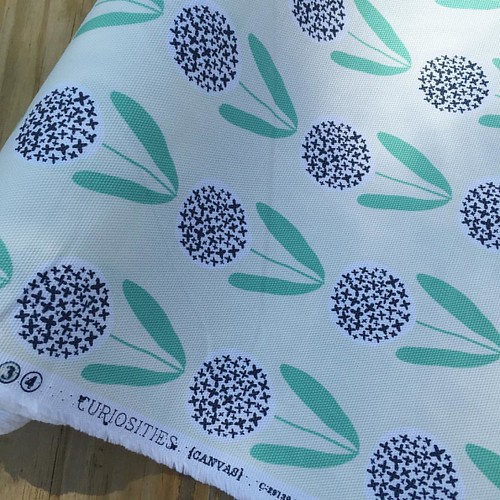
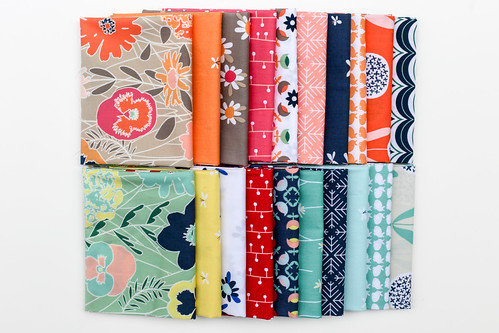
I also happen to have plenty of knit fabrics on hand! I have eight different knit prints with Art Gallery Fabrics, four from Geometric Bliss and four from Curiosities. I've been trying to focus on finding non-garment projects that use knits, in addition to slowly building a wardrobe of handmade shirts.

I made all three softies at the same time, assembly line style. I used my Janome Memory Craft 4800, which is my backup machine. It's easier for me to use when sewing with knits. I used a stretch needle to sew all of these, along with Aurifil 50wt cotton thread. I thought I might use my serger for parts, but didn't end up using it.


First up is Franklin the Fat Cat! As soon as I read the name of the pattern, I was in love. I love a good fat cat! This one was the easiest of the three patterns, and also the smallest. One of Michael's cousins had a baby in December, so of course I had to make one for the baby! I was giving them a baby quilt made with Curiosities, so I decided to make a softie to match.


I used the Sweet Nothings Fond Knit along with a little bit of the Amaranth Knit Solid for the ears. Since this was for a baby, I embroidered the face instead of using plastic eyes. I also reinforced the arms, legs, ears and tail. Instead of using plastic pellets, it's filled only with fiberfill.


Next up is Benson Bunny! This one might be my favorite, since it is a bunny! This one probably took the longest. It has soft and stable in the ears to give them shape. It also has a stuffed tail and felt nose, both of which are attached by hand at the end. This bunny went to live with baby's big sister! I figured it has to be hard sharing all the attention, so she needed a softie too.


I used the Radical Blooms Blush and Parallel Segments Quartz Knits from Geometric Bliss for this bunny. The head and ears are Peachy Custard Knit Solid. I was able to find the perfect matching mint felt from The Sewcial Lounge, score! I filled the arms and legs with plastic pellets and there is some in the body along with fiberfill. I also used safety eyes on the bunny. I am very thankful that I reinforced the limbs and ears on this one too, since upon opening he was already getting played with and tugged on!


Last up is Munch! He has a mouch that you can stick your hands (or his!) in, which is really fun. I thought the construction of this guy would be the hardest of the three because of the mouth, but it really wasn't. It came together easily in the end! I made Munch for my brother for Christmas!


For Munch I used the Spherical Buds Aqua Knit from Geometric Bliss. For his mouth and ears I used the Turquoise Knit Solid. As instructed, I used a mix of fiberfill and plastic pellets to fill Munch. I also used safety eyes for him. I had to be extra careful when cutting him out since I was using a directional print. Luckily I did it right!


I really enjoyed sewing these! It is always fun taking flat fabric and turning it into something three dimensional. It's so satisfying. I haven't sewn a lot of softies before, so this was a learning experience for sure. I have a few other patterns I'd like to try this year. I think the softies turned out so sweet, and they were well received. Now that I've made all three, I need to decide which to make for myself! :)

Happy Sewing!

2015 in Review

Thursday, December 31, 2015


I don't even know where to begin in reviewing this past year. So much was crammed in, it's hard to process! Let's just say there were plenty of freak out moments and diet coke to get through this past year.


Personally, I was so happy to get married this year. I don't know what I would do without Michael. I definitely would have gone crazy by now! We had a wonderful day surrounded by family, and then escaped to Disney World. All a dream come true.

Photo by Dennis Crider for Imagen Photography.


Professionally, I checked a big thing off my list this year with my book, Patchwork Essentials: The Half-Square Triangle. I put so much work into this book, and it's both exciting and terrifying to think it's actually out in the world now! A big thank you to Lucky Spool for making this possible. I have some fun stuff planned for it in 2016, hopefully early in the year!


Let's be real though, the biggest news this past year was that George now has his own fabric. I released my fifth fabric collection with Art Gallery Fabrics, Curiosities, in June!


This year I discovered Tsum Tsums, and am now a happy member of the Tsum Tsum of the month club! Yes, it is a real thing!


Knitting continued to be the perfect hobby for me, and I finished 15 projects this year! I really tried to challenge myself to try new things. I knit my first sweater, knit colorwork, tried weaving and knit three pairs of mittens. Plus, tried felting for the first time! I have lots of projects to share still.


I finished three of the book quilts in January this year, but otherwise didn't have a ton of quilt finishes. Three I have yet to share, will be able to do that soon!


I did manage to make five pincushions this year. My love of pincushions continues to grow!

It's always fun looking back on the year, and this sure was a busy one! Will share some goals and resolutions for 2016 next week. In the meantime, Happy New Year! Thank you for your continued support. It was a quieter year that usual here on the blog, I'm hoping to hit the ground running next year and be better about making time to write!

Curiosities Carry-All Pincushion

Wednesday, December 2, 2015


Happy Wednesday! I have a number of finished projects to share before the year ends, starting with this super cute pincushion! Pincushions are one of my favorite things to make, and this one was lots of fun. This is the Carry-All Pincushion from Anna's book, Handmade Style. I knew immediately that I'd want to make this pincushion, and it did not disappoint! I'm already scheming a second.


I chose prints from the warm colorway of Curiosities for my cushion. The only thing I did differently from the instructions was to use a bit of ruler twill tape instead of a sewn fabric strip for the scissor strap! This particular twill is from Little Red Cottage.


Look at all the cute pockets on this pincushion! It's unlike any pincushion I've made before! It's a great addition to my collection.


The other side has these two pleated pockets. Perfect for packs of extra needles, my little tin of pins, or even some washi tape!


Each end has a pocket too! Standard round tape measure fit great in them.


I really enjoyed making this pincushion. I haven't been sewing too many small projects lately, I forgot how satisfying they can be. I am looking forward to sewing through more of the projects in Handmade Style. I've stitched up the Zip-Top Tote and the Double Zip Wallet (which I haven't posted yet!). I think I'd like to make either the tunic or the makeup travel case next! Or maybe her new Maker's Tote Pattern? It's a toss up!

Happy Sewing!

Catch-up

Thursday, November 5, 2015

Work in Progress
Happy Thursday! I realized that I haven't done a catch-up post since before the wedding, so it seemed like a good time to go ahead and do one! I'm slowly working on putting together a new quilt pattern. It's been in my head for a couple years, and I'm finally making it. This shot is from a few weeks back when I was early in the process.

Michael + Jeni
Our wedding photos came in on Monday, so I didn't want to keep you all waiting for a shot! We had a really special day and wonderful trip to Disney!

Photo by Dennis Crider for Imagen Photography.

Lined Drawstring Bag
A lined drawstring bag I stitched up! I love the main print. I used it for a quilt back and was able to use some of the leftovers for this bag!

Glamp Stitchalot Fabric Pull
Glamp Stitchalot is right around the corner! I've been working away on my sample quilt top, but remembered to take a photo of my fabric pull before starting.

Visible Mending
Did a little visible mending on a pair of jeans with a few tears. I have been waiting for the opportunity since receiving a Cannonball Collective Revival kit! It was full of inspiration and all the tools I needed to do a bit of fun mending.

Gourmet Pyrex Casserole
Bought a piece of Pyrex for the first time in a while! I finally found a Gourmet Casserole. I've had my eye out for this one for a while. The entire thing is blue delphite, and the outside design (white and gold) are painted on. Pretty cool!

Apple Pie
Baked my once a year apple pie last weekend, yum! I use this recipe for the crust and filling, but I subbed in Cortland apples.

George
George bunny!

Have a great day!

Catch-up!

Friday, September 11, 2015

Mums
Happy Friday! I almost didn't make it into this space this week. I was hoping to share my recent garment finishes, but it just didn't quite happen. It's been nearly a month since my last catch-up post, so that seemed appropriate instead! The wedding is getting real close, so my main goal the last week and next week is simply to relax as much as I can. There is still plenty of work to do before we leave for Ohio, but I haven't been putting too many self-imposed deadlines on myself! I'm so happy that Fall is right around the corner. I was so tempted by these multi-colored mums at the grocery store, I've never seen any like that before!

General Housekeeping: My online shop will be closed from September 16th-27th! Here is a list of shops that carry my PDF Patterns: Pink Castle Fabrics, Connecting Threads

Patchwork Essentials: The Half-Square Triangle
In between all the other exciting things going on this month, my book, Patchwork Essentials: The Half-Square Triangle, is shipping! (!!!) I'm not going to lie, it's been a little overwhelming thinking that it's winging it's way to shops right now! It should be showing up in local shops this week! So, let your shops know you'd like it!

My local shop, The Sewcial Lounge, is running a pre-order special until the 15th! Use code VIP at checkout to receive 15% off and get a signed copy! For locals, this includes an invite to our VIP launch party, woot! (Also, if you are local and are picking up your book in store, your shipping will be refunded!) Order here!

Imprint Arithmetic Quilt Top
I have been doing some sewing! I stitched up a quick quilt top with Katarina Roccella's Imprint collection earlier this month. I used the largest square size in my Arithmetic Quilt Pattern! I love how it's turning out!

Patchwork Pincushion
I also managed to sew a little pincushion too! I used Pure Elements scraps and my pattern from the book Stitch n' Swap. I kind of want to make a bunch more.

Purple Yarn Stash
I have been doing some reorganizing in my sewing room, spurred on by Fall and an awesome deal for storage containers at Target. It's been a couple weeks now, but I got some giant bins for $4! I won't tell you how many I bought, haha! Anyways, when I was putting away my yarn purchases over the last few months I realized they were all purple!

Curiosities Canvas
All the new Art Gallery Canvas prints shipped late last month, including my print from Curiosities! Hawthorne Threads has all the prints in stock, you can find mine here. I made a Zip-Top Tote from Handmade Style with my print earlier this summer (see here), and I have another project to share soon too!

Nectarine and Blueberry Crostata
In July, Michael and I took a cooking class together at the newly opened Sur La Table in Madison. We took a Spectacular Summer Pies class, and made three kinds of pie. Since Michael's favorite dessert is pie, I knew he would be game! We had so much fun, and the pies were delicious. I made one of the pies from class a few weekends ago, a Nectarine Blueberry Crostata. It was messy, but so tasty!

George in Black and White
We have also started shooting black and white film photos again. It had been seven years since I shot a roll of film. Michael bought all the chemicals to develop the film ourselves, so I got to develop my roll earlier this month. I forgot how much work it is, but it was fun to do it again. I of course had to take some photos of George bun. This one is my favorite, he is so perfect for black and white photos!

Have a great weekend!

Curiosities Knitting Bag

Wednesday, August 26, 2015


Happy Wednesday! This week I wanted to share with you a recent gifted project! I wanted to make something for my friend Lei, and I remembered that she always brought her knitting over in a reusable shopping bag. I thought she could use a dedicated knitting bag, which would be a little more functional and cuter too!


I pulled out one of my friend Christina's older patterns, Amanda's Knitting Bag. I've had the pattern printed for ages, but never got around to make it. It's named after our mutual friend Amanda, as the pattern sample was a gift for her. This seemed like the perfect bag to make for Lei!

I chose to use a natural linen for the main body of the bag, like Christina's original bag. I chose a couple of prints from Curiosities and a bright zipper to finished it off!

I buy all my zippers from Zipit.


I love all the little details in this bag that make it perfect for a knitter. There are pockets for a pattern, knitting needles, yarn, and all the notions too! The little peeks of the interior fabric are really sweet. And the tiny zipper pocket are great for small notions like scissors and stitch markers!


I saved the Splendiferous Warm print for the main interior of the bag, since it's so bold and colorful! It's a great surprise when you open up the bag!


I filled up the bag with yarn, and some handy knitting notions! There is room for a large project or a few smaller ones. The short handles make it easy to hang the bag on a door handle or travel with! Now I want to make one of these bags for myself!

Happy Sewing and Knitting!

Half-Square Triangle Pincushion Tutorial

Tuesday, July 28, 2015

Half-Square Triangle Pincushion Tutorial - In Color Order
Happy Tuesday! I am happy to share another tutorial featuring Curiosities with you today! As you may know, I love pincushions. I also happen to love half-square triangles (HSTs). So when faced with scraps and a need for a quick and easy project, I put those two loves together and made these fun pincushions! The HSTs are small, but not so small that they’re hard to piece. Just tiny enough to be extra cute!

Half-Square Triangle Pincushion Tutorial - In Color Order
I made two, because why not! The first uses two pink prints from the Sweet Finds colorway. The second uses two prints from the Fresh Encounters color way. I backed both pincushions with coordinating Art Gallery Fabrics Elements. The small prints and small HSTs give these a sweet vintage feel. As usual, I filled my pincushions with crushed walnut shells (lizard litter). You can find it at most pet stores. This also lets them double as pattern weights, bonus!

Half-Square Triangle Pincushion Tutorial - In Color Order  
Sewing Level: Beginner

Materials:
- 2 fat eighths for pincushion top (Fabric A and B)
- 6.5" scrap for pincushion backing
- Coordinating thread
- Marking pen/chalk
- Pincushion filling of choice (I use crushed walnut shells)
- Hand sewing needle

Looking for supplies? Check out my Pattern Supplies and Resources post. 

Cutting:
From each Fabric A:
Cut (8) 2.5" squares

From each Fabric B:
Cut (8) 2.5" squares

From Backing Fabric:
Cut (1) 6.5" square

Finished Size: 6" square

Instructions:
*Use a 1/4'' seam allowance unless otherwise noted*

Half-Square Triangle Pincushion Tutorial - In Color Order
1. Make half-square triangles: Using a marking pen, draw a diagonal line across the wrong side of all Fabric A squares. Place one square on top of a Fabric B square right sides together. Sew 1/4” on either side of the marked line. Cut square in half on the line you marked. Press seams open. Repeat with remaining squares. Trim all half-square triangles to 2” square.

Half-Square Triangle Pincushion Tutorial - In Color Order
2. Arrange half-square triangles in four rows of four as shown in the diagram above. Sew units together in each row. Press seams in one direction, alternating direction every other row. Sew rows together, press seams open.

3. Place pincushion top right sides together with pincushion backing. Sew around all four sides, leaving a small opening in the middle of one side.

4. Turn pincushion right sides out, pushing out the corners with a full pencil or turning tool. Fill pincushion with desired filling. Hand stitch the opening closed.

Half-Square Triangle Pincushion Tutorial - In Color Order
Voila! You're done!

Half-Square Triangle Pincushion Tutorial - In Color Order
BONUS: You can make an even tinier version (3" square finished) with just four HSTs like I did for these pincushions! You'll only need two 2.5" squares of each fabric, trim them to 2", and use a 3.5" square for the backing.  

If you make something using this pattern, I hope you'll share it in the In Color Order Flickr Group or using the #jenibaker hashtag on Instagram!