How to Organize Paper Sewing Patterns

Wednesday, April 21, 2021


Happy Wednesday! It's time for another post for the Sewing Room Organization Series. In last week's post I wrote about how I organize my digital pattern PDF files. Here are the other posts in the series so far:

How I Organize my Digital Sewing Patterns
Tips for Keeping Your Sewing Table Organized and Clutter Free
Tips for Storing Projects in Progress (WIPs)
Tips for Organizing and Storing Fabric Scraps


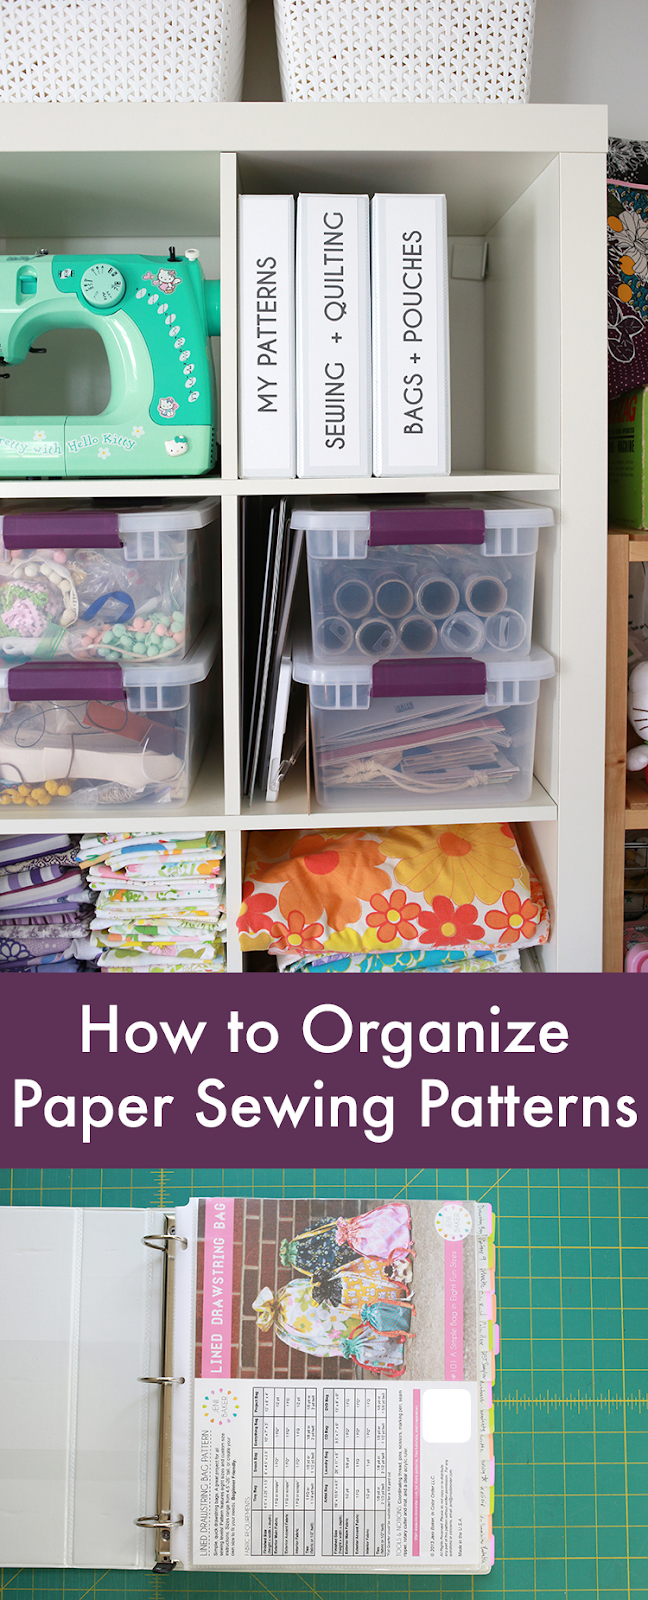
For today's post I'm sharing how I organize my paper and printed patterns. This includes digital patterns that I've printed out at home as well as paper patterns that I have purchased in person or had shipped to my home. Typically I purchase digital patterns, but I do prefer to buy paper patterns for garments. I use two different types of organization for my paper patterns. For sewing and quilting patterns I use three ring binders. I've seperated mine into three different binders, one for home decor + quilting patterns, one for bags + pouches, and one for my own pattern line.

This is just one way of organizing paper patterns that has worked for me and the patterns that I have in my collection. What works well for me may not be best suited to you. I encourage you to experiement and find something that works for your individual work flow, space and collection of patterns. There is no wrong way to organize your patterns!


First up is the sewing + quilting binder where I keep patterns for home decor, sewing organizers, pincushions, quilts, pillows, etc. A bit of everything! I use 5 tab dividers to keep the different categories seperated. If you're planning to use dividers with sheet protectors, make sure they're big enough. Most dividers are meant to be used with 8.5x11" paper that has been hole punched. Just something to keep in mind if you decide to organize your patterns this way too!

These are the 5 tab dividers* I used for my binders. They're not my favorite to be honest, but they were what I could find locally that were the right size and they get the job done!


I use a sheet protector for each individual pattern, to make it easy to keep all the pieces together (if there are templates), and to keep everything nice and neat. This also means I don't have to punch holes in my patterns in order to store them in a binder. This system works well for me since I am combining patterns I've printed as well as paper patterns I purchase, which come in many different sizes. When I'm ready to sew I can open the binder rings and grab the pattern I want!


For patterns that have a lot of little pieces, I'll often include a small paper envelope in the sheet protector with the pattern instructions. That way nothing can fall out!


The bags + pouches binder is set up the same way as the sewing + quilting one. Another set of 5 tab dividers and sheet protectors. I have the patterns organized by bag size. One advantage to this particular set of dividers is each one has a pocket. I store miscellaneous templates in those pockets.


The last binder contains my self-published patterns. They're organized slightly differently. I still use sheet protectors, but there is only one double-sided page per protector. This allows me to flip through the binder and see all the pages of each pattern. I also have an unfolded cover for each pattern to start. Since I refer to my own patterns a lot, it's helpful to be able to quickly see each page. I would recommend this method for those patterns that you use over and over again!


Instead of dividers, I use these post-it tabs* instead. This reduces bulk and is more cost-efficient since this would have requried a large number of dividers!


Next up is my garment patterns. My system for storing these is not quite as streamlined as it is for my other patterns. But I don't sew garments as often, so it works okay for me! All my patterns fit in a storage cube that sits on top of my shelving unit.


Each pattern has it's own manila envelope, I've used a combination of 9x12" envelopes and 10x13" envelopes. No reason for having two different sizes, other than it was what I had on hand. I like using large envelopes because it means I don't need to refold the tissue paper that comes in many garment patterns down to a small size again. I can easily fit the original tissue, my traced pieces and the instructions in each envelope. When I'm ready to sew I just grab the envelope I need!


I hope seeing my systems might give you some ideas for organizing your own patterns in your space!

Happy Sewing!

*Note: Any links marked with an asterisk in this post are affiliate links. This means if you click through and buy something, I make a small commission, at no extra cost to you.

Work in Progress: Kaleidoscope Quilt

Tuesday, April 13, 2021


Happy Tuesday! I wanted to chat today about one of my oldest works in progress. I picked it up again last week and am determined to finish it, for real this time.


I pulled these fabrics for a Kaleidoscope quilt in early April 2012. Whoa, 9 years ago! It's a mix of two collections by Tula Pink*: Neptune and Prince Charming. I paired it with Quilter's Linen* by Robert Kaufman. I think the color is Parchment, but I am not 100% sure since I bought it so long ago.


All the pieces for this quilt were cut with a template. I used the Marti Mitchell Kaleido Ruler*.


This is one of those projects that I would go years without working on it. I know I brought it to a few retreats without even taking it out of my bag! To be honest, this is not the type of piecework that I really enjoy and that made me avoid it at times. It's also tough when so much time goes by, your tastes change. This quilt was just never a priority to finish. For 2021 one of my goals is to finish at least one long term work in progress. I listed this quilt specifically because it is such an old one for me.


Fast forward to last week, I didn't know what to work on so I decided to set myself a small goal to finish 10 blocks for this quilt every day. I had 50 blocks total left to make. Having that small goal really helped. I worked on them before lunch each day except Thursday. I have access to our car on Thursday mornings so that I can go do the grocery shopping. I didn't end up in the sewing room that day, so I made 20 blocks on Friday to make up for it.


10 blocks a day was so much more manageable a task than thinking about all 50 blocks at once. It also motivated me to sew almost every day, which is good. I've really struggled with finding a good routine, especially this year. I only dedicated about an hour a day to this project, and I made so much progress. I think I'm going to try to use this system going forward, to try to get back into a better routine of sewing every day, instead of in randome spurts.


It is so satisfying to be done with these blocks! Now I'm just finalizing the layout and I can start piecing them together. I hope to have the top put together by the end of the week. I will probably end up piecing a backing from my stash. At one point I had a matching backing, but got rid of it before we moved. I'm tempted to buy a backing for it, but I know I should just piece something from what I have in my stash. We'll see!


My new goal now is to get this quilt completely finished during the first half of 2021, and tackle another one of my long term works in progress in the second half. That would be awesome, I hope I can make that happen.

Happy Quilting!

*Note: Any links marked with an asterisk in this post are affiliate links. This means if you click through and buy something, I make a small commission, at no extra cost to you.

How to Organize Digital Sewing Patterns

Thursday, April 8, 2021


Happy Thursday! I'm back today with another post for the Sewing Room Organization Series. I wrote three posts for this series last Spring, and wanted to pick it back up again. Find the other posts in the series here:
Tips for Keeping Your Sewing Table Organized and Clutter Free
Tips for Storing Projects in Progress (WIPs)
Tips for Organizing and Storing Fabric Scraps

For today's post I'm sharing how I organize my digital pattern PDF files. When I asked last year what you all struggle with organizing this was a repeated request. To be honest, at the time my files really weren't well organized. They were all in one central folder, and I often had trouble finding what I was looking for.

Preparing for this post was just the push I needed to really get my files organized and now I can share with you how I do it. I got organized last year and have been living with it for probably 7-8 months. The system I use is really simple and didn't take too long to set up. As always, there is no right or wrong way to organize your files. This is just a method that is working for me, but feel free to organize your digital patterns however you like!


The first thing I did when I decided to get organzied was to create a main folder, which I named "Digital Patterns". Within this folder I created folders for different pattern types. I looked through all my digital patterns to decide what types of folders I'd need. This will be different for everyone, depending on what types of patterns you buy, and how you'd like to have them organized. I set up the following pattern type folders:

Bag Patterns
Craft Patterns
Embroidery Patterns
Garment Patterns
Home Decor Patterns
Knitting Patterns
Magazines + Books
Pincushion Patterns
Pouch Patterns
Quilt Patterns
Softie Patterns


Here's a peek inside my "Bag Patterns" folder. The other thing I did with all my digital patterns was to rename all the files in a consistent way to make them easer to search for. Here is the format I used:

Pattern name - pattern designer.pdf

You could include any other identifying information you want. The date you downloaded the pattern, the type of item it is (if it's not in the pattern name), etc. I'd just recommend you decide on a system and then stick with it. In my opinion that will make it easier to look through your patterns and find what you're looking for.


See my organization method in action in this short video. (Direct link to the video here, if it's not showing up.) I also share how I treat a "new" pattern that comes in and get it organized into my system. I use a Mac, but this method works just as well on a PC.


I hope it was helpful to see one method for organizing digital patterns! It took me a few sittings to get my system set up, but it's been really easy to maintain. For me it has been worth that initial time investment to be able to easily look through and find specific patterns when I need them. The next post in this series will be how I organize my printed patterns. This will include both physical patterns I've purchased and digital patterns that I've printed at home.

Happy Organizing!

March Monthly Report

Tuesday, April 6, 2021


It's time for the March monthly report. See past reports here.


I worked on a random assortment of small projects this month. I share this scrappy pincushion I made in a blog post here. It's the Sit 'N Sew Pincushion Pattern by Shannon Fraser. It was my scrap project for the month of March and also my new-to-me pattern to make in quarter one of 2021.


Made a new lined drawstring bag to share my new wooden beads. I held onto this print by Creative Thursday for many years. It feels good to finally use it up! This is the everything size bag. Pattern, twill tape and beads can be found in my online shop.


This set of coasters was a very long standing WIP. I had a completed set of four and then six more in various stages of completion. I taped a segment for a tv show 5 or 6 years ago and you had to have step-outs of the projects. It felt good to get all of them finished, even if they're mostly the same coaster. I'll never be short on coasters again!


I made two blocks for my vintage sheet bear paw quilt this month. This quilt is definitely taking a while to make, but I'm hoping to pick up steam on it this spring. It's going to be a good one.


Still weaving away! I finished another scarf, this one used up almost two full skeins of yarn. I have so much yarn, I love how much weaving uses. It's been fun.


To keep myself accountable for my stash goals, I track my yardage for fabric and yarn each month. Read more about how I track here. Here is how I did in March:

March Fabric
Used up: 4.5 yards
Brought in: 3 yards
Net: -1.5 yards
Year to date: -9.375 yards

March Yarn
Used up: 365 yards
Brought in: 0 yards
Net: -365 yards
Year to date: -1400 yards

I made my first fabric purchase of 2021! I bought a couple yards of black canvas to make more grow bags this this season. Pretty exciting! I passed a little fabric on to a friend too.


On my second birthday during the pandemic (whoa), we decided to sneak out and make a trip to a local nursery. It was only for about 15 minutes, but it was nice to go on an adventure instead of just being cooped up at home. They had tons of bulbs and pansies, so there was a lot to see. It was a nice day.


Speaking of plants, I've been busy starting all kinds of seeds. So far I have started dahlia, strawflower, portulaca, rudbeckia, tomoato and zinnia seeds. I've also been doing small batches of microgreens, which has been fun.


Leaving you with a little egg rainbow. I love to dye eggs, but don't really like hard boiled eggs much. So I carefully dye raw eggs. Now we can enjoy them for the next few weeks!

Have a great month!