Two-Color Woven Quilted Pillow

Thursday, February 28, 2019


Happy Thursday! I feel like I have been on a pillow making bender lately! Now that we live in a house with more than one place to sit, we have a lot more places for pillows. I like to switch up our decor a little when the seasons change, so I'm building up a stash of all different pillow covers.


I am also trying to finish up the last of the leftover blocks and tops from writing my book, Patchwork Essentials: The Half-Square Triangle. This block was an all solid variation of my Woven quilt! It actually has made me want to make an entire quilt like this, I just need to choose a color. Using up orphaned blocks is such a quick and satisfying way to make a pillow!


For the quilting, I didn't go too crazy. I stitched diagonal lines, avoiding the center of the block. This meant that there is some quilting in the ditch along some of the half-square triangles. I wasn't super sure I'd be happy with this look but I actually quite like how it turned out!


I decided to add pom-pom trim to this quilt to it give it a little extra special detail. I really love pom-poms on a pillow! I have to say though, it takes a lot longer than I remember. It's not hard or anything, just fussy. I'd definitely do it again, but probably won't be trimming out all my pillows. Who can resist these mustard gold poms though?


I kept the back simple with some linen, but used a pretty purple zipper for a pop of color. This is my favorite way to back a pillow.


Happy Quilting!

Staircase Lap Quilt

Tuesday, February 26, 2019


Happy Tuesday! I have a little lap quilt to share with you today!


I really love how this quilt turned out, but it took me a while to finally get photos of it! It originally appeared in the Winter 2018 issue of Quilts and More magazine as a part of the Scrap Lab section. For the design, I wanted to create a block that was a simple tessellation. I came up with these simple staircase shapes. This quilt is 48.5"x54.5".


I think what makes this quilt really striking is the color palette, it's really fresh! The fabrics used in this quilt are Painter's Palette solids by Paintbrush Studio. Here are the colors in this quilt: Claret, Taupe, Lime Mist, Moss, Rosebud, Peach, Teal, Snow, Coral, and Emerald.


I kept the quilting on this super simple, just some straight line quilting 1/4" on either side of all the horizontal seams.


For the backing I used a print from my Nordika collection that just so happened to be a perfect match! For the binding, I used scraps from all the solids used to put together the top.


Happy Quilting!

All About Pincushions

Thursday, February 21, 2019


Earlier this week I shared this quick pincushion that I made, on Instagram (I'm @jenib320). It was a 15 minute project made with scraps. Anytime I write or post photos about pincushions, I always get questions about how I fill them, close them, etc. So, I thought I'd make one big post with all that information in one easy to find spot! If you've ever had questions about making pincushions, I hope this will be helpful!

What I Use for Pincushion Filling

I use crushed walnut shells to fill almost all of my pincushions. It is used as litter for pet lizards! I usually pick it up at a local pet store, but you can also order it online* too. A big bag will last a while, so you may want to split one with a friend!

Above: Dumpling Pincushion Pattern* by Julia Williams of Alchemy Tea.


I keep it in a big 2-gallon ziploc bag. I store a plastic funnel and a plastic spoon (free princess cereal spoon for the win!), right in the bag too. This way I don't have to wrangle the tools every time I want to make a pincushion.

I've also filled pincushions with fiberfill in the past, but I prefer the crushed walnut shells*. It gives pincushions such a nice weight and they can double as pattern weights when I'm cutting out garments!

How I Close My Pincushions

For an invisible closure, you could use a ladder stitch to close your pincushion opening. Personally, I am terrible at this stitch (and impatient), so I like to use a small whip stitch instead. It's quick and if you use a coordinating thread it's not super noticeable.

How to Make a Sturdy Pincushion

If you're planning to actually use your pincushion for pins rather than just for display, you may want to stabilize the pincushion top so that it hold up longer! Depending on the pincushion, I've used light-weight interfacing like SF101, medium-weight interfacing like fusible fleece, or quilt batting. It's a good way to use up those small scraps! This also gives you an opportunity to add extra detail with some quilting. Want to make it even more substantial? Quilt the backing too!

How to Make a Pincushion Out of a Dish

I've made a number of pincushions out of small containers like egg cups, candle holders, jars, little baking tins, and even a sponge holder! These can take a little fiddling with to get just right, but they're pretty easy to make. Start with a piece of fabric (usually cut in a circle) about two inches in diameter larger than the opening you're filling. Then run a quick running stitch around the circle and leave a long tail. Place fiberfill in the center and pull on the thread tails to cinch and create a little puff. Then you can test the fit in your object and add more filling or take some away. Once you're happy, knot the threads and use some hot glue to secure the fabric in place.

How I Display My Pincushions

My favorite way to display my pincushion collection is on this shallow wall shelf that I made with my Dad. It's not super deep, but can hold a lot! It's very similar in size to my thread shelf, which you can find a short tutorial for here: DIY Thread Storage Shelf.


Currently, I have my collection tucked into a cubby of my Expedit. I have a shelf in there to give me two levels of display. I'm hoping to get my shelf hung soon!

My Pincushion Tutorials

Triangular Log Cabin Pincushion Tutorial


Half-Square Triangle Pincushion Tutorial


Hexagon Pincushion Tutorial


Hexagon Ring Pincushion Tutorial

More Pincushion Inspiration


Happy Sewing!

*Note: Any links marked with an asterisk in this post are affiliate links. This means if you click through and buy something, I make a small commission, at no extra cost to you.

Confetti Zipper Pouches

Tuesday, February 19, 2019


Happy Tuesday! I have a cute little pair of zipper pouches to share with you today! I made them with my friend Aneela's new speedy vinyl pouches pattern.


So earlier this month I had been itching to make myself a confetti pouch. I've seen them here and there, but it was seeing one in person at Target that pushed me over the edge. What's a confetti pouch? It's a pouch made with clear vinyl that is filled with confetti, sandwiched between the layers of vinyl. The confetti can move around inside, and they're just fun.

I made one attempt on a bit of a whim, but used vinyl that was too thick and had to throw it out. Enter Aneela's pattern, and it seemed like an easy customization to add! I experimented with different gauge vinyl for each pouch, in order to determine what would work best.

By the way, can you tell I was wearing a coral sweatshirt when I took these photos? It's reflected in some of the confetti!


First up, I made the largest size in the pattern. I decided to match my fabric to my confetti (which is from Dollar Tree). I went with this Japanese night sky fabric that I bought from Miss Matatabi on Black Friday last year (it's no longer available and there is no selvedge info unfortunately!). It has little flecks of gold sparkle.

For this pouch I used 8 gauge clear vinyl. I think this would have been closer to the right weight except I messed it up a little. When I attached the binding to the back of the pouch, I wasn't thinking and I ironed it. This made the vinyl wrinkle up and some moisture from the steam got between the layers. Whoops!


Anyways, the vinyl is thin enough that the confetti can easily move around, and two layers of it isn't a big deal! If you want to make your pouch a confetti pouch too, just use two pieces of vinyl instead of one. Baste around the edges leaving a small opening for filling with confetti. Then stitch that closed and make the pouch!


For the second pouch, I made the smallest size. For this pouch I used a print from Carkai by Carolyn Friedlander. Another print with a little gold sparkle! I used 12 gauge clear vinyl for this pouch. It still works, but is a little stiffer and so the confetti doesn't move around as much. 10 gauge would be the best I think, but my local craft store doesn't carry it.


And here is a view of the pouches from the back. I think these turned out really cute, and I'm definitely going to make some more, and experiment with other confetti pouches. They're a little over the top, but I don't care! They make me smile, and that's what matters, right? Now to go down the confetti rabbit hole on Etsy!


Find the pattern in Aneela's shop here: Speedy Vinyl Pouches Pattern

Happy Sewing!

Patchwork Essentials: Woven Quilt

Tuesday, February 12, 2019


Photo © 2015 Lauren Hunt for Lucky Spool Media.

Time to share another quilt from my book, Patchwork Essentials: The Half-Square Triangle! You can find all the posts about Patchwork Essentials using the MY BOOK link at the top of every page, or here.


I'm going to share each quilt, in order, with the exception of a few that I've already shared. The Waypoint quilt is next in this chapter, I shared that quilt here: Waypoint Quilt. Now it's time for the Woven quilt!

For more on how the book is structured see this post.

https://incolororder.bigcartel.com/product/patchwork-essentials-the-half-square-triangle-book-signed
Need a copy of the book? Buy a signed one here: Patchwork Essentials: The Half-Square Triangle


Photo © 2015 Lauren Hunt for Lucky Spool Media.

This is one of my favorite quilts from my book. I love working with jewel tones, especially when the palette includes eggplant purple! I used some of my favorite purple prints in this quilt. This design uses two different sizes of half-square triangles, and was inspired by traditional ocean waves quilts.


This quilt was quilted by Melissa of Sew Shabby Quilting. The design is one of my favorites, popcorn. I've used it for quite a few quilts now, it just feels so cheerful to me!


For the backing, I used a blender from Urban Mod. It's bound in a purple dashed stripe from Bazaar Style. This binding fabric was one of those prints that had been in my stash for years, just waiting for the perfect project. It made a great binding!


In 2016, I made a second Woven quilt, this time in all blue fabrics! I wish I could say that it made a significant dent in my blue stash, but it did not. Still a fun quilt to make though! See the post about that quilt here: All Blue Woven Quilt.


Happy Quilting!

In Color Order is 10 Years Old!

Saturday, February 9, 2019


Today is my blog's 10th birthday!


On February 9th, 2009, I wrote my first post here at In Color Order. It was actually a sewing project too, a purse from Anna Maria Horner's first book, Seams to Me. See that post here.


2009 was a big year for me. I started this blog in February. In August, I brought George bunny home and moved into my first apartment. In November, I made my first quilt!


Ten years and almost 1500 posts later, here we are! I'm still posting my sewing and quilting projects, my thrifting finds, and sharing little life updates. A lot has changed since I first started this blog, but I'm glad I've stuck with it all these years. There have been times where I haven't felt much like posting, but I never gave it up. The blog world has changed so much since then too, it's kind of crazy!


I was 19 years old when I started In Color Order, and I had no idea what kind of opportunities it would bring me. Because of this blog, I started my business, I designed fabric, I wrote a magazine column, I have contributed patterns to books and magazines, I lectured at conferences, I taught sewing classes, designed my own line of sewing patterns, and even wrote my own book. Blogging also introduced me to so many amazing people, and helped me make some of my best friends. What an adventure this has been!


I could ramble on, but let's keep things short and sweet. Thank you for your support and readership over the years, I couldn't have kept going this long without you all.


One little treat before you go, an early photo of George bunny, before he grew into his big round eyes! :)

Happy Sewing!

2019 Sewing Room Tour

Thursday, February 7, 2019


Happy Thursday! I thought today it would be fun to do a little sewing room tour! I've shown photos here and there of my space, but now that we've been in our home for a year, I figured it was time to give a proper tour of my workspace. Fair warning, this is a photo heavy post!

I'm very lucky to have an entire room in our house to dedicate to my sewing. It's in an extra bedroom on the second floor, and it gets lots of morning sun. Plus there is access to the walk-up attic from this room which is convenient for storage.


I was so happy when I realized I could squeeze both of my tables along the wall where the ceiling slopes. I remember tearing pictures of an attic craft room out of a copy of Martha Stewart Living many, many years ago that had a similar set-up. I thought it was so lovely and cozy, and it is! The tables were given to me by my Dad, who bought them out of an old schoolhouse that was closing.

I've got a cutting mat on each table, and plenty of space to spread out. My sewing machine is on the end of the room with the two windows, which is great.

Note: I sew on a Janome 1600P, see my review of this machine here.


My serger is set up on the other table! I also have room to pull out my older Janome machine if I need to sew buttonholes or use any special stitches.

Note: My serger is a Juki MO654DE.


My quilting cotton fabric stash is housed in a Billy bookcase (with glass doors) from ikea. I wanted the doors to help keep the fabrics protected from sun damage. Thankfully it doesn't get any direct sun!


Next to that is a metal cabinet (vintage) that houses most of my garment fabrics and larger cuts of canvas, linen, etc.


My scraps could be a little more organized, but I keep them somewhat tidy in this red vintage metal chest of drawers.


Sensing a theme? I love vintage metal! This old metal breadbox holds my liberty of london stash!


Opposite my sewing tables is this big cubby unit. It's the largest Expedit from ikea, which has now been replaced by the Kallax line. This was quite a challenge to take apart and move, but it survived! It holds my vintage sheet stash, some collections, notions, hardware, patterns, interfacing, works in progress, and more.


How about a little peek at the top cubbies? First up, some of my vintage sewing machines!


Next, a few vintage tins, including a sewing machine accessories tin and my Droste cocoa tins!


My Hello Kitty Janome sewing machine, and some of my pincushion stash! I have a small wall shelf for my pincushions, but I haven't figured out where best to hang it yet!


This shelving unit holds a lot, in part thanks to my very favorite storage containers! These are 15 quart Sterilite ClearView Latch Bins from Target. I bought my first one a couple years ago because of the purple handles, but quickly realized how great they were. Two stacked can fit perfectly in the cubbies. The internal dimensions of the Expedit vs. Kallax units are the same, so you should be able to use these in Kallax units in the same way. I use them downstairs to store my paper pattern inventory too, it would be scary to count how many I own!


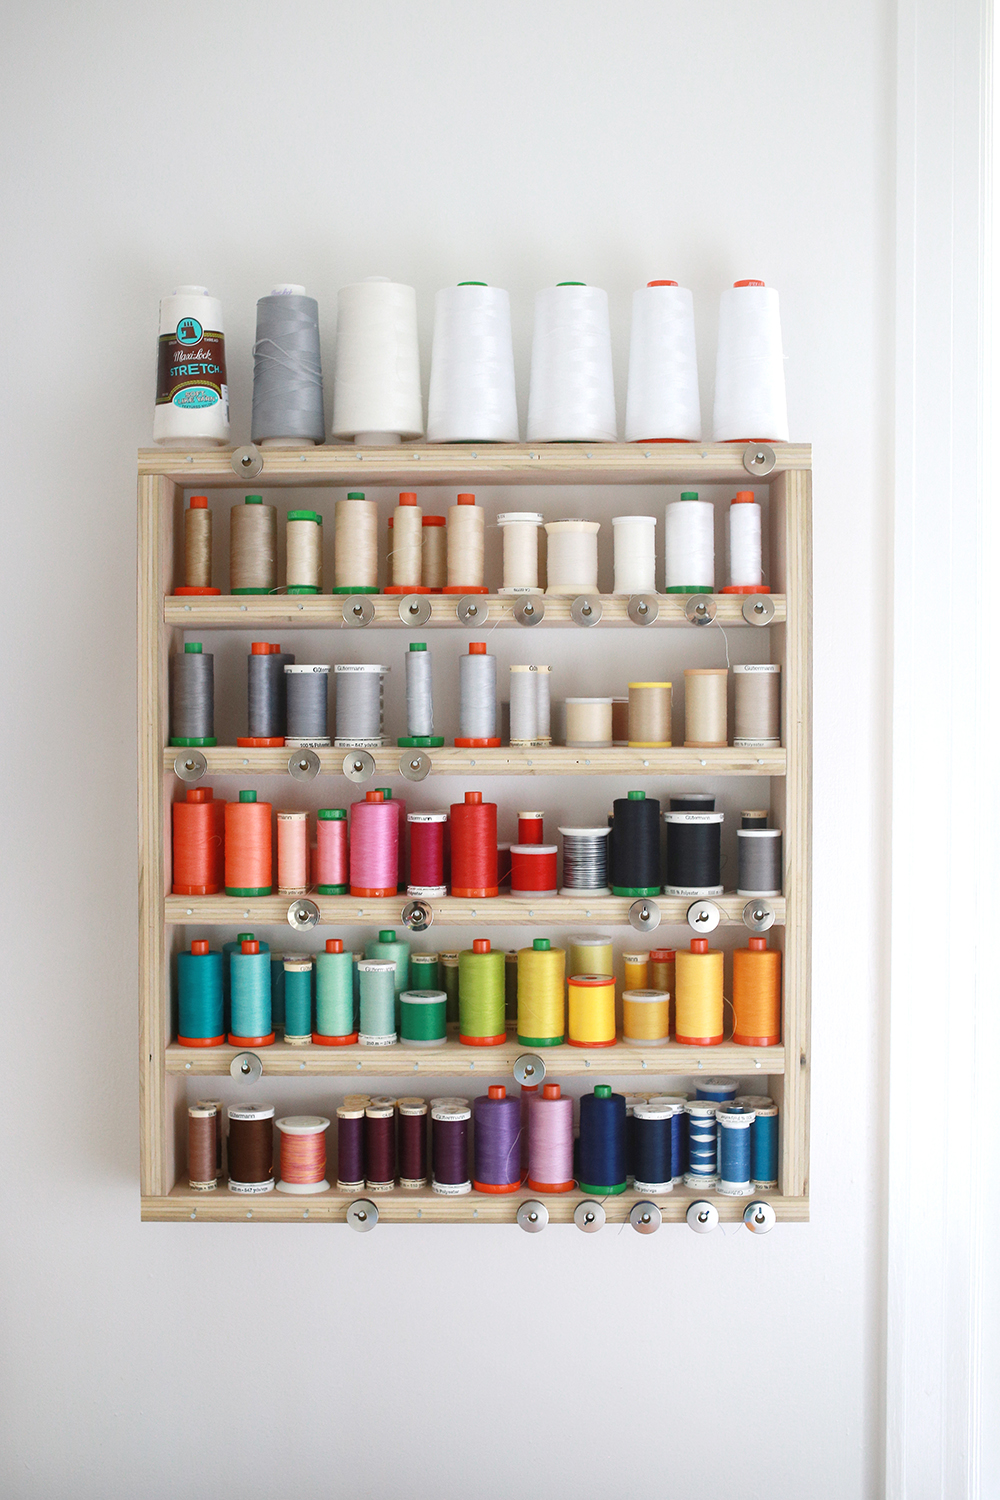
A few months ago I made this thread shelf to store all my thread and bobbins. It hangs next to my sewing machine for easy access. I shared a tutorial for how I made it here: DIY Thread Storage Shelf.


I hung up a set of two shelves on the wall behind my sewing machine to keep tools handy, but off the table. It's also a great place to put a few cute things!


One of my favorite things I've found thrifting here in CT is this vintage pink lamp. It wasn't in super great shape when I found it, and it was only $2! After a little TLC it's working great!


Another DIY project I tackled for my sewing room was a pegboard! I've wanted one of these for a long time, but didn't really have room (or the tools) in my last space. I used this tutorial to make mine. It's so useful!


I haven't hung much up on the walls yet, but I did hang up my pin banners! Find my tutorial to make these here: Enamel Pin Banner Tutorial.


Right behind my sewing machine is my ironing station. I recently installed a metal curtain line (also from Ikea, can you tell we live 20 minutes from one?) on this wall to hang quilts, quilt tops, or a piece of batting as a makeshift design wall.


And last but not least, one last DIY, a rug! The middle of the room is all open, so it's nice to have a rug there most of the time. It's a big room, which means I needed a big rug. With all the stray threads and messy crafts happening in here though, I didn't want to spend a lot on a rug. So, I decided to make one by stitching together some cheap runners from Ikea! The bonus is that it's not super heavy, so I can easily roll it up and out of the way when I want to baste a quilt. Find my simple DIY for this here: Sewing Room Scrap Rug Tutorial.


I hope you've enjoyed this tour around my sewing space!

Happy Sewing!