A little crafty reading thanks to my local library!
Making progress on my vintage sheet quilt!
Received a lovely swap :)
A little innocent crush!
And as always, George bunny!
A thoughtful reader brought some mistakes to my attention in the Lap Size of my Plus Quilt Tutorial. Those mistakes have now been fixed!
Today I love the..
Smell of: Biscuits baking
Sound of: Pushing Daises
Taste of: Chai
Sight of: A clean bedroom
Feel of: Cool sheets
Good Things about Today:
- Productive day at school
- Finally did some much needed cleaning and laundry!
- Dijon Biscuits :)

Lately


Dijon Biscuits
Baked some mustard biscuits this evening and I thought I'd share the recipe! These are my very favorite biscuits. For a long time my Mom wouldn't tell me that the secret ingredient was mustard because I was such a picky eater. You would never know they had mustard in them!
Dijon Biscuits
2 c. flour
3 t. baking powder
1/4 t. salt
1/4 t. garlic powder
1/4 c. oil
2/3 c. lowfat buttermilk
1 T. dijon mustard
*Makes about 12 biscuits!
1. Preheat oven to 450 F.
2. Combine dry ingredients in a bowl.
3. Combine milk, oil and mustard.
4. Mix together dry and wet mixtures until well combined.
5. Turn dough out on a lightly floured surface. Knead 5 or 6 times.
6. Roll dough to about 1.5" thickness and cut with a biscuit cutter (or in my case an empty clean soup can!)
7. Place on a greased baking sheet. Bake for 10 to 12 minutes until lightly browned.
Notes
*Biscuits actually puff up more than my photo, I rolled mine too thin! They still tasted good though!
*These freeze well!
*Ridiculously good with stew! :)
Enjoy!

Dijon Biscuits
2 c. flour
3 t. baking powder
1/4 t. salt
1/4 t. garlic powder
1/4 c. oil
2/3 c. lowfat buttermilk
1 T. dijon mustard
*Makes about 12 biscuits!
1. Preheat oven to 450 F.
2. Combine dry ingredients in a bowl.
3. Combine milk, oil and mustard.
4. Mix together dry and wet mixtures until well combined.
5. Turn dough out on a lightly floured surface. Knead 5 or 6 times.
6. Roll dough to about 1.5" thickness and cut with a biscuit cutter (or in my case an empty clean soup can!)
7. Place on a greased baking sheet. Bake for 10 to 12 minutes until lightly browned.
Notes

*Biscuits actually puff up more than my photo, I rolled mine too thin! They still tasted good though!
*These freeze well!
*Ridiculously good with stew! :)
Enjoy!
Monday, September 27, 2010
1. Fiddleheads, 2. Northman Mittens, 3. fiddlehead mittens, 4. Handmade Mittens, 5. Mom's Mittens, 6. Good Yarn, 7. Fiddlehead Mittens, 8. A Shell of a Mitten, 9. Fiddlehead Mittens
It seems every year for the past few years I fall deeply in love with Norwegian/Latvian style mittens. The intricate patterns are so beautiful and those pointed tips! I cannot resist. Despite my love for said mittens I don't own anything even remotely like them. My mitten of choice has been a pair of boring gray Thinsulate mittens. While warm, they leave much to be desired.
Part of this problem is I do not knit! I can sometimes manage a full row of regular stitches with no issues but that's about it. If only I could fast forward my skills so that I could create some Fiddlehead Mittens of my own. In the meantime I've been scouring etsy. I may just have to splurge on a pair of mittens this year.
I do wear mittens for like... 6 months of the year so why not? :)
Sunday, September 26, 2010
Whipped up the first block of my vintage sheet sparkling cider quilt!
All the pieces are cut for my quilt!
Playing around with fabric :)
Enjoying a favorite mug!
George! :)
Today I love the..
Smell of: Fresh fall air
Sound of: Pushing Daises
Taste of: Mashed potatoes
Sight of: Vintage sheets
Feel of: George
Good Things about Today:
- Used two 50% off coupons at Joanns!
- Finished all the cutting for my new quilt!
- Fall weather!

All the pieces are cut for my quilt!

Playing around with fabric :)

Enjoying a favorite mug!

George! :)

Today I love the..
Smell of: Fresh fall air
Sound of: Pushing Daises
Taste of: Mashed potatoes
Sight of: Vintage sheets
Feel of: George
Good Things about Today:
- Used two 50% off coupons at Joanns!
- Finished all the cutting for my new quilt!
- Fall weather!
Saturday, September 25, 2010

The Modern Plus Quilt is finally finished! I've cooked up a tutorial if you're interested in making your own! It's a fun alternative to regular patchwork, but the piecing is just as easy since you're still using squares! I can definitely see myself making more plus quilts in the future!


If you’d rather have this tutorial in downloadable/printed form, check out my Arithmetic Quilt Pattern. It features six different quilt sizes in three different square sizes. That adds up to eighteen different quilt options to customize your project!
Find the pattern in my online shop here: Arithmetic Quilt Pattern.
Fabric Shops: If you'd like to teach classes on this design, I ask that you order paper copies of my pattern for each student. You can order patterns wholesale through this form. Please refrain from teaching directly from this tutorial, thanks!
 I used Castle Peeps by Lizzy House* to make my quilt. I added some coordinating Kona Cotton Solids* for the backing and binding. There is also an optional scrappy pieced backing included in this tutorial. It's a great way to use up the leftover scraps from the front of the quilt!
Sewing Level: Beginner Friendly
Finished Size: 64"x75"
Modern Plus Quilt Materials:
- 20 fat quarters of print fabrics
- 2 yards of 90" wide cotton batting
- 4 yards of backing fabric**
- 1/2 yard of binding fabric
- Coordinating thread
**Optional pieced backing: 3 3/4 yards solid fabric + scraps from fat quarters
Modern Plus Quilt Cutting:
From 20 fat quarters:
- Cut (4) 4.5"x21" strips
- Subcut each strip into (4) 4.5" squares for a grand total of 320 squares.
Modern Plus Quilt Instructions:
 Use a 1/4" seam allowance unless otherwise noted.
 1. Lay out your quilt according to the diagram, you'll have 19 rows of 16 squares each. The process for laying out the pluses is easiest to explain in a diagram! Here is a diagram showing the process below:
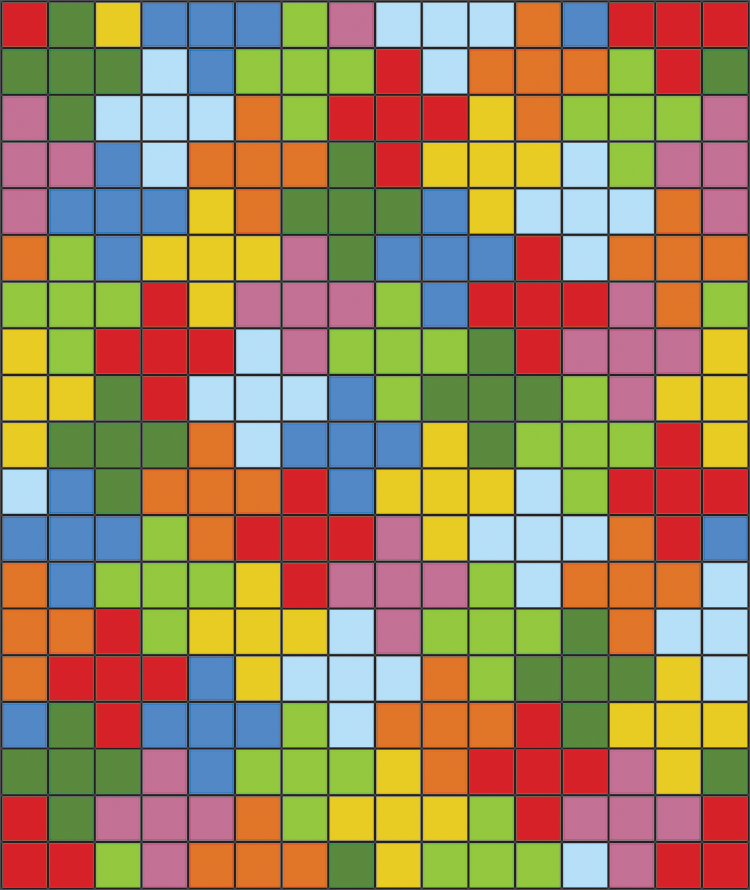
(48) - Full 5 square pluses
(11) - 4 square partial pluses
(2) - 3 square partial pluses
(14) - Single squares
Note: The diagram above has eight colors, simply to show the way the plus design is laid out. You'll likely have more than 8 different fabrics in your quilt so it is not meant to show exact fabric placement.
Once you’re happy with your layout, you’ll want to stack up your rows so that you sew them up in the correct order. I choose to stack the squares moving from left to right. Label the top of each row with a small slip of paper attached with a safety pin.
 2. Sew your squares together in each row. I recommend pressing seams to one side, alternating direction every other row. I like to sew a few rows and then press 2 or 3 at a time. This breaks up the sewing a bit and doesn’t leave you with a ton of ironing at the end!
 3. Now it’s time to sew your rows together. I suggest sewing your rows together in pairs, 1+2, 3+4, etc. You can then sew your pairs together and continue until you’ve finished. This system helps minimize the amount of bulky sewing you’ll have to do. Just like with your rows, don’t forget to press your seams. Your top is done, congrats!
4. Prepare Backing: It’s good practice to cut your backing and batting at least 4” larger than your top on all four sides. I’ve included this overage in the backing yardage requirements. Cut your backing yardage in half. Press. Trim off the selvedges and sew your pieces together lengthwise. Press seam open.
Optional pieced backing instructions can be found at the end of this tutorial.
 5. Basting: Using masking or painter’s tape, tape the backing to a clean, hard surface, right side down. Spread out your batting on top of the backing. Smooth out any wrinkles. Carefully spread out your quilt top on top of the batting, right side up. Pin your top, I like to use curved safety pins, spacing the pins a few inches apart. Make sure that your pins are going through all three layers.
 6. Quilting: Quilt as desired, by machine or by hand. For my quilting I choose to do straight lines 1/4" on both sides of the seams going vertically and horizontally. Trim away excess batting and backing fabric.
 7. Binding: Cut yardage listed for binding into 2.5” strips. Trim off selvedges and sew your strips together to form one long strip, press seams open. Fold in half lengthwise, pressing with your iron as you fold. Attach binding using your preferred method. Find my detailed tutorial on attaching your binding to both sides by machine here: Machine Quilt Binding Tutorial
Optional Pieced Backing:

Pieced Backing Cutting:
From solid backing fabric:
- Cut (4) 33.5"x39.5" rectangles
Pieced Backing Instructions:
Use a 1/4" seam allowance unless otherwise noted.
1. To make the pieced plus, you’ll need the leftover scraps from cutting your fat quarters. You should have pieces that are 18" long and varying widths of 3"-4". Take all your strips and sew them together on the long side (18"). You'll end up with a big piece 18" wide and around 60" long. Once sewn, press all the seams. Cut this long strip into (3) 6" wide strips.
2. Sew all 3 strips together end to end so that you have one giant strip that is approximately 6"x180". From this large strip, cut (1) 84" long piece and (2) 33.5" long pieces.
3. Take one of your backing pieces (33.5"x39.5") and sew one of the 33.5" scrappy strips to one of the short sides of the backing piece. Repeat with the other 33.5" scrappy strip.
4. Sew the remaining backing piece to the other side of the short scrappy strip for both sides, resulting in two large backing pieces that have two solid pieces with a scrappy strip in the middle. Press seams.
5. Sew one of the large pieced backing pieces to one side of the long scrappy strip. Sew the other large pieced backing piece to the other side of the scrappy strip. Press seams. You’re finished with the backing!
 I hope you've enjoyed this free pattern! I have lots of other free tutorials for everything from quilts, pillows, bags, and holiday items to informational series and techniques. Find all my tutorials here: Tutorials. My online shop is filled with patterns for quilts and bags. Find my patterns here: Jeni Baker Patterns
If you make something using one of my tutorials or patterns, I hope you'll tag me @jenib320 and use my hashtag #jenibaker on instagram!

Double Gauze Plus Quilt

Sugar Plus Quilt

Nordika Plus Quilt

Geometric Bliss Baby Plus Quilt

Dreamin' Vintage Baby Plus Quilt

Imprint Plus Quilt

Folksy Flannels Plus Quilt
*Note: Any links marked with an asterisk in this post are affiliate links. This means if you click through and buy something, I make a small commission, at no extra cost to you.
Friday, September 24, 2010
1. mini cooper, 2. baby 4 quilt regular, 3. hello, Fall. [little quilt no. 1], 4. Another one, 5. a work in progress - FMF mug rug, 6. Allium mug rug by Poppyprint, 7. fall quilt wip, 8. Double Wedding Ring, 9. block for Jessica
Every week I go through my favorite photos on Flickr, and choose nine sewing/quilting related projects to showcase here. These photos and projects are not my own, you can find the original images and creators by clicking the coordinating links! If for any reason you do not want your project featured here, please email me and I'll remove it!
Happy Friday!
Thursday, September 23, 2010
Collecting a few fall treasures.
Doing a little sewing!
And a little fabric shopping.. whoops! ;)
Enjoying the scents of fall.
Staring at this sweet bunny :)
What have you been up to?

Doing a little sewing!

And a little fabric shopping.. whoops! ;)

Enjoying the scents of fall.

Staring at this sweet bunny :)

What have you been up to?
Tuesday, September 21, 2010

This Week
My Castle Peeps quilt is done! Instructions and full reveal to follow soon! :)
Bound her in green!
Finished up a bee block!
Received the Mini cards I ordered. I really liked the vintage sheet ones!
It's so tiring to look this cute all the time!
Today I love the..
Smell of: Hot tea
Sound of: Friends
Taste of: Cornflakes
Sight of: George
Feel of: Freshly washed quilt
Good Things about Today:
- The weather is going to be nice!
- Should be able to get a lot done today!
- Made headway on the tutorial last night!
- The apartment isn't a total disaster :)

Bound her in green!

Finished up a bee block!

Received the Mini cards I ordered. I really liked the vintage sheet ones!

It's so tiring to look this cute all the time!

Today I love the..
Smell of: Hot tea
Sound of: Friends
Taste of: Cornflakes
Sight of: George
Feel of: Freshly washed quilt
Good Things about Today:
- The weather is going to be nice!
- Should be able to get a lot done today!
- Made headway on the tutorial last night!
- The apartment isn't a total disaster :)
Saturday, September 18, 2010
Pumpkins are the best!
Darci of Stitches & Scissors had a lovely giveaway to celebrate the grand opening of her etsy shop and I was the lucky winner! I was able to choose a selection of fabrics to have something made out of! After trolling my favorites, she made me this beautiful scrap bucket! Thank you again Darci! I love it!
Found some vintage sheets today!
Quilting along on my Castle Peeps quilt!
George loves his bag :)
Today I love the..
Smell of: Sweet cinnamon pumpkin candle!
Sound of: Keane
Taste of: Japanese takeout
Sight of: Turning leaves
Feel of: Warm quilt
Good Things about Today:
- Decent luck thrifting today!
- Strawberry banana smoothie :)
- Cleaned my sewing area a bit
- Pumpkins!

Darci of Stitches & Scissors had a lovely giveaway to celebrate the grand opening of her etsy shop and I was the lucky winner! I was able to choose a selection of fabrics to have something made out of! After trolling my favorites, she made me this beautiful scrap bucket! Thank you again Darci! I love it!

Found some vintage sheets today!

Quilting along on my Castle Peeps quilt!

George loves his bag :)

Today I love the..
Smell of: Sweet cinnamon pumpkin candle!
Sound of: Keane
Taste of: Japanese takeout
Sight of: Turning leaves
Feel of: Warm quilt
Good Things about Today:
- Decent luck thrifting today!
- Strawberry banana smoothie :)
- Cleaned my sewing area a bit
- Pumpkins!
Subscribe to:
Posts
(
Atom
)