It was a busy weekend! Managed to sew up two more Mendocino mermaid blocks last night! That makes 13, so I'm over half-way done! I'm excited but also a little sad, I really love working on these! :)
This is probably one of my favorites. I just love the colors in this one!
The brown ones are not quite as easy as the others. It's such a weird color of brown!
Because of all the dust created by ripping sheets, it was essential that I finally have a sewing machine cover. I used this tutorial that I found on Pinterest and some of Erin McMorris's newest line, Summersault. I'm happy with how it turned out, but I think I was a little too generous in my measurements, it's pretty roomy. Oh well, it's cute and does it's job! :)
A great day of thrifting this morning! I'm happy to say this haul is from only 3 stores!
I had forgotten that I finished this set up without snapping a photo! The rest of the pieces were all packed up for the move when I finally found the 502. LOVE this set so much!
We've already made this recipe twice in just a few days. It is SO good. The best pizza dough recipe I've tried and this tastes exactly like the cheesy bread our favorite pizza place made. Now that we've moved away, I thought we'd be without it, but this is just as good if not better!
George has been a little under the weather the last day or so. I mentioned his crazy shedding on Friday, it had gotten even crazier! We kept brushing him, but he ingested a little too much fur and since bunnies can't take care of hair-balls like cats, he was a tad uncomfortable with tummy and potty problems. So we took him to the vet yesterday. I'm happy to say he is doing much better now! He hates getting his medicine, but he is acting just like his old self now, which is such a relief! :)
Today I love the..
Smell of: Warm butter
Sound of: Harry Potter 6 audiobook
Taste of: Cheesy garlic pizza
Sight of: Sunny afternoon
Feel of: George
Good Things about Today:
- Great thrift run this morning!
- George is doing great today!
- Productive morning and afternoon!
- Beautiful weather!

Weekend


Friday, August 26, 2011
Started working on my Mendocino Mermaid quilt again! Made two blocks, block 10 and block 11 yesterday! :)
Also started a new quilt this week, using Wonderland by Momo! Love this line so much! Framing charm squares using honey bun strips!
Stood in line for forever at the post office today, but it was totally worth it because they finally had the Disney PIxar stamps in! Yippee! Aren't they so cute?!
It was a great week of vintage sheet thrifting! These fun new prints are in the shop, with stripe bundles coming back soon!
Finally was able to add charm packs back into the shop! The GO! Baby cutter has been getting a super workout over here! Look out for a big giveaway next week! :)
Look what arrived on my doorstep yesterday!! My sweet flickr friend Sandy surprised me with it! I love, love, love it! So close to finishing up this set! Thanks again Sandy!
George has been great! He is such a little sweetheart. He is shedding like crazy right now! I need to find a bunny brush, hehe.
Hope everyone has a great weekend! Stay safe east-coasters! :)
Today I love the..
Smell of: Fresh laundry
Sound of: Harry Potter 6 audiobook
Taste of: Popcorn
Sight of: Empty inbox!
Feel of: Comfy futon
Good Things about Today:
- Got a lot of shop stuff done today!
- Beautiful sunny day!
- Got emails and messages answered!
- Meeting a childhood friend for dinner tonight! :)

Also started a new quilt this week, using Wonderland by Momo! Love this line so much! Framing charm squares using honey bun strips!

Stood in line for forever at the post office today, but it was totally worth it because they finally had the Disney PIxar stamps in! Yippee! Aren't they so cute?!

It was a great week of vintage sheet thrifting! These fun new prints are in the shop, with stripe bundles coming back soon!

Finally was able to add charm packs back into the shop! The GO! Baby cutter has been getting a super workout over here! Look out for a big giveaway next week! :)

Look what arrived on my doorstep yesterday!! My sweet flickr friend Sandy surprised me with it! I love, love, love it! So close to finishing up this set! Thanks again Sandy!

George has been great! He is such a little sweetheart. He is shedding like crazy right now! I need to find a bunny brush, hehe.

Hope everyone has a great weekend! Stay safe east-coasters! :)
Today I love the..
Smell of: Fresh laundry
Sound of: Harry Potter 6 audiobook
Taste of: Popcorn
Sight of: Empty inbox!
Feel of: Comfy futon
Good Things about Today:
- Got a lot of shop stuff done today!
- Beautiful sunny day!
- Got emails and messages answered!
- Meeting a childhood friend for dinner tonight! :)
Giveaway Winner!
Thank you to everyone who entered the Vintage Pillowcase Laundry Bag Kit Giveaway! I'm glad that so many of you enjoyed the tutorial! :)
Without further ado, Ms. Random.org choose:

#103, which is kristinorth! She said:

I'll be in touch soon!
Without further ado, Ms. Random.org choose:

#103, which is kristinorth! She said:

I'll be in touch soon!

Wednesday, August 24, 2011
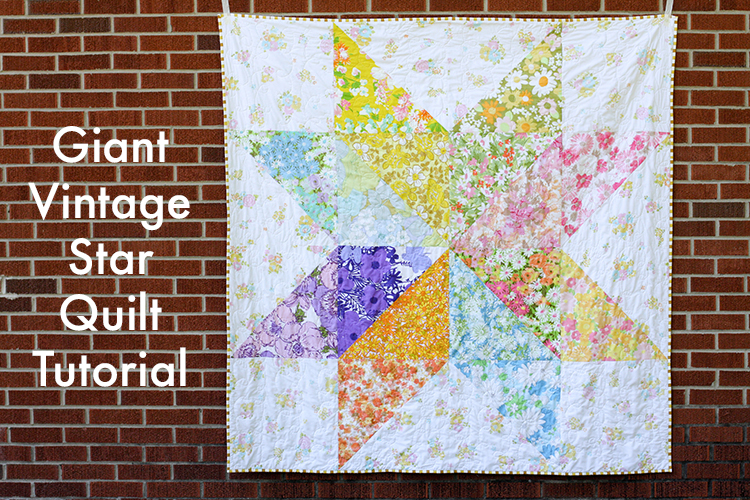
As promised, a tutorial for my Giant Vintage Star Quilt. This quilt takes advantage of a single quilt block, super sized! It takes a traditional block, the Starflower block, and makes for a very modern quilt. Perfect for beginner and advanced quilters alike. For more on my process and the inspiration behind this quilt, see this post: Giant Vintage Star Quilt.

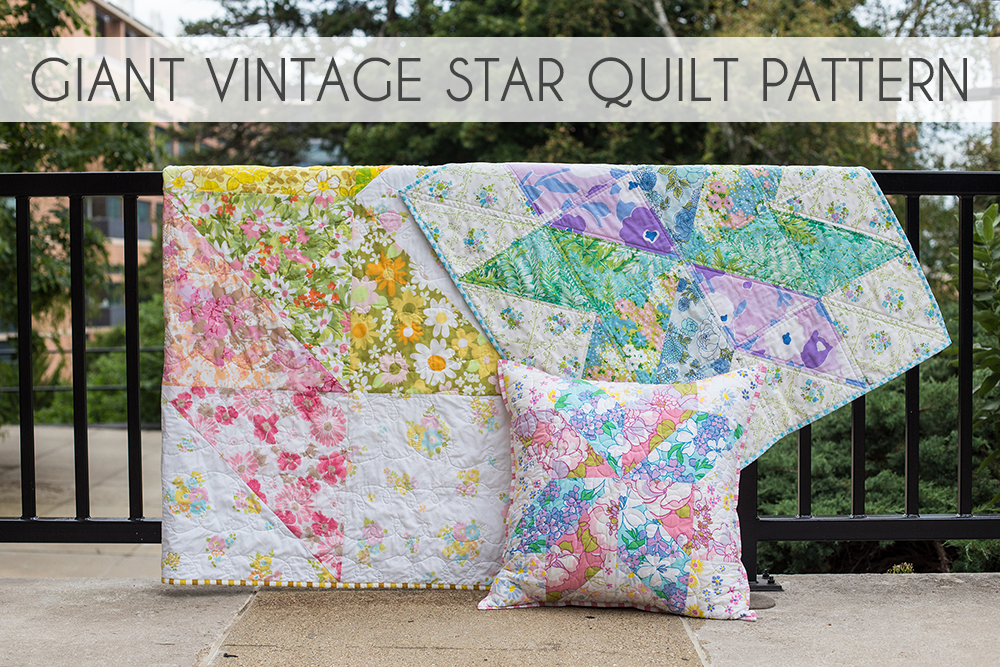
If you'd rather have this tutorial in downloadable/printed form, check out the Giant Vintage Star Quilt Pattern. It features a throw quilt (same size as this tutorial!), baby quilt, and quilted pillow. The yardage for all the different color combinations is broken down to make it easy to customize your quilt!
Find the pattern in my online shop here: Giant Vintage Star Quilt Pattern.
Fabric Shops: If you'd like to teach classes on this design, I ask that you order paper copies of my pattern for each student. You can order patterns wholesale through this form. Please refrain from teaching directly from this tutorial, thanks!
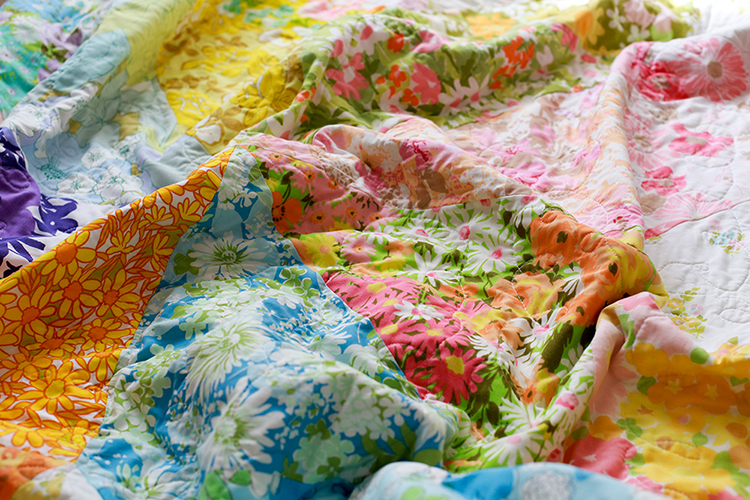
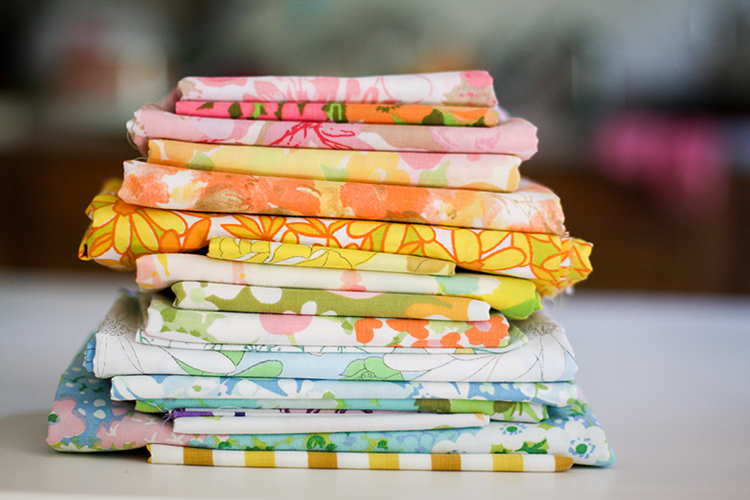
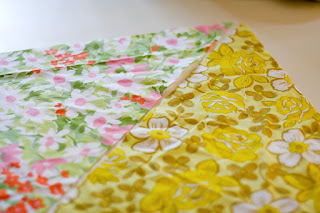
I made my quilt entirely from vintage sheets, but you can use any fabric you'd like to make your quilt! There are lots of shops that sell vintage sheet fat quarters* on Etsy, if you want to make one just like mine! If you'd like to learn more about working with vintage sheets, check out my post: How to Identify, Shop for and Sew with Vintage Sheets
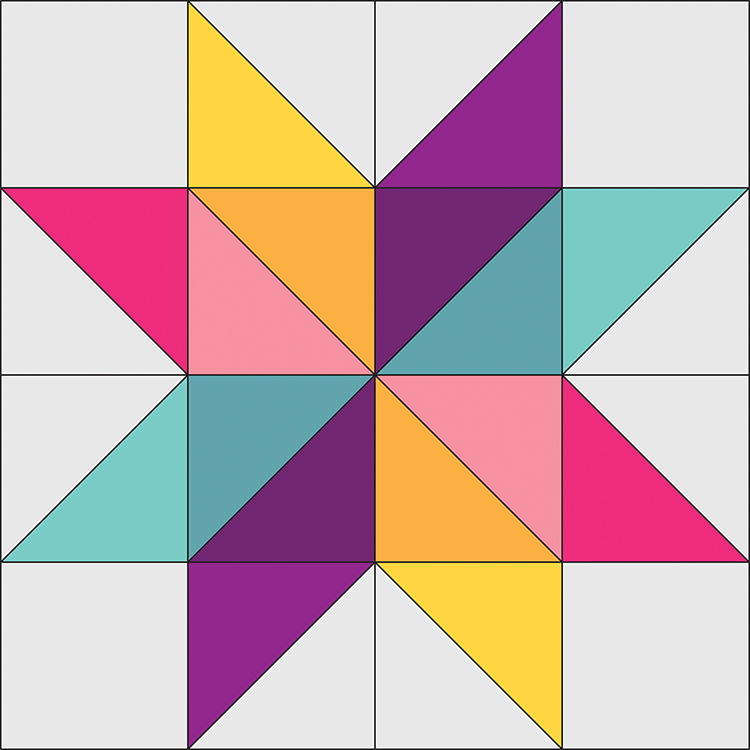
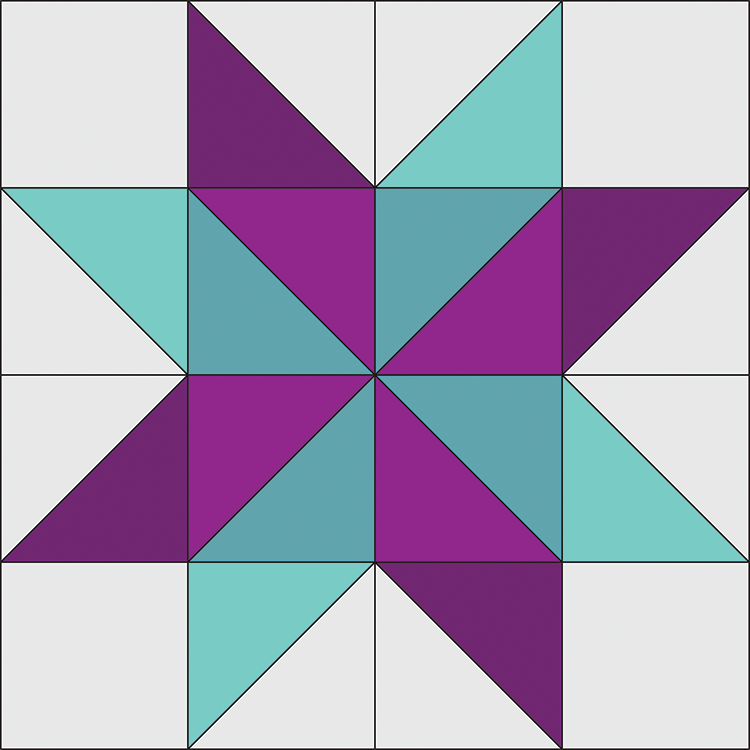
First, you need to decide what kind of color layout you'd like! You may choose to use as few as two colors or as many as eight. You could also use as few as two fabrics or as many as sixteen! I've drawn out a few options here as examples:

This is the layout I used, 8 different colors using 16 different fabrics.
A little less busy, 4 different colors.
And finally, just 2 colors.
However many colors you decide on, you also need to decide on how many fabrics to use. The traditional starflower block uses a single fabric for each 'petal'. In my quilt I used one color in each petal but two different fabrics. You may choose to do whatever you'd like for your quilt!
Sewing Level: Beginner Friendly
Finished Quilt Size: 68"x68"
Finished Block Size: 17" square
Giant Vintage Star Quilt Materials:
- 8 fat quarters (minimum, use up to 16)
- 2 yards of background fabric
- 76"x76" piece of quilt batting
- 4 1/4 yards of backing fabric (or a Twin bedsheet)
- 1/2 yard of binding fabric
Giant Vintage Star Quilt Cutting:
From each print fat quarter:
- Cut (1) 18" square
From background fabric:
- Cut (4) 18" squares and (4) 17.5" squares
Giant Vintage Star Quilt Instructions:
Use a 1/4" seam allowance unless otherwise noted.
1. Before cutting, you'll want to decide how much variety you want and what kind of color scheme you'd like. That will determine how much fabric you need and how you'll construct your quilt. If you don't mind prints repeating in your quilt, you can use 8 fat quarters. If you don't want any repeats and want more variety like mine, you will need 16 fat quarters, but you'll only be using half of each fat quarter, or you can make two matching quilts.
TIP: It can be helpful when working with large pieces to use spray starch or a starch alternative like Flatter by Soak* to help keep those long seams from getting stretched out. Spray before cutting.
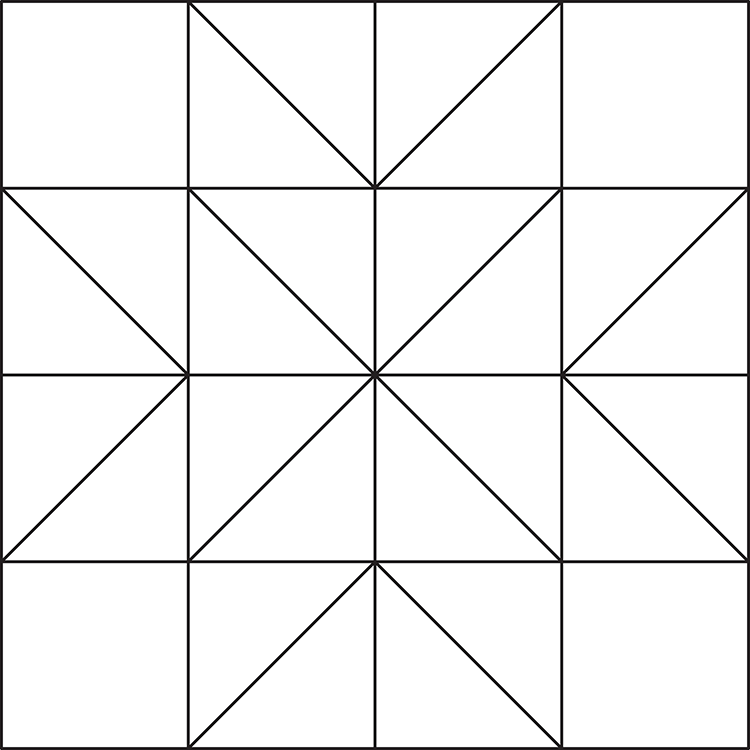
2. Think about how you want to lay out your colors. This will determine which prints you pair up together. I've included this blank quilt diagram that you can print and color in your layout if you'd like!
3a. If you're using 4 or 2 colors AND 8 fat quarters, you'll be constructing your blocks using the traditional half-square triangle (HST) method. You need a total of 8 print + background HSTs and 4 print + print HSTs. So, create 2 pairs of print + print squares, and 4 pairs of print + background squares. You can use my Half-Square Triangle Tutorial if you need help with that!
3b. If you're using 8 colors AND/OR 16 fat quarters, you'll be putting together your half-square triangles a different way. You need to cut your print squares and 18" background squares in half across the diagonal.* You'll end up with a total of 32 print triangles and 8 background triangles. Take half of your print triangles and set them aside for another project, you won't be needing them to create this quilt top. Now, pair up 8 print triangles with your 8 background triangles. Take the remaining 8 print triangles and pair them up with each other. Sew each pair of triangles together to create 12 half-square triangles.
To make that diagonal cut, I temporarily taped a 24" ruler and a 6" ruler end to end with masking tape!
4. Once your half-square triangles are finished and pressed, they may need trimming down to 17.5"
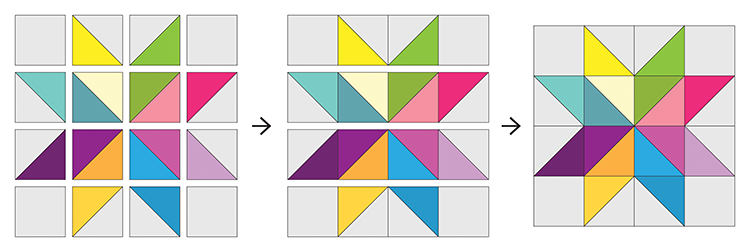
5. Lay out your blocks, arranging your half-square triangle blocks like the diagram above to create the starflower petal shapes. Use the 17.5" background squares in the corners. Sew blocks together in each row. Press seams in one direction, alternating direction every other row. Sew rows together. Press seams open.
6. Making Backing: Cut backing yardage in half. Press. Trim off the selvedge and sew your pieces together lengthwise. Press seam open.
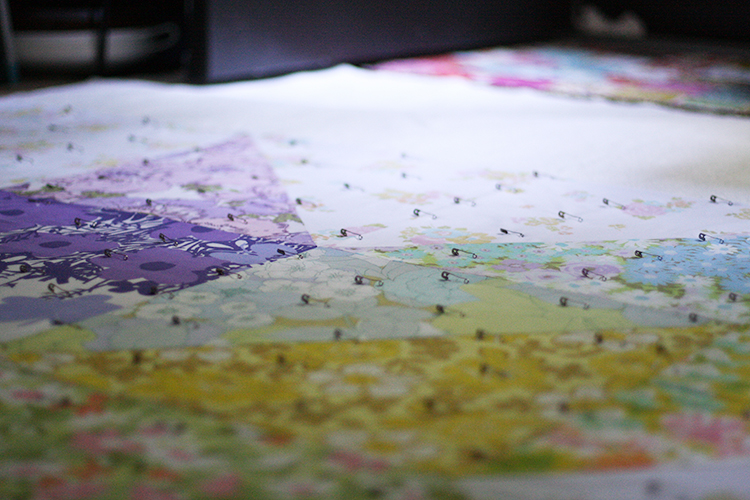
7. Basting: Using masking or painter’s tape, tape the backing to a clean, hard surface, right side down. Spread out your batting on top of the backing. Smooth out any wrinkles. Carefully spread out your quilt top on top of the batting, right side up. Pin your top, I like to use curved safety pins, spacing the pins a few inches apart. Make sure that your pins are going through all three layers.
8. Quilting: Quilt as desired, by machine or by hand. Trim away excess batting and backing fabric.
9. Binding: Cut yardage listed for binding into 2.5” strips. Trim off selvedges and sew your strips together to form one long strip, press seams open. Fold in half lengthwise, pressing with your iron as you fold. Attach binding using your preferred method. For a detailed tutorial on attaching your binding to both sides by machine: Machine Quilt Binding Tutorial.
I hope you've enjoyed this tutorial! I have lots of other tutorials for everything from quilts, pillows, bags, and holiday items to informational series and techniques. Find all my tutorials here: Tutorials. My online shop is filled with patterns for quilts and bags. Find my patterns here: Jeni Baker Patterns
If you make something using one of my tutorials or patterns, I hope you'll tag me @jenib320 and use my hashtag #jenibaker on instagram!

Liberty Lawn Giant Vintage Star Quilt
Looking to experiment more with super sized blocks? Check out the Vast quilt from my book, Patchwork Essentials: The Half-Square Triangle.
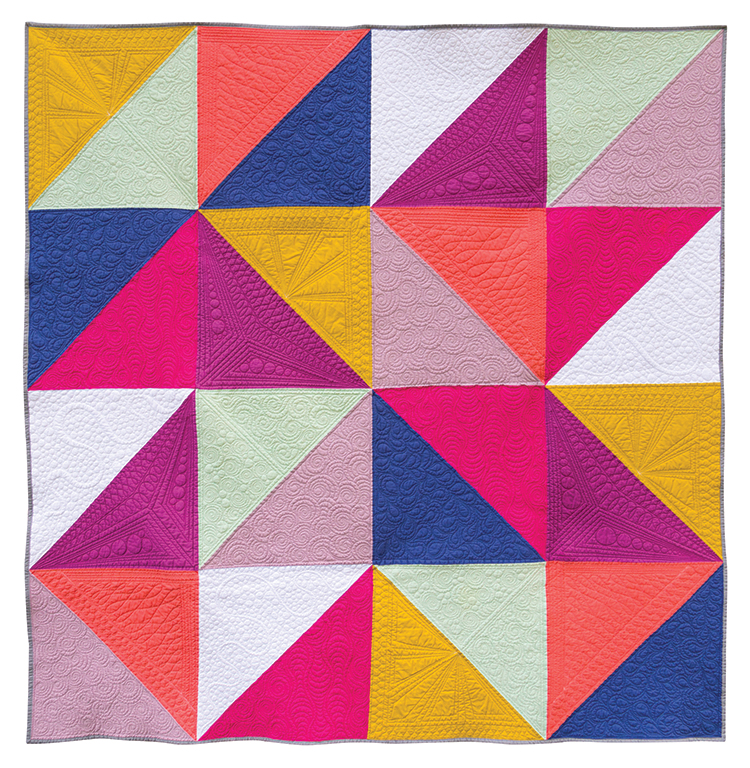
Photo © 2015 Lauren Hunt for Lucky Spool Media.
Happy Quilting!
*Note: Any links marked with an asterisk in this post are affiliate links. This means if you click through and buy something, I make a small commission, at no extra cost to you.
Monday, August 22, 2011
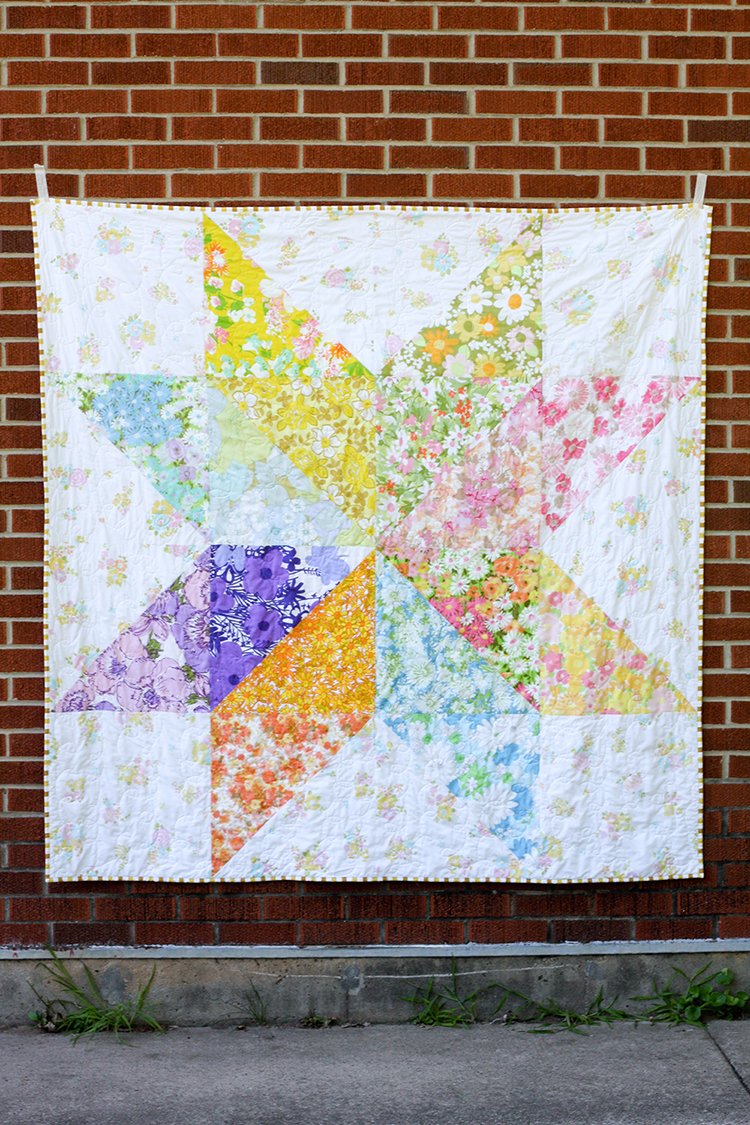
This was one of the quickest quilts I've ever made. Saturday night, I was poking around on Pinterest and was led to this article featuring these two barn quilts, located in Adams County, Ohio. I first read about barn quilts on Ryan Walsh's blog, I'm Just a Guy Who Quilts, when he featured a barn quilt calendar. I had seen one before in Holmes County, Ohio, but hadn't thought much about it. I was immediately inspired by this take on a barn quilt, and started thinking about translating the concept into a quilt.
Make your own: Giant Vintage Star Quilt Tutorial
This quilt is made up of one giant quilt block. The block is generally known as the Starflower block. It's a block I was already familiar with and fond of. I didn't hesitate and dug right into my vintage sheet stash. I thought at first I might go the same route as the barn quilts and go with a monochromatic color scheme, but I ended up choosing a rainbow of colors instead!
If you'd like to learn more about working with vintage sheets, check out my post: How to Identify, Shop for and Sew with Vintage Sheets
The top came together really quickly and rounds off at 68" square. I backed it in one of my favorite vintage sheets.
It's quilted with free motion doodle loops, which is the most natural quilting pattern for me. I would love to start branching out and trying other patterns on perhaps some smaller projects though!
I grabbed a striped sheet for the binding to finish it! I almost had another sob story like the mishap with my Sherbet Pips quilt, but it resolved itself nicely. I accidentally got stabbed by a pin while basting and unknowingly got blood all over the quilt top. Thanks to Oxiclean, it all came out!
Want to make your own? I've written up a tutorial, you can find it here.
Doesn't it look pretty with my Sparkling Cider Quilt?
Happy Quilting!

Make your own: Giant Vintage Star Quilt Tutorial
This quilt is made up of one giant quilt block. The block is generally known as the Starflower block. It's a block I was already familiar with and fond of. I didn't hesitate and dug right into my vintage sheet stash. I thought at first I might go the same route as the barn quilts and go with a monochromatic color scheme, but I ended up choosing a rainbow of colors instead!

If you'd like to learn more about working with vintage sheets, check out my post: How to Identify, Shop for and Sew with Vintage Sheets
The top came together really quickly and rounds off at 68" square. I backed it in one of my favorite vintage sheets.

It's quilted with free motion doodle loops, which is the most natural quilting pattern for me. I would love to start branching out and trying other patterns on perhaps some smaller projects though!

I grabbed a striped sheet for the binding to finish it! I almost had another sob story like the mishap with my Sherbet Pips quilt, but it resolved itself nicely. I accidentally got stabbed by a pin while basting and unknowingly got blood all over the quilt top. Thanks to Oxiclean, it all came out!

Want to make your own? I've written up a tutorial, you can find it here.

Doesn't it look pretty with my Sparkling Cider Quilt?

Happy Quilting!
Sunday, August 21, 2011
Today I'm sharing a super quick and easy drawstring laundry bag tutorial! Perfect for storing your dirty laundry while you're traveling. This tutorial uses a vintage (or new) pillowcase, so most of the work is already done for you. This can be tackled by sewers of all levels, even beginners. You could make it even easier by using ribbon or string, but I think the handmade "string" we'll be making adds a nice touch.
Sewing Level: Beginner Friendly
Materials:
- 1 pillowcase
- 1/8 yard of coordinating fabric or 1 1/4 yards twill ribbon
- Thread
- Marking pen
- Safety pin
If you'd like to learn more about working with vintage sheets, check out my post: How to Identify, Shop for and Sew with Vintage Sheets.
Instructions:
*Use a 1/4” seam allowance unless otherwise noted*
If using ribbon instead of handmade drawstring, skip to step 6.
1. Cut (1) 2.5" x WOF from coordinating fabric.
2. On each short end, fold over 1/2" and press.
3. Fold entire strip in half lengthwise, pressing as you go.
4. Unfold strip and fold both edges into the center fold line you just created, press.
5. Fold in half lengthwise and press. Topstitch along the open edge, stitching close to the edge. Backstitch at start and end.
6. Grab your pillowcase, and find the seam on the hem.
7. Measure your hem (mine was 3.5"), divide that number in half, this is your center. Mark a line .5" on either side of the center, giving yourself a 1" wide space.
8. Using your seam ripper, carefully rip the stitches between the two lines.
9. Depending on the seam allowance used by the pillow's manufacturer, you may need to flip under the seam allowance to create a clear opening. Use a pencil or turner (fancy word for a clean chopstick) to help. Pin in place if need be.
10. Extend your marked opening lines around the entire pillowcase. Use the top of the hem as a guide, using your cutting ruler and your marking tool of choice.
11. Sew on the line all the way along, backstitching at the start and end. Repeat on the second line.
12. Attach a safety pin to one end of your handmade "string". Insert the safety pin into the opening you created.
13. Wiggle it through all the way around to the opening.
14. Even out your ends and tie together in a tight knot close to the ends.
Voila, you're done!
Happy Sewing!

Sewing Level: Beginner Friendly


Materials:
- 1 pillowcase
- 1/8 yard of coordinating fabric or 1 1/4 yards twill ribbon
- Thread
- Marking pen
- Safety pin
If you'd like to learn more about working with vintage sheets, check out my post: How to Identify, Shop for and Sew with Vintage Sheets.
Instructions:

*Use a 1/4” seam allowance unless otherwise noted*
If using ribbon instead of handmade drawstring, skip to step 6.
1. Cut (1) 2.5" x WOF from coordinating fabric.
2. On each short end, fold over 1/2" and press.

3. Fold entire strip in half lengthwise, pressing as you go.

4. Unfold strip and fold both edges into the center fold line you just created, press.

5. Fold in half lengthwise and press. Topstitch along the open edge, stitching close to the edge. Backstitch at start and end.

6. Grab your pillowcase, and find the seam on the hem.

7. Measure your hem (mine was 3.5"), divide that number in half, this is your center. Mark a line .5" on either side of the center, giving yourself a 1" wide space.

8. Using your seam ripper, carefully rip the stitches between the two lines.

9. Depending on the seam allowance used by the pillow's manufacturer, you may need to flip under the seam allowance to create a clear opening. Use a pencil or turner (fancy word for a clean chopstick) to help. Pin in place if need be.


10. Extend your marked opening lines around the entire pillowcase. Use the top of the hem as a guide, using your cutting ruler and your marking tool of choice.

11. Sew on the line all the way along, backstitching at the start and end. Repeat on the second line.

12. Attach a safety pin to one end of your handmade "string". Insert the safety pin into the opening you created.

13. Wiggle it through all the way around to the opening.

14. Even out your ends and tie together in a tight knot close to the ends.

Voila, you're done!

Happy Sewing!
Subscribe to:
Posts
(
Atom
)