1. An Autumn Herringbone Quilt // Maureen Cracknell Handmade, 2. www.flickr.com/photos/83530863@N08/9903639713/in/faves-je..., 3. cross quilt, 4. Don's Star finished, 5. FO: xPlus, 6. ☆Tessellation - Estrelas, curvas, triangulos e hexágonos, 7. A finished top, 8. As promised, my finished quilt top! This one was all for me from the start, and I love it! The uneven edges will get trimmed after quilting. I'm thinking straight line quilting on the diagonal following the triangles., 9. 36 Hearts Pillow
Every week I go through my favorite photos on Flickr, and choose nine sewing/quilting related projects to showcase here. These photos and projects are not my own, you can find the original images and creators by clicking the coordinating links! If for any reason you do not want your project featured here, please email me and I'll remove it!
Happy Friday!

Favorites

Wednesday, September 25, 2013

Today I want to talk about how I tackle a big creative project! Diane of CraftyPod invited me to share my experience preparing for a large event like Quilt Market as a part of a blog hop, Tackling the Big Project. Make sure and check out Diane's post as well as posts from Lisa, Liz, Martine, and Wendi.
I wish there was a magic formula I could give you that says do this and this to get X result. If only it were that easy. Tackling a big project, whether it be outfitting a trade show booth, writing a book or even designing a quilt from start to finish, it can at first seem overwhelming. Everyone approaches projects, large or small, in different ways, but there are a few things that have helped me power through a big project, especially with sewing for this past Quilt Market!

1. Plan, plan, plan
I am a huge planner. I love the problem solving aspect of figuring out what projects to make, how to make them, and then actually seeing them through from start to finish. Quilt Market adds it's own set of challenges, primarily limited time and limited resources. I received my first fat quarters of fabric approximately a month and a half before Quilt Market, and was unsure of how much I'd have to work with in the end. Having to plan without knowing how much fabric I'd have was really hard. It requires a plan, a back-up plan, and then another back-up plan! Thankfully I planned enough projects, so when I received 2 yards of my fabrics a little over a week before the event, I was able to scramble and get a lot of projects done. Always plan more than you think you'll need!

2. Create a schedule
I'll be the first to admit I didn't do a very good job at this. To be honest, I worked on little else during the month and a half leading up to Quilt Market. It was unhealthy and left me feeling burned out when it was all over. As I'm gearing up to sew for this Fall's Quilt Market I'm trying to set certain hours of the day for project sewing, leaving time for regular everyday tasks and things that can't be pushed aside like pattern writing and blogging. It can be hard to find a good routine working from home. It's far too easy (and sometimes necessary) to work too many hours a day and wear yourself out. Set boundaries for yourself and know when it's okay to break them.

3. Take it one day at a time
This is the number one thing that helped me continue to sew for hours on end each day leading up to Quilt Market. I set a goal for each day, along with mini goals throughout the day to keep me motivated. When you have such a large project, there isn't a lot of instant gratification, so create some using small goals. It keeps you motivated and also makes the project feel more manageable. I would often set chocolate goals. "If I get all of these blocks pieced, I can have a piece of chocolate." Or, "If I cut out the rest of this project, I can hop on Pinterest for a few minutes." Creating rewards for getting things done not only helped me get more done, but it helped me save time.

4. Don't cut corners
When it comes down to it, try to find shortcuts to make your life easier, but don't cut corners. Use quality materials and tools. Do things the right way, even if it takes a little longer. I rushed on basting the last quilt for my booth and I ended up with huge puckers on the back. I ended up having to unpick most of the quilting (which took about 5 hours), re-baste part of it and then re-quilt it! If I had taken a little extra time in the beginning and basted it correctly I could have save myself loads of time! 20 minutes versus 6-7 hours, I think we all know which is the best choice!

5. Be reasonable
So many of these things I learned as I was going through the process of preparing for Quilt Market, rather than before I started. It's hard to know what is going to work until you've tried it. This is my biggest piece of advice. Be reasonable about what you can do given your limitations. As I mentioned, for me those limitations were time and resources. There were a few projects I tried to tackle that were unreasonable given the time I had.

For example, I spent nearly 5 full days last Spring trying to make a braided rug from scratch. It took forever to tear the bedsheets I'd chosen into strips, braid all of the strips and then sew them together into the rug. In the end, it was a total and absolute failure! I sewed it on the machine and it didn't turn out flat. The silly thing was, it was purely a decoration. It wouldn't have helped me promote my products any better. It should have been insignificant on my priority list and instead I wasted 5 days on it. This time around, I'm really thinking about each possible project and evaluating whether it is a good use of my time. Bounce your ideas off of friends or family if you can. They are often the voice of reason!
I felt a real sense of accomplishment when I put the finishing touches on my booth and stepped back to admire all of my hard work. It was a huge undertaking, but it all came together in the end. I didn't take very good care of myself while I was working, and now that I'm about to do it all again, I'm being more thoughtful about how I'm approaching it. At the end of the day, big projects demand that you make sacrifices. Make sure it's worth it! :)


Monday, September 23, 2013

Happy Monday! I'm popping in quickly today after a weekend of traveling and attending Sewing Summit to share some fun news for you!
You may remember the two seasonal issues of the UK magazine, Love, Quilting & Patchwork! I had the honor of having projects/features in both issues! The issues are stuffed full of great projects, information and lots of eye candy. Because of their success, they are going to start running as a monthly magazine!

The brand new Love, Patchwork & Quilting (little name swap there!) is brought to you by the same folks as Mollie Makes! This magazine is for anyone who loves modern quilting, whether you’re already an avid fan or someone who wants to learn. With every issue you’ll receive a FREE gift to spark your creativity before you even look inside. I'm thrilled to continue to work with their lovely staff on this first issue and beyond. I can't wait to share more when this issue is released!
The first issue of Love, Patchwork & Quilting goes on sale October 16th, but you can pre-order your copy now. (For US subscribers it works out to about $8 per issue!) If you order by September 27th, your subscription will start with the first issue! There are special offers for UK and US subscribers. For UK subscribers, get 3 issues for £5, click here. For US subscribers, get 3 issues for $10, click here.
PS - They're also running an awesome giveaway on their facebook page, so head over and enter to win some Nordika, Legacy, Tule, or Reminisce fabric! :)
Friday, September 20, 2013

1. Bringing it Together, 2. another 22 blocks to go..., 3. pillow improv curves, 4. Plus Quilt Back, 5. R & R Quilt Blocks, 6. Soon to be a laptop sleeve., 7. Jenny's Quilt, 8. Parisville Scrapbuster, 9. Convergence Quilt
Every week I go through my favorite photos on Flickr, and choose nine sewing/quilting related projects to showcase here. These photos and projects are not my own, you can find the original images and creators by clicking the coordinating links! If for any reason you do not want your project featured here, please email me and I'll remove it!
Happy Friday!
Wednesday, September 18, 2013
Hi there! Coming at you today from the Minneapolis Airport! I didn't manage to find time last night between laundry, packing and a fun trip to eat wings with Michael. It was really nice to sit down for a bit before leaving for Sewing Summit this morning! I've started a new project to keep me busy during my layover and flights. I've got a great set of favorites scheduled for Friday, otherwise I won't be back to chat until next week!
I'm not about to leave you with nothing though! How about a little sneak peek of my new collection Dreamin' Vintage, that will be debuting next month! The first round of strikeoffs arrived last week and I'm smitten. I can't wait to share it with you!
My sweet friend Frances sent over some super cool vintage quilt blocks and fabrics for me! I'm excited to find time to play with these, I'm thinking I'll make a few more blocks to go with it!
I've been knitting away in the evenings lately! I finished Michael's hat and I finally finished my Honey cowl (hooray!).
Of course, George bun! He is loving his new basket!
Today I love the..
Smell of: New soap
Sound of: Keane
Taste of: Diet Coke
Sight of: George
Feel of: Comfy clothes
Good Things about Today:
- Landing in Salt Lake City today!
- Waffles that will be eating later!
- Airport had my favorite snack!
- Getting pictures of George from home already!

I'm not about to leave you with nothing though! How about a little sneak peek of my new collection Dreamin' Vintage, that will be debuting next month! The first round of strikeoffs arrived last week and I'm smitten. I can't wait to share it with you!

My sweet friend Frances sent over some super cool vintage quilt blocks and fabrics for me! I'm excited to find time to play with these, I'm thinking I'll make a few more blocks to go with it!

I've been knitting away in the evenings lately! I finished Michael's hat and I finally finished my Honey cowl (hooray!).


Of course, George bun! He is loving his new basket!

Today I love the..
Smell of: New soap
Sound of: Keane
Taste of: Diet Coke
Sight of: George
Feel of: Comfy clothes
Good Things about Today:
- Landing in Salt Lake City today!
- Waffles that will be eating later!
- Airport had my favorite snack!
- Getting pictures of George from home already!
Sunday, September 15, 2013
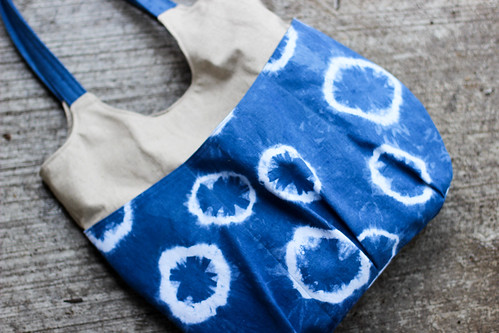
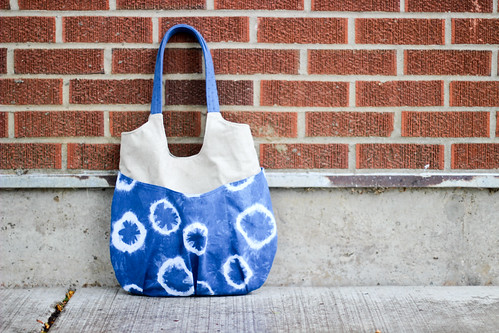
I've been thinking for a while now about making myself a new purse. Of all the bags I've made for myself, I get the most use out of this one, which was made using Anna Graham's Go Anywhere Bag Pattern. It's simply the perfect size for me. I can keep my sunglasses, phone, and keys in the outer pockets, so I always know where they are. It fits a lot but it's still pretty low-profile. After a year and a half of heavy use, my first bag is looking a little worn.
The last few days I've been wishing I had time to make a new purse in time to take with me to Sewing Summit this week. So, last night I decided to just go ahead and make one! Since I've already made this pattern, I managed to cut, interface and stitch up the entire bag in one night. I absolutely love it!
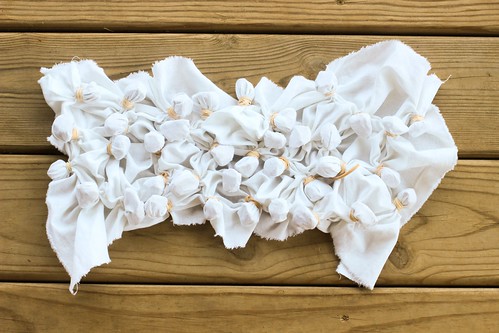
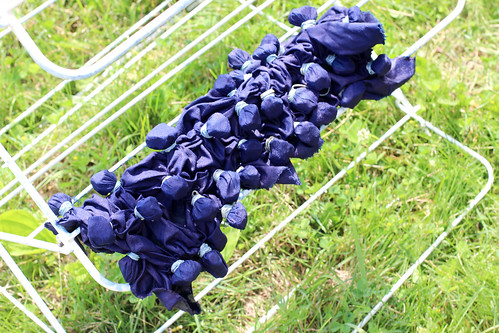
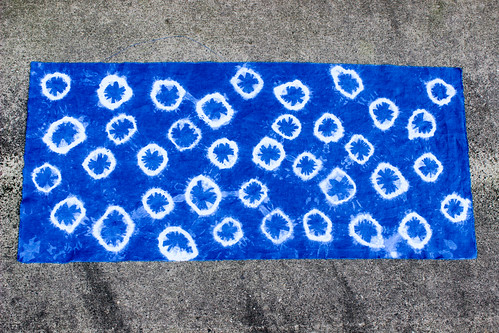
I decided to use my very favorite piece of cotton/linen that I dyed this summer with indigo using a resist technique. It was created using small stones and rubber bands. I had originally planned to use it in a garment, but I figured I would get a lot more use out of it in a purse.
For more information on indigo dyeing, check out my Indigo Dyeing Tutorial.
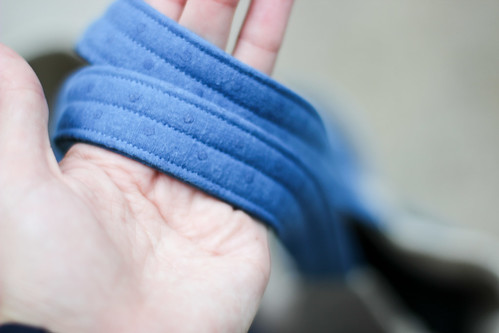
I paired the indigo piece with plain cotton/linen for the body and lining. For the handles I used a cotton dot that I also dyed with indigo. I love how simple it is, I think it really lets the dyed print shine.
I did my handles a little differently, since on my first bag the handles got thin from wear. I used 4" wide pieces, folded the edges in and then in half again. I also used SF101 and Fusible Fleece interfacing, so they're super sturdy! I am really hard on my bags, and I want this one to last a long time!
For the rest of the bag, I used SF101 on the exterior and pocket pieces.
I really love how this bag turned out, and I'm glad I gave myself the night off to make it. I haven't felt that fired up to make something for a while, and I needed it. I'm excited to start using it! If you're on the lookout for a great bag pattern, definitely stitch this one up. It's my very favorite purse pattern! Comes together really easily, lots of opportunities to customize it, and it turns out so cute!
You can find the Go Anywhere Pattern on Anna's blog, here.
The last few days I've been wishing I had time to make a new purse in time to take with me to Sewing Summit this week. So, last night I decided to just go ahead and make one! Since I've already made this pattern, I managed to cut, interface and stitch up the entire bag in one night. I absolutely love it!
I decided to use my very favorite piece of cotton/linen that I dyed this summer with indigo using a resist technique. It was created using small stones and rubber bands. I had originally planned to use it in a garment, but I figured I would get a lot more use out of it in a purse.
For more information on indigo dyeing, check out my Indigo Dyeing Tutorial.
I paired the indigo piece with plain cotton/linen for the body and lining. For the handles I used a cotton dot that I also dyed with indigo. I love how simple it is, I think it really lets the dyed print shine.

I did my handles a little differently, since on my first bag the handles got thin from wear. I used 4" wide pieces, folded the edges in and then in half again. I also used SF101 and Fusible Fleece interfacing, so they're super sturdy! I am really hard on my bags, and I want this one to last a long time!
For the rest of the bag, I used SF101 on the exterior and pocket pieces.
I really love how this bag turned out, and I'm glad I gave myself the night off to make it. I haven't felt that fired up to make something for a while, and I needed it. I'm excited to start using it! If you're on the lookout for a great bag pattern, definitely stitch this one up. It's my very favorite purse pattern! Comes together really easily, lots of opportunities to customize it, and it turns out so cute!
You can find the Go Anywhere Pattern on Anna's blog, here.
Friday, September 13, 2013
1. high-volume 3/4 log cabin, 2. Buzz Saw Quilt, 3. pinwheel quilt in coral red, 4. DSC_0504s, 5. scrappy trip along quilt (11), 6. Neutral with a Blast of Stripes, 7. Quiet improv quilt, 8. psychedelic half square triangle top, 9. Pixelated Houndstooth Quilt
Every week I go through my favorite photos on Flickr, and choose nine sewing/quilting related projects to showcase here. These photos and projects are not my own, you can find the original images and creators by clicking the coordinating links! If for any reason you do not want your project featured here, please email me and I'll remove it!
Happy Friday!
Monday, September 9, 2013

Happy Monday! I have a fun tutorial using Nordika to share with you today! I sketched up this design when I was planning booth projects early in the year. I ran out of time to make it then, but knew it would still be a great project to show off the prints!

I like to think of these as a companion project to my modern plus quilt pattern, Arithmetic! It looks awesome sewn up in Nordika, so continuing the plus theme made sense! A little solid helps break things up a bit. I used Pure Elements in Moonstone and Ash. They're quilted with two of my favorite Aurifil 50wt threads, #2600 and #2605. These pillows come together simply, but pack a big punch!

Sewing Level: Intermediate
Materials:
- 2" strip of 10 print fabrics
- 1/8 yard solid fabric
- 1/3 yard of pillow backing fabric
- 1/2 yard of muslin
- 20"x20" piece of cotton batting
- 16" pillow form
- Coordinating thread
Finished Size: 16" square
Width of Fabric (WOF) = 42" assumed
Note: Materials are for one pillow.

Cutting:
From 7 print fabrics:
- Cut (1) 2"xWOF strip
- Subcut strip into (3) 2" squares and (1) 2"x5" rectangle
From 3 print fabrics:
- Cut (1) 2"xWOF strip
- Subcut strip into (4) 2" squares and (2) 2"x5" rectangle
From print fabric scraps:
- Cut (1) 2" square
From solid fabric:
- Cut (3) 2"xWOF strips
- Subcut 2 strips into (21) 2" squares
- Subcut remaining strip into (6) 2" squares
From muslin fabric:
- Cut (1) 20" square
From pillow backing fabric:
- Cut (1) 11.5"xWOF strip
- Subcut into (2) 16.5"x11.5" rectangles

Instructions:
*Use a 1/4" seam allowance unless otherwise noted.*
1. Arrange print squares and rectangles to form 13 plus shapes using the illustration as a guide.
2. Fill in with solid squares and remaining print squares. You'll have 11 rows: 6 rows of print squares and solid squares, and 5 rows of print rectangles and solid squares.
3. Sew pieces together in each row, press seams in one direction, alternating directions every other row.
4. Sew rows together, press seams in one direction.
5. Baste with batting and muslin. Quilt as desired. Trim to 16.5" square.

6. Create envelope backing using the two 11.5"x16.5" rectangles. Take one rectangle and turn the long edge down 1/2" towards the wrong side, press. Turn down again 1/2", press. Topstitch closed. Repeat with remaining rectangle.

7. Pin one backing piece right sides together with the front of the pillow top, lining up the raw edges with the sides and bottom of the pillow top. Pin the remaining piece to the top of the pillow top, overlapping the first.

8. Stitch around the pillow top, securing the backing in place. Finish seams with a zig-zag stitch or serger. Turn and press.

Voila, you're done! Enjoy your pretty new pillow!

I hope you've enjoyed this tutorial! I've loved seeing all the wonderful things you've been making with Nordika! As always, if you make something from my tutorials, patterns or with my fabric, I'd love for you to add it to the In Color Order Flickr Group!
Happy Sewing!
Sunday, September 8, 2013
I have such a backlog of things to share that every time I think about blogging I can't decide what to share. Thought today I should just go ahead and choose a few things. Lately I'm finding time for instagram (I'm @jenib320), but not much else in terms of sharing. Hoping to get back on track for September.
I'll have a fun tutorial using Nordika to share with you tomorrow afternoon, seen above!
A couple weeks ago I whipped up some pouches to hold my knitting projects using Anna's open-wide zippered pouch tutorial! I made one large and one medium using Nordika and some leftover pure element triangles. They're a great instant gratification project. And they turn out so cute!
Stitched up one of the projects for my Equilateral Triangle Class at Sewing Summit, a throw quilt. I used Sarah Watson's Luxe in Bloom and rounded it out with some oval elements and a few other blenders. I love the way it turned out!
I've been working on two knitting projects at the moment, it's nice to switch between the two depending on my mood (or sleepiness). This one is a hat for Michael. I'm hoping to finish it before it gets too cold. The other is another cowl for me!
The Fall issue of Love, Quilting & Patchwork has hit newsstands (Barnes & Noble and JoAnn) here in the U.S.! You can find an interview with me about my experience having a booth at International Quilt Market this past Spring! Make sure and check it out, there are a lot of cute projects in this issue! You can also order copies online, here.
I went out for some thrifting on Monday for the first time in a while. I didn't have much luck but I did find a teal vintage lotus bowl for my collection! Now I just need a red one. I had one, but I broke it, blurg!
George!
Today I love the..
Smell of: Grilling
Sound of: Sons of Anarchy
Taste of: Hummus
Sight of: Sunshine
Feel of: Relaxing
Good Things about Today:
- Got a few things done
- Relaxing day with Michael
- Made it to the sewing machine
- Cool enough for a quilt

I'll have a fun tutorial using Nordika to share with you tomorrow afternoon, seen above!
A couple weeks ago I whipped up some pouches to hold my knitting projects using Anna's open-wide zippered pouch tutorial! I made one large and one medium using Nordika and some leftover pure element triangles. They're a great instant gratification project. And they turn out so cute!


Stitched up one of the projects for my Equilateral Triangle Class at Sewing Summit, a throw quilt. I used Sarah Watson's Luxe in Bloom and rounded it out with some oval elements and a few other blenders. I love the way it turned out!


I've been working on two knitting projects at the moment, it's nice to switch between the two depending on my mood (or sleepiness). This one is a hat for Michael. I'm hoping to finish it before it gets too cold. The other is another cowl for me!

The Fall issue of Love, Quilting & Patchwork has hit newsstands (Barnes & Noble and JoAnn) here in the U.S.! You can find an interview with me about my experience having a booth at International Quilt Market this past Spring! Make sure and check it out, there are a lot of cute projects in this issue! You can also order copies online, here.


I went out for some thrifting on Monday for the first time in a while. I didn't have much luck but I did find a teal vintage lotus bowl for my collection! Now I just need a red one. I had one, but I broke it, blurg!

George!

Today I love the..
Smell of: Grilling
Sound of: Sons of Anarchy
Taste of: Hummus
Sight of: Sunshine
Feel of: Relaxing
Good Things about Today:
- Got a few things done
- Relaxing day with Michael
- Made it to the sewing machine
- Cool enough for a quilt
Friday, September 6, 2013
1. Shoot for the Stars Pillow, 2. Supernova Quilt, 3. A Butterfly Quilt, 4. xPlus Top, 5. Quilt top, 6. Mini Scrappy Drunkard's Path Quilt, 7. Rainbow Medallion, 8. X- Factor Pillow "Spring", 9. Pinky Pop
Since I missed last Friday's favorites post, how about some favorites from the In Color Order Flickr Group! So fun seeing all the awesome stuff you guys make!
1. Lined drawstring bag, 2. HST quilt feather quilting, 3. Sparkle Quilt in Timber & Leaf, 4. Mitten to Apple: Coral+Turquoise 1, 5. Tiny Lined Drawstring Bags, 6. Floral Chevron (In Color Order's Patchwork Chevron), 7. "Four Blocks", 8. HST zipper pouch & key fob, 9. Wonky Star
Every week I go through my favorite photos on Flickr, and choose nine sewing/quilting related projects to showcase here. These photos and projects are not my own, you can find the original images and creators by clicking the coordinating links! If for any reason you do not want your project featured here, please email me and I'll remove it!
Happy Friday!

Since I missed last Friday's favorites post, how about some favorites from the In Color Order Flickr Group! So fun seeing all the awesome stuff you guys make!
1. Lined drawstring bag, 2. HST quilt feather quilting, 3. Sparkle Quilt in Timber & Leaf, 4. Mitten to Apple: Coral+Turquoise 1, 5. Tiny Lined Drawstring Bags, 6. Floral Chevron (In Color Order's Patchwork Chevron), 7. "Four Blocks", 8. HST zipper pouch & key fob, 9. Wonky Star

Every week I go through my favorite photos on Flickr, and choose nine sewing/quilting related projects to showcase here. These photos and projects are not my own, you can find the original images and creators by clicking the coordinating links! If for any reason you do not want your project featured here, please email me and I'll remove it!
Happy Friday!
Subscribe to:
Posts
(
Atom
)