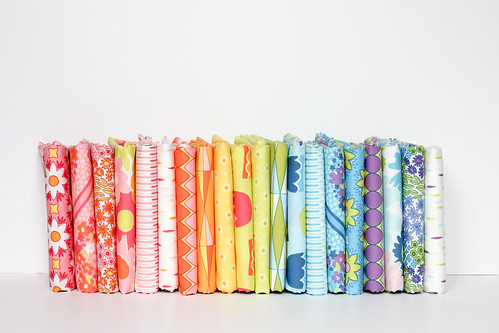
Geometric Bliss Coordinates

Monday, August 18, 2014

Geometric Bliss
It's that time again! Geometric Bliss will be shipping in September, so in the next few weeks leading up to the release I'll be sharing my projects from Spring Quilt Market, chatting about the inspiration for the collection and sharing some freebies!

Today I'm here to share the coordinating blenders and solids that match Geometric Bliss. Art Gallery Fabrics has lots of beautiful blenders that work well with this collection.

Geometric Bliss Coordinates - Pure Elements
Pure Elements: PE-439 Raspberry Rose, PE-438 Coral Reef, PE-426 Apricot Crepe,  PE-407 Empire Yellow, PE-441 Blueberry Zest, PE-443 Sweet Mint, PE-424 Mirage Blue, PE-402 Cozumel Blue, PE-425 Mauvelous, PE-453 Purple Pansy, PE401 Verve Violet, PE-413 Caviar, PE-433 Snow.

Geometric Bliss Coordinates - Squared Elements
Squared Elements: CST-3101 King's Road Fuchsia, SE-600 Watermelon, SE-601 Rosewater, CST-3201 King's Road Lemon, SE-603 Lemongrass, SE-604 Seafoam, CST-3108 King's Road Turquoise, SE-612 Blueberry, SE-607 Noir.

Geometric Bliss Coordinates - Oval Elements
Oval Elements: OE-908 Crocus, OE-935 Passionate Fuchsia, OE-910 Sweet Pea, OE-924 Peaches 'n Cream, OE-921 Mustard, OE-900 Peacock, OE-918 Blue Lagoon, OE-930 Licorice, OE-919 Cookies 'n Cream.

Geometric Bliss Coordinates - Nature Elements
Nature Elements: NE-127 Cyclamen, NE-111 Hot Pink, NE-109 Veiled Rose, NE-106 Orange Peel, NE-125 Antique Gold, NE-116 Lemonade, NE-118 Caribbean Blue, NE-100 Ocean Breeze, NE-110 Orchid Bloom.

Geometric Bliss Coordinates - Floral Elements
Floral Elements: FE-502 Blush, FE-506 Sunflower, FE-531 Grape Jam, FE-530 Moonlight.

Favorite Things Aurifil Thread Collection - Geometric Bliss
Other: A number of threads in my Favorite Things Aurifil Thread Collection coordinate with Geometric Bliss. Don't forget Aurifil embroidery floss is available in the same colors as their regular threads! I was also able to find coordinating pom-pom trim from my friend Jacey's shop, and zippers from Zipit.

If you're a shop interested in carrying Geometric Bliss, it can be ordered through Art Gallery Fabrics.  Find your sales rep here, or call toll-free (888) 420-5399.

Favorites

Friday, August 15, 2014

Favorites
1. Working on a new pattern..., 2. A Pastoral Gift, 3. #htwipit It's growing! Supervisor says it's ok so far, needs more tuna. #lonestar #scrappy #stringfever #rainbows, 4. Quarter Square Log Cabin Quilt, 5. Riddle and {Whimsy} HRT quilt (front), 6. Drift Away, 7. Shape Shifters ~ Faith Circle, 8. Fancy Fence quilt, 9. Ansley's Swell

Every week I go through my favorite photos on Flickr, and choose nine sewing/quilting related projects to showcase here. These photos and projects are not my own, you can find the original images and creators by clicking the coordinating links! If for any reason you do not want your project featured here, please email me and I'll remove it!

Happy Weekend!

Jolly Apron Tutorial

Wednesday, August 13, 2014

Jolly Apron Tutorial - In Color Order
Happy Wednesday! Today I have a quick and easy apron tutorial to share with you! I promised this tutorial way back when, and I finally made time this week to write it up.

This craft apron is plain and simple, nothing fancy! The nice thing about it is that it's completely customizable! You can do more or less pockets, add patchwork, use another fabric for the pocket lining, it's up to you!

Jolly Apron Tutorial - In Color Order
[Photo by Art Gallery Fabrics]

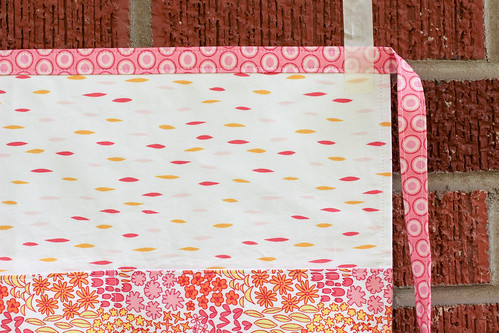
For my apron, I used a few prints from Dreamin' Vintage! The Jolly Dots Petal for the main apron pieces, and Sweet Meadow Rose for the pocket. It finishes off with an Oval Elements Sweet Pea tie! This is a fat quarter friendly project, you can make the entire apron with four fat quarters!

Jolly Apron Tutorial - In Color Order
Sewing Level: Beginner

Materials:
- 1 fat quarter of main apron fabric (front)
- 1 fat quarter of main apron fabric (back)
- 1 fat quarter of pocket fabric
- 1 fat quarter of apron tie fabric
- 5/8 yd of medium weight interfacing (Pellon SF101)
- Coordinating thread
- Marking pen

Notes:
Finished Size: 19.5" W x 12.25" H (Ties measure 31" from either side)
Fat Quarter =  18"x21"


Cutting:
From main apron fabric:
- Cut (2) 12.5"x20" rectangles

From pocket fabric:
- Cut (2) 7.5"x20" rectangles

From apron tie fabric:
- Cut (4) 2"x21" strips

From interfacing:
- Cut (1) 12.5"x20" rectangle
- Cut (1) 7.5"x20" rectangle


Instructions:
*Use a 1/4" seam allowance unless otherwise noted.*

1. Apply interfacing to the front main apron piece and the exterior pocket piece according to the manufacturer's instructions.

Jolly Apron Tutorial - In Color Order

2. Place pocket pieces right sides together. Sew along the top long edge. Backstitch when you start and finish. Press seam open, then fold in half with wrong sides together along the seam and press again. Topstitch along this edge to secure.

Jolly Apron Tutorial - In Color Order
3. Place the pocket piece on the right side of a main apron piece (front piece), aligning raw edges along the bottom and sides. Secure in place with pins.

4. Measure 6.5" from either side of the apron and mark a line down the pocket. Sew on top of this line, this creates the pockets. You may choose to do more, less, or different sized pockets if you want! Backstitch when you start and finish.

Jolly Apron Tutorial - In Color Order
5. Place the second main apron piece (back piece), right sides together with the front of the apron (main + pocket). Pin in place. Sew along sides and bottom, backstitch when you start and finish. Clip the corners and turn. Press well. Topstitch along the sides and bottom.

Jolly Apron Tutorial - In Color Order
6. Join the apron tie strips together so that you have one long strip.  Press seams open.  Fold down 1/4” on each short edge, wrong sides together. Press. Topstitch to secure. Fold in half lengthwise, wrong sides together.  Press. Unfold, and fold each raw edge into the crease you just created. Press. Fold in half again and press.

7. Nestle the apron into the folded tie, lining up the center of the tie strip with the center of the apron. Secure with pins. Topstitch along both edges of the tie, securing the apron in place.  Backstitch when you start and finish. Voila! You're done!

Jolly Apron Tutorial - In Color Order
As always, if you make something from my tutorials, patterns or with my fabric, I'd love for you to add it to the In Color Order Flickr Group!

I hope you enjoyed this tutorial!

Pattern Sale + Project Bags

Monday, August 11, 2014


Happy Monday! It is time for a sale! I love a sale as much as the next person, and now seems like a good time. I always feel more motivated to sew during the fall and winter months, so let's get a jump start on that! This week only, all patterns (PDF and Paper) are 25% off in my shop! Sale ends Friday 8/15. Prices are already marked down.

This includes wholesale orders! If you are a shop that would like to set up an account, fill out this form or shoot me an email: jenib320@gmail.com


I also have two new products to share with you! These have been in the works since March, when I took a screen printing class at Home Ec Workshop in Iowa City with Deedee and Anna! I cooked up the idea of a knitting abbreviations chart and soon after designed a sewing one. They have now become project bags!


The knitting abbreviations project bag features common knitting shorthand. They are hand screen-printed cotton drawstring bags. It is the perfect accessory to hold your current knitting project!


100% cotton muslin drawstring bag (commercially made). Bag measures 10" wide x 12" tall. Screen printed by me! Available in black and neon pink. Pink is a true neon in person.


The sewing abbreviations project bag features common sewing shorthand. They are hand screen-printed cotton drawstring bags. It is the perfect accessory to hold your current hand sewing project!


100% cotton muslin drawstring bag (commercially made). Bag measures 10" wide x 12" tall. Screen printed by me! Availabl in black and neon pink. Pink is a true neon in person.

I am happy to have these out in the world! It is a totally different craft for me, and a fun change of pace from my regular work. The bags are available in my shop here.

Have a great week!