Half-Square Triangle Pincushion Tutorial

Tuesday, July 28, 2015

Half-Square Triangle Pincushion Tutorial - In Color Order
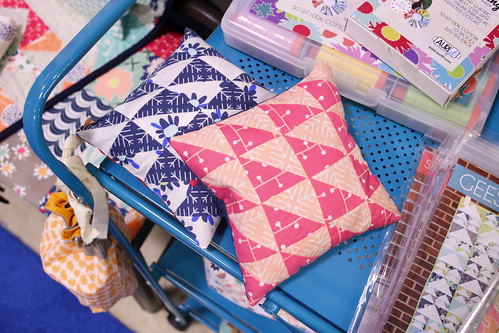
Happy Tuesday! I am happy to share another tutorial featuring Curiosities with you today! As you may know, I love pincushions. I also happen to love half-square triangles (HSTs). So when faced with scraps and a need for a quick and easy project, I put those two loves together and made these fun pincushions! The HSTs are small, but not so small that they’re hard to piece. Just tiny enough to be extra cute!
Half-Square Triangle Pincushion Tutorial - In Color Order
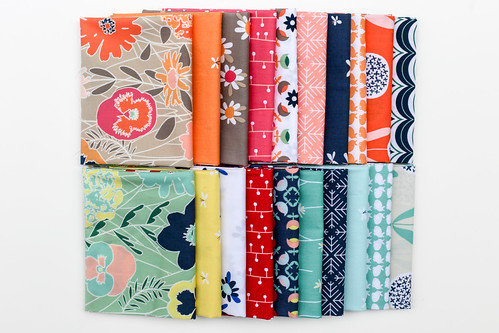
I made two, because why not! The first uses two pink prints from the Sweet Finds colorway. The second uses two prints from the Fresh Encounters color way. I backed both pincushions with coordinating Art Gallery Fabrics Elements. The small prints and small HSTs give these a sweet vintage feel. As usual, I filled my pincushions with crushed walnut shells (lizard litter). You can find it at most pet stores. This also lets them double as pattern weights, bonus!
Half-Square Triangle Pincushion Tutorial - In Color Order  
Sewing Level: Beginner

Materials:
- 2 fat eighths for pincushion top (Fabric A and B)
- 6.5" scrap for pincushion backing
- Coordinating thread
- Marking pen/chalk
- Pincushion filling of choice (I use crushed walnut shells)
- Hand sewing needle

Looking for supplies? Check out my Pattern Supplies and Resources post. 

Cutting:
From each Fabric A:
Cut (8) 2.5" squares

From each Fabric B:
Cut (8) 2.5" squares

From Backing Fabric:
Cut (1) 6.5" square

Finished Size: 6" square

Instructions:
*Use a 1/4'' seam allowance unless otherwise noted*

Half-Square Triangle Pincushion Tutorial - In Color Order
1. Make half-square triangles: Using a marking pen, draw a diagonal line across the wrong side of all Fabric A squares. Place one square on top of a Fabric B square right sides together. Sew 1/4” on either side of the marked line. Cut square in half on the line you marked. Press seams open. Repeat with remaining squares. Trim all half-square triangles to 2” square.

Half-Square Triangle Pincushion Tutorial - In Color Order
2. Arrange half-square triangles in four rows of four as shown in the diagram above. Sew units together in each row. Press seams in one direction, alternating direction every other row. Sew rows together, press seams open.

3. Place pincushion top right sides together with pincushion backing. Sew around all four sides, leaving a small opening in the middle of one side.

4. Turn pincushion right sides out, pushing out the corners with a full pencil or turning tool. Fill pincushion with desired filling. Hand stitch the opening closed.

Half-Square Triangle Pincushion Tutorial - In Color Order
Voila! You're done!

Half-Square Triangle Pincushion Tutorial - In Color Order
BONUS: You can make an even tinier version (3" square finished) with just four HSTs like I did for these pincushions! You'll only need two 2.5" squares of each fabric, trim them to 2", and use a 3.5" square for the backing.  

If you make something using this pattern, I hope you'll share it in the In Color Order Flickr Group or using the #jenibaker hashtag on Instagram!

Favorites

Friday, July 24, 2015


1. Rainbow Plus Quilt- large print fabricsTheMakingsOfJoy, 2. Glowing Star Pillow, 3. Charity quilt 2, 4. Totem Quilt, 5. Molehills Complete Top, 6. T-Act II, 7. front of Carousel Too, 8. Riddle and {Whimsy} AMH Charm Along 1, 9. Tuck Everlasting bound and completed. We'll see how she goes through the wash...😅

Every two weeks I go through my favorite photos on Flickr, and choose nine sewing/quilting related projects to showcase here. These photos and projects are not my own, you can find the original images and creators by clicking the coordinating links! If for any reason you do not want your project featured here, please email me and I'll remove it!

Happy Weekend!

Just Today Free Printables

Wednesday, July 22, 2015


Happy Wednesday! I'll try to keep things short today, but I wanted to share a printable with you! A few months ago I listened to a really interesting TEDx talk by Andie Mitchell about losing weight (video of her talk can be found at the bottom of this post). I don't remember how I came across it, but I really enjoyed it. In particular her experience trying to break old habits and make new ones. She'd find herself easily overwhelmed with the thought of having to make those changes permanent. In relation to her weight loss, imagining never being able to eat a doughnut or pizza again in order to meet her goals. This was overwhelming and in turn caused her to get off track.

I have felt this way a lot when trying to change. I have bit my cuticles since I was a kid and have been trying to break the habit for years. Same with trying to eat healthier. I do okay for a week or a few days and then I fall off the wagon and eat my emotions, or I get overwhelmed thinking about having to eat well everyday.

One of the things that Andi discusses in her talk that really made sense to me is the idea of "Just Today". It urges you to think about one day at a time. Can I eat healthy "just today"? Can I stop biting my cuticles "just today"? It's so much easier to think about doing something for one day. If you've watched the Netflix comedy The Unbreakable Kimmy Schmidt (if you haven't, you should, it's hilarious), take things 10 seconds at a time. Can I handle this for 10 seconds? Yes, I can!

Anyways, the sentiment really stuck with me and I just think it's a nice thing to think about. Just for today, be the best you can be. Worry about tomorrow, tomorrow. To remind myself of this idea everyday, I made a pretty printable poster using the Firefly Jar prints from Curiosities. I wanted to share those with you too!


Just Today in Orange.


Just Today in Yellow.


Just Today in Blue.


Just Today in Navy.

Download all four here! Enjoy!

 Have a great day!

Emmy Grace Magic Stars Quilt

Monday, July 20, 2015


Happy Monday! I am excited to share a recent quilt finish with you all today! I started this quilt last summer, so I am glad that it’s finally done!


I have loved Aneela Hoey’s Magic Stars quilt (pattern here!) ever since she released it. When Bari J and I swapped some fabric last summer, I knew I had found the perfect match! The top stitched up so quickly, but then I let it sit for a while. I sent it along with some other tops to Melissa of Sew Shabby Quilting to be quilted in the Fall. Then it sat waiting to be bound until last month! I had shown the quilt top to my Mom last year, and she really liked it. So, I finished it up last month for her Birthday! She has a nice quilt ladder that needs filling up with pretty quilts!


I added one extra row (six extra blocks) to this quilt to make it just a tad bigger. It was fun laying out all the pieces before piecing to make sure I had a good variety in my blocks. I’m sure I spent way more time on that than was needed, haha. I tend to get a little obsessive about that part. Oh well!


I used the Autumn’s Sigh colorway from Emmy Grace plus a few additional Art Gallery Elements for this quilt. The backing and binding are both from Coquette by Art Gallery In-House. I've been saving both prints for a while! Melissa quilted it with this fun clamshell design. I think it pairs well with Bari’s style!


My Mom (and Blackie), were happy with the finished quilt! I loved stitching it up, and I know I’ll make another one at some point. This was a great just-for-fun project. I need to start another quilt just because!

Happy Quilting!