Email Subscriber Update

Tuesday, June 29, 2021


Hello! This is a quick post specifically for those of you that have subscribed to receive my blog posts via email. Unfortunately, the service that I've been using for this feature since I first started my blog is being discontinued at the end of June. I am working with a new service to seamlessly (hopefully!) transfer over your existing email subscription to their service. If all goes well, you won't need to do anything to continue to receive my posts in your email inbox!

The new email delivery service is called "follow.it". When you receive an update that I have published a new post, that is who the email will be from, so don't be alarmed!

I'll be publishing a new blog post sometime during the first week of July (7/1-7/7). If you don't receive an email letting you know I posted, you may need to re-sign up for emails using the new "Follow by Email" form that can be found at the bottom of any page on my website (incolororder.com). Or simply respond to this email and I'll make sure you're added back onto the list. I'm hopeful that won't be necessary and all will transfer over as planned! Fingers crossed.

Thanks for your patience as I navigate this change with you! And thank you for following along with my blog :)

May Monthly Report

Wednesday, June 9, 2021


It's time for the May monthly report. See past reports here.


This month's report is going to be brief. I didn't do a whole lot of sewing in the month of May. It was busy, but just no sewing-wise. We got our second shots of the COVID vaccine, and celebrated our newly vaccinated reality by seeing my parents for the first time in a year and a half! I took basically no photos while they were here, but it was great. I also spent lots of time getting the garden planted and arranged for the season. I'll probably share a dedicated post on that soon. Nothing too complicated, just want to document it a few times this season.

One of the few things I did sew was a new set of grow bags. I'm using cotton this time around. For more on what I used last year/how I made them/my choice for this year, see this post: DIY Fabric Grow Bags


I finally figured out a good storage system for the wooden beads I carry in my shop! I bought this plastic organizer at a thrift store earily 10+ years ago. It's held so many different things over the year, but it's working great for the beads. Glad I held onto it.


The first month in a while that I didn't finish a weaving! I did start a new one though and I'm enjoying it. Just didn't get super far on it!


To keep myself accountable for my stash goals, I track my yardage for fabric and yarn each month. Read more about how I track here. Here is how I did in May:

May Fabric
Used up: 3.125 yards
Brought in: 6 yards
Net: 2.875 yards
Year to date: -18.75 yards

May Yarn
Used up: 0 yards
Brought in: 0 yards
Net: 0 yards
Year to date: -1823 yards

Had a good mix of fabric in and out this month. Used up fabric for the grow bags and for my Dad's Father's Day present (which I obviously can't share right now!). I did buy yardage to back my kaleidoscope quilt.


The big non-sewing project that I worked on in May was making an outdoor sofa! I wanted to make one last year but it was tough to get out and source materials. So this Spring I was really determined to make one. We needed somewhere comfy to hang out during the warmer months. We get pretty much full shade all day on our deck, so it's a great spot for a couch. I used these plans from Ana White, and bought the cushions, covers and stain from ikea. The stain matches our other outdoor furniture from ikea, and I think it looks super similar. Very pleased with how it turned out. It stretched my skills nicely but never felt overwhelming which is nice. We've already used it a bunch!

A little taste of the garden this year. Always growing marigolds.

Have a Great Month!

April Monthly Report

Thursday, May 6, 2021


It's time for the April monthly report. See past reports here.


My big accomplishment this month was finally finishing my kaleidoscope quilt top! I am so happy that it's put together and done. Now I just need to get a backing for it and I can send it away for quilting. I can't wait for it to be done. See more of this project here: Work in Progress: Kaleidoscope Quilt


I also finished my first quilt of 2021! And it's a long-term work in progress too, which is great. I'll be sharing more of this quilt soon, but it's made with one of my old fabric collections, Dreamin' Vintage.


My scrap project for this month was this tiny lined drawstring bag. I have had this canvas animal scrap for many years, just waiting to become something. I realized I needed a scrap project still for April so I grabbed it first and pulled a few things around it. The top edge of blue is actually the lining peeking out. It's a variation that can be found in the expansion pattern. I didn't have a scrap big enough for the lining that matched the focal print very well, so I used the wrong side of the fabric as the right side! I used 3/8" cotton twill and 3/4" beads to finish it.

You can find the patterns, twill, and beads all in my shop here:
- Lined Drawstring Bag Pattern
- Lined Drawstring Bag Expansion Pattern
- Cotton Twill Tape
- Round Wooden Beads


Managed to finish another weaving. This one used a very special skein of wool/mohair blend yarn that I've been hanging on to for a while. More details for this project are on my ravelry, here.


To keep myself accountable for my stash goals, I track my yardage for fabric and yarn each month. Read more about how I track here. Here is how I did in April:

April Fabric
Used up: 12.25 yards
Brought in: 0 yards
Net: -12.25 yards
Year to date: -21.625 yards

April Yarn
Used up: 423 yards
Brought in: 0 yards
Net: -423 yards
Year to date: -1823 yards

Feeling good about my totals for this month! Used up a good amount of fabric yardage, I have a few other projects I made this month that I still need to photograph. Keeping up with the weaving projects means my yarn yardage is looking good too. I love how much yardage it uses up!


Didn't try any new baking recipes this month, but did whip up a batch of marshmallows. The recipe I use is for mint chocolate chip marshmallows from the Joy the Baker Cookbook*. I just adjust the flavorings. This time I did simple vanilla, with vanilla bean paste. They turned out so fluffy and tasty.


Spring is really coming on now, my lily of the valley is starting to bloom. I am getting excited to start planting! After feeling super cooped up this winter, I am looking forward to being able to spend more time outside.

Have a Great Month!

*Note: Any links marked with an asterisk in this post are affiliate links. This means if you click through and buy something, I make a small commission, at no extra cost to you.

How to Organize Paper Sewing Patterns

Wednesday, April 21, 2021


Happy Wednesday! It's time for another post for the Sewing Room Organization Series. In last week's post I wrote about how I organize my digital pattern PDF files. Here are the other posts in the series so far:

How I Organize my Digital Sewing Patterns
Tips for Keeping Your Sewing Table Organized and Clutter Free
Tips for Storing Projects in Progress (WIPs)
Tips for Organizing and Storing Fabric Scraps


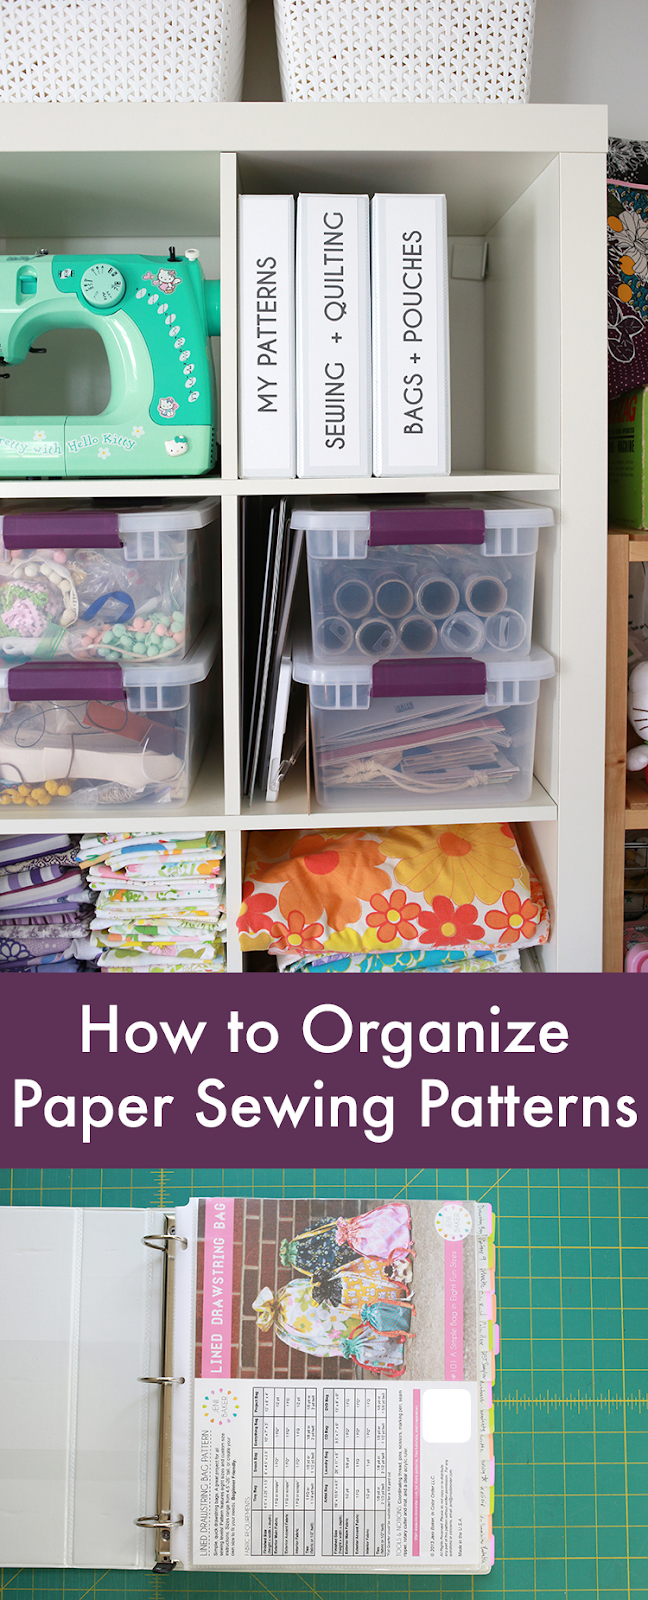
For today's post I'm sharing how I organize my paper and printed patterns. This includes digital patterns that I've printed out at home as well as paper patterns that I have purchased in person or had shipped to my home. Typically I purchase digital patterns, but I do prefer to buy paper patterns for garments. I use two different types of organization for my paper patterns. For sewing and quilting patterns I use three ring binders. I've seperated mine into three different binders, one for home decor + quilting patterns, one for bags + pouches, and one for my own pattern line.

This is just one way of organizing paper patterns that has worked for me and the patterns that I have in my collection. What works well for me may not be best suited to you. I encourage you to experiement and find something that works for your individual work flow, space and collection of patterns. There is no wrong way to organize your patterns!


First up is the sewing + quilting binder where I keep patterns for home decor, sewing organizers, pincushions, quilts, pillows, etc. A bit of everything! I use 5 tab dividers to keep the different categories seperated. If you're planning to use dividers with sheet protectors, make sure they're big enough. Most dividers are meant to be used with 8.5x11" paper that has been hole punched. Just something to keep in mind if you decide to organize your patterns this way too!

These are the 5 tab dividers* I used for my binders. They're not my favorite to be honest, but they were what I could find locally that were the right size and they get the job done!


I use a sheet protector for each individual pattern, to make it easy to keep all the pieces together (if there are templates), and to keep everything nice and neat. This also means I don't have to punch holes in my patterns in order to store them in a binder. This system works well for me since I am combining patterns I've printed as well as paper patterns I purchase, which come in many different sizes. When I'm ready to sew I can open the binder rings and grab the pattern I want!


For patterns that have a lot of little pieces, I'll often include a small paper envelope in the sheet protector with the pattern instructions. That way nothing can fall out!


The bags + pouches binder is set up the same way as the sewing + quilting one. Another set of 5 tab dividers and sheet protectors. I have the patterns organized by bag size. One advantage to this particular set of dividers is each one has a pocket. I store miscellaneous templates in those pockets.


The last binder contains my self-published patterns. They're organized slightly differently. I still use sheet protectors, but there is only one double-sided page per protector. This allows me to flip through the binder and see all the pages of each pattern. I also have an unfolded cover for each pattern to start. Since I refer to my own patterns a lot, it's helpful to be able to quickly see each page. I would recommend this method for those patterns that you use over and over again!


Instead of dividers, I use these post-it tabs* instead. This reduces bulk and is more cost-efficient since this would have requried a large number of dividers!


Next up is my garment patterns. My system for storing these is not quite as streamlined as it is for my other patterns. But I don't sew garments as often, so it works okay for me! All my patterns fit in a storage cube that sits on top of my shelving unit.


Each pattern has it's own manila envelope, I've used a combination of 9x12" envelopes and 10x13" envelopes. No reason for having two different sizes, other than it was what I had on hand. I like using large envelopes because it means I don't need to refold the tissue paper that comes in many garment patterns down to a small size again. I can easily fit the original tissue, my traced pieces and the instructions in each envelope. When I'm ready to sew I just grab the envelope I need!


I hope seeing my systems might give you some ideas for organizing your own patterns in your space!

Happy Sewing!

*Note: Any links marked with an asterisk in this post are affiliate links. This means if you click through and buy something, I make a small commission, at no extra cost to you.