Happy Easter! My Easter Bunny and I wanted to wish you all a great day! It's a day for bunnies! For George that means lots of carrots, a new log, and plenty of run around time! He's excited. How about some outtakes from our Easter photo today?
Hmm, this yellow bun smells good.
What are you looking at?
I will stand on this yellow bun.
Hmm, this pink one also smells good.
Leave me with my minions please! ;)
Happy Easter!

Happy Easter!


Friday, March 29, 2013
1. Birdie Quilt front 3 Bold Goods, 2. Today's piecing., 3. Admiring vintage quilts at the inlaw's, waiting on the movers., 4. Wonky Bee R3, 5. Hope Valley Twister Blocks, 6. twofronts2, 7. Swappen Kissen, 8. Starburst-finished-full, 9. Arkansas Traveler Quilt Top Layout
Every week I go through my favorite photos on Flickr, and choose nine sewing/quilting related projects to showcase here. These photos and projects are not my own, you can find the original images and creators by clicking the coordinating links! If for any reason you do not want your project featured here, please email me and I'll remove it!
Happy Friday!
Wednesday, March 27, 2013
Happy Wednesday! It was a busy, fun weekend over here! My parents came into town and we did lots of thrifting, eating, and catching up!
We also managed to finally pick up my vintage featherweight sewing machine and boy does it sew like a dream! I am really enjoying sewing on it!
It was a great weekend for vintage fabric! Thrifted the orange sheet which had been at the top of my wish list for years, pretty much since I started collecting! Also picked up a few vintage cottons and a feedsack.
I've officially started a new collection: silk scarves! I couldn't resist these ones, so retro and I love the colors!
Found a few other goodies too! The linen towel needs a good wash and press, and the bunny items are perfect for Easter!
I've been looking for a small wall shelf for my pincushion collection for a while now. After still having no luck, my Dad helped me build this one while he was here! It's simple and perfect! Only problem is I have too many pincushions! ;)
The most delicious mail arrived this week! Beautiful new collections! Luxe in Bloom by Sarah Watson, Carnaby Street by Pat Bravo, and Urban Mod by Art Gallery In-House Studio! I can't wait to find time to cut into these.
My sweet students from last month's drawstring bag class at The Sewcial Lounge! April classes have been scheduled, I'll be teaching a two-part Introduction to Quilting Series April 7th & 14th 9:00am-1:00pm, a Zipper Pouch Class April 17th 6:00pm-8:30pm, and a Lined Drawstring Bag Class April 25th 6:00pm-8:30pm. For more information and registration see here. I'll continue to keep my class schedule updated on the Teaching page in the tabs above!
George Bun.
Today I love the..
Smell of: Daffodils
Sound of: Harry Potter Audiobook 4
Taste of: Starburst Jelly Beans
Sight of: Sunshine
Feel of: Refreshing evening air
Good Things about Today:
- Skype with friends!
- Fabric mail!
- Made progress on a new quilt!
- George!

We also managed to finally pick up my vintage featherweight sewing machine and boy does it sew like a dream! I am really enjoying sewing on it!
It was a great weekend for vintage fabric! Thrifted the orange sheet which had been at the top of my wish list for years, pretty much since I started collecting! Also picked up a few vintage cottons and a feedsack.

I've officially started a new collection: silk scarves! I couldn't resist these ones, so retro and I love the colors!

Found a few other goodies too! The linen towel needs a good wash and press, and the bunny items are perfect for Easter!

I've been looking for a small wall shelf for my pincushion collection for a while now. After still having no luck, my Dad helped me build this one while he was here! It's simple and perfect! Only problem is I have too many pincushions! ;)

The most delicious mail arrived this week! Beautiful new collections! Luxe in Bloom by Sarah Watson, Carnaby Street by Pat Bravo, and Urban Mod by Art Gallery In-House Studio! I can't wait to find time to cut into these.

My sweet students from last month's drawstring bag class at The Sewcial Lounge! April classes have been scheduled, I'll be teaching a two-part Introduction to Quilting Series April 7th & 14th 9:00am-1:00pm, a Zipper Pouch Class April 17th 6:00pm-8:30pm, and a Lined Drawstring Bag Class April 25th 6:00pm-8:30pm. For more information and registration see here. I'll continue to keep my class schedule updated on the Teaching page in the tabs above!

George Bun.

Today I love the..
Smell of: Daffodils
Sound of: Harry Potter Audiobook 4
Taste of: Starburst Jelly Beans
Sight of: Sunshine
Feel of: Refreshing evening air
Good Things about Today:
- Skype with friends!
- Fabric mail!
- Made progress on a new quilt!
- George!
Tuesday, March 26, 2013
Over the past couple of years I have really enjoyed experimenting with fabric dyeing. I've played around with wax-resist dyeing with the aid of Malka Dubrawsky's Color Your Cloth, and have almost exclusively worked with Procion MX cold water dyes. There are a lot of advantages to this type of dyeing: the colors are pretty true, very vibrant, and even. There are a lot of disadvantages too. They are expensive, toxic, and the process takes about 8 hours plus setup and clean up.
A few weeks ago I wanted to see what I could do about finding alternative dyeing and resist techniques to make it more accessible. It was fun to experiment and see what I could come up with! These techniques use RIT dye, and aren't a true replacement for the other method, but they are a great place to start if you're interested in learning to dye fabric!
The advantages of using RIT dye: it's cheap, readily available, less time consuming and safe (see their safety information here). The disadvantages: It is more difficult to achieve vibrant colors.
Materials
For this basic dyeing, everything you need can easily be found at your local grocery store and craft store. While the RIT dye is pretty safe, you'll want to designate these tools for dyeing and no longer use them for food just to be safe. You'll need:
Fabric to dye: For RIT dye I'd recommend using 100% cotton fabric, like Kona Cotton White. It can be used to dye synthetic fabrics, but you're going to get better results sticking with natural fibers. Fabrics that are white-on-white prints look really cool when dyed because for the most part the printing stays white! Pre-wash and dry all fabrics before dyeing. If you're dyeing right after washing you can skip drying.
Liquid RIT dye: The liquid version is easier to use for this process and it can be used multiple times since you won't need much.
Salt: Plain table salt, not iodized.
Soda Ash: This is the dye fixer. It can be found with the tie-dye supplies and dyes at most craft stores. It is Sodium Carbonate, and is also used to raise the PH level in pools, so it can sometimes be found with pool supplies in large quantities.
Rubber Gloves: I just use a pair of regular kitchen dish gloves.
Plastic containers: I make my dye baths in big empty yogurt containers, cheap plastic pitchers or plastic dish tubs.
Measuring cups & spoons: I picked up a set of each at the dollar store.
Stirring spoon: A plastic spoon for stirring.
Basic Dyeing Technique
Okay, now that we have our supplies, let's talk about the basics of dyeing. The instructions are for a fat quarter, but a table with conversions for other amounts is also provided. I'd recommend wearing an apron or "craft clothes" in case you spill some dye. I like to do my dyeing either in a bathtub or sink for easy clean up.
1. Fill your dye bath container with 1 quart of HOT water.
2. Put 2 Tablespoons of salt in the water, stir until dissolved.
3. Carefully measure out 2 Tablespoons Liquid RIT into the salt water, stir.
4. In a separate container, wet fat quarter (or 1/4 yard) of fabric. Squeeze out excess water.
5. Put fabric in the dye. Stir constantly for the first 5 minutes or so to ensure even coverage. Leave in bath for 30 minutes, stirring every 5 minutes..
6. After 30 minutes, carefully remove fabric from dye bath. Add 1 Tablespoon of Soda Ash to the dye bath. Stir until dissolved.
7. Add fabric back into the dye bath, stirring for a few minutes. Leave in bath for 30 minutes to 1 hour, stirring every 10-15 minutes.
8. Remove fabric from dye bath, dump dye down the drain.
9. Rinse out fabric, starting with cold water, then warm water, then hot water until the water runs clear.
10. Wash normally with detergent on warm/cold. If I've dyed a dark purple and a light yellow I'll often do two different loads, otherwise I put multiple colors together. Add 1/2 cup of salt to the washer (in water for top loading, with detergent for front loading) to help reduce bleeding. Dry or remove from washer and press with a hot iron.
I calculated these amounts based on previous dyeing experience and the instructions on the RIT bottle. Fat quarters can be substituted for yardage.
RIT has a Color Formula Tool on their website that helps you create up to 500 different colors by mixing different RIT dyes. Personally, I like to just wing it, but it would be a great place to start if you have a certain color in mind.
Doubling the dye amounts (as recommended by RIT for bright colors) Made a pretty noticeable difference for this pink color.
Doubling the dye amounts did not make a noticeable difference when I was trying to achieve a true red (I used Cherry Red). You'll have to experiment a bit too!
Alternative Resist Methods
The most common dye resist method uses wax. Wax is applied to the fabric before dyeing, and the wax keeps that portion of the fabric un-dyed. Using wax creates beautiful results (shown in the image above), but it is messy and can be difficult to remove after the dyeing process. I experimented with a couple of other methods to see if I could get similar results.
For all of these methods I applied the resist to dry fabric before dyeing. Let the resist dry if need be and then dye with the instructions outlined in the beginning of this post.
1. Hot Glue: This was a long shot! In a few places it worked okay, but for the most part it did not stick well to the fabric and started to come off as soon as it hit the water. It's too bad it didn't work, it was very easy to apply and dried very quickly. Peel off after dyeing and washing.
2. Crayons: I am wondering how much wax is in traditional crayons, because this was the worst method I tried. I used a white crayon to draw on the fabric and it's barely even visible. I wanted to try these wax-resist sticks but couldn't find them locally. They may be worth a try, but traditional crayons are not! Crayon will come off in the wash.
3. Elmer's School Glue Gel: This by far worked the best of the three methods I tried. It was pretty consistent and the results are pretty similar to what you can achieve with wax. I applied it pretty thickly onto the fabric, which took most of the day to dry. I'd recommend applying it and letting it dry overnight. It worked well being squeezed onto the fabric and dipping a tool into it and stamping. This is a great resist to try! Elmer's Glue will come off in the wash.
Both fabrics shown above were creating using Elmer's School Glue Gel. For the Purple fabric I squeezed the glue straight onto the fabric, creating a shape with simple lines. For the orange fabric, I poured glue into a small dish and dipped a cardboard toilet paper roll into it and stamped it onto the fabric, twisting it a bit on the fabric to get more glue onto it. Both methods provided great results!
Don't hang it up to dry unless you want drip marks! Dry flat.
There are a few more techniques I'd like to try with this type of dyeing as well as the with the cold water dyes this summer. I'll be sure to do an update if they're successful!
For the fabrics above I used the following dyes (purple, green, and orange were made by mixing): Cherry Red, Fuchsia, Petal Pink, Lemon Yellow, Aquamarine, and Teal.
I hope that this post was helpful! I know that dyeing can be scary but it's really a lot of fun! If you're interested in using Procion MX dyes or wax-resist dyeing, I highly recommend Malka Dubrawsky's Color Your Cloth! All of the fabrics in the above image were dyed using Procion MX cold water dyes!
Disclaimer: I am not an expert when it comes to dyeing. I have learned some tricks and tips while experimenting on my own, but please exercise caution when working with dyes. Keep small children and pets away from dye baths and supplies. Dye is permanent and will stain clothes and tile grout. It will temporarily stain bathtubs, but can usually be cleaned up pretty easily with bleach-based cleaning products. Use your best judgement and consult the RIT website for more information on their dyes.
Happy Dyeing!

A few weeks ago I wanted to see what I could do about finding alternative dyeing and resist techniques to make it more accessible. It was fun to experiment and see what I could come up with! These techniques use RIT dye, and aren't a true replacement for the other method, but they are a great place to start if you're interested in learning to dye fabric!
The advantages of using RIT dye: it's cheap, readily available, less time consuming and safe (see their safety information here). The disadvantages: It is more difficult to achieve vibrant colors.

Materials
For this basic dyeing, everything you need can easily be found at your local grocery store and craft store. While the RIT dye is pretty safe, you'll want to designate these tools for dyeing and no longer use them for food just to be safe. You'll need:

Fabric to dye: For RIT dye I'd recommend using 100% cotton fabric, like Kona Cotton White. It can be used to dye synthetic fabrics, but you're going to get better results sticking with natural fibers. Fabrics that are white-on-white prints look really cool when dyed because for the most part the printing stays white! Pre-wash and dry all fabrics before dyeing. If you're dyeing right after washing you can skip drying.
Liquid RIT dye: The liquid version is easier to use for this process and it can be used multiple times since you won't need much.
Salt: Plain table salt, not iodized.
Soda Ash: This is the dye fixer. It can be found with the tie-dye supplies and dyes at most craft stores. It is Sodium Carbonate, and is also used to raise the PH level in pools, so it can sometimes be found with pool supplies in large quantities.
Rubber Gloves: I just use a pair of regular kitchen dish gloves.
Plastic containers: I make my dye baths in big empty yogurt containers, cheap plastic pitchers or plastic dish tubs.
Measuring cups & spoons: I picked up a set of each at the dollar store.
Stirring spoon: A plastic spoon for stirring.
Basic Dyeing Technique
Okay, now that we have our supplies, let's talk about the basics of dyeing. The instructions are for a fat quarter, but a table with conversions for other amounts is also provided. I'd recommend wearing an apron or "craft clothes" in case you spill some dye. I like to do my dyeing either in a bathtub or sink for easy clean up.

1. Fill your dye bath container with 1 quart of HOT water.
2. Put 2 Tablespoons of salt in the water, stir until dissolved.
3. Carefully measure out 2 Tablespoons Liquid RIT into the salt water, stir.
4. In a separate container, wet fat quarter (or 1/4 yard) of fabric. Squeeze out excess water.
5. Put fabric in the dye. Stir constantly for the first 5 minutes or so to ensure even coverage. Leave in bath for 30 minutes, stirring every 5 minutes..
6. After 30 minutes, carefully remove fabric from dye bath. Add 1 Tablespoon of Soda Ash to the dye bath. Stir until dissolved.
7. Add fabric back into the dye bath, stirring for a few minutes. Leave in bath for 30 minutes to 1 hour, stirring every 10-15 minutes.
8. Remove fabric from dye bath, dump dye down the drain.
9. Rinse out fabric, starting with cold water, then warm water, then hot water until the water runs clear.
10. Wash normally with detergent on warm/cold. If I've dyed a dark purple and a light yellow I'll often do two different loads, otherwise I put multiple colors together. Add 1/2 cup of salt to the washer (in water for top loading, with detergent for front loading) to help reduce bleeding. Dry or remove from washer and press with a hot iron.
I calculated these amounts based on previous dyeing experience and the instructions on the RIT bottle. Fat quarters can be substituted for yardage.

RIT has a Color Formula Tool on their website that helps you create up to 500 different colors by mixing different RIT dyes. Personally, I like to just wing it, but it would be a great place to start if you have a certain color in mind.
Doubling the dye amounts (as recommended by RIT for bright colors) Made a pretty noticeable difference for this pink color.

Doubling the dye amounts did not make a noticeable difference when I was trying to achieve a true red (I used Cherry Red). You'll have to experiment a bit too!

Alternative Resist Methods
The most common dye resist method uses wax. Wax is applied to the fabric before dyeing, and the wax keeps that portion of the fabric un-dyed. Using wax creates beautiful results (shown in the image above), but it is messy and can be difficult to remove after the dyeing process. I experimented with a couple of other methods to see if I could get similar results.

For all of these methods I applied the resist to dry fabric before dyeing. Let the resist dry if need be and then dye with the instructions outlined in the beginning of this post.
1. Hot Glue: This was a long shot! In a few places it worked okay, but for the most part it did not stick well to the fabric and started to come off as soon as it hit the water. It's too bad it didn't work, it was very easy to apply and dried very quickly. Peel off after dyeing and washing.

2. Crayons: I am wondering how much wax is in traditional crayons, because this was the worst method I tried. I used a white crayon to draw on the fabric and it's barely even visible. I wanted to try these wax-resist sticks but couldn't find them locally. They may be worth a try, but traditional crayons are not! Crayon will come off in the wash.
3. Elmer's School Glue Gel: This by far worked the best of the three methods I tried. It was pretty consistent and the results are pretty similar to what you can achieve with wax. I applied it pretty thickly onto the fabric, which took most of the day to dry. I'd recommend applying it and letting it dry overnight. It worked well being squeezed onto the fabric and dipping a tool into it and stamping. This is a great resist to try! Elmer's Glue will come off in the wash.
Both fabrics shown above were creating using Elmer's School Glue Gel. For the Purple fabric I squeezed the glue straight onto the fabric, creating a shape with simple lines. For the orange fabric, I poured glue into a small dish and dipped a cardboard toilet paper roll into it and stamped it onto the fabric, twisting it a bit on the fabric to get more glue onto it. Both methods provided great results!

Don't hang it up to dry unless you want drip marks! Dry flat.
There are a few more techniques I'd like to try with this type of dyeing as well as the with the cold water dyes this summer. I'll be sure to do an update if they're successful!

For the fabrics above I used the following dyes (purple, green, and orange were made by mixing): Cherry Red, Fuchsia, Petal Pink, Lemon Yellow, Aquamarine, and Teal.
I hope that this post was helpful! I know that dyeing can be scary but it's really a lot of fun! If you're interested in using Procion MX dyes or wax-resist dyeing, I highly recommend Malka Dubrawsky's Color Your Cloth! All of the fabrics in the above image were dyed using Procion MX cold water dyes!

Disclaimer: I am not an expert when it comes to dyeing. I have learned some tricks and tips while experimenting on my own, but please exercise caution when working with dyes. Keep small children and pets away from dye baths and supplies. Dye is permanent and will stain clothes and tile grout. It will temporarily stain bathtubs, but can usually be cleaned up pretty easily with bleach-based cleaning products. Use your best judgement and consult the RIT website for more information on their dyes.
Happy Dyeing!
Friday, March 22, 2013
1. AMH WIP, 2. thrift blocks, part 1, 3. Sew Retro, Baby! top, 4. Spring Fling front Bold Goods, 5. Pantone Emerald challenge top, 6. DSCF9785, 7. Wonky Star Class Sample, 8. Buddy, 9. SWAP°PEN pillow ready
Every week I go through my favorite photos on Flickr, and choose nine sewing/quilting related projects to showcase here. These photos and projects are not my own, you can find the original images and creators by clicking the coordinating links! If for any reason you do not want your project featured here, please email me and I'll remove it!
Happy Friday!
Wednesday, March 20, 2013
Happy Wednesday! Happy Spring Day! And Happy Birthday! Another day older today, hitting the big 2-4! Michael was able to come home at noon! We had lunch at Dumpling Haus (so yummy!), and relaxed. It was perfect. My parents are coming in from Ohio this weekend and I can't wait!
I plotted lots of fun new projects today! On Monday, my friend and new sponsor, Sara of Sew Sweetness Patterns launched her newest pattern, the Aeroplane Bag! She very kindly used Color Me Retro prints for the bags, which come in two sizes! I am so excited to sew one up! The larger size (in blue) is big enough to fit a mid-sized sewing machine, so I'm making one for my Featherweight!! I had to go with the red colorway for mine!
You can find the Aeroplane Bag Pattern in Sara's shop, along with her other bag patterns!
I also dove headfirst into The Staple Dress, a new pattern by April Rhodes! She has been posting photos of these dresses and the process of putting together this pattern for a while and I knew right away I wanted to make it! I've got my pieces taped together, a test fabric picked out (yay for thrifted chambray!), and fabric ordered for another! Amanda and I are going to tackle it tomorrow over Skype!
You can find The Staple Dress Pattern on April's blog, here.
Last week Amanda and I had a "skype and sew" date! It didn't start that way but we both ended up making laptop cases! We happen to have the same computer so that made it nice and easy! It's basically a giant zipper pouch with little gussets and extra padding. I used Color Me Retro and Pure Elements in Fresh Water for the outside and Floral Elements in Lapis Lazuli for the inside. It was so much fun! I'm looking forward to working on our dresses tomorrow!
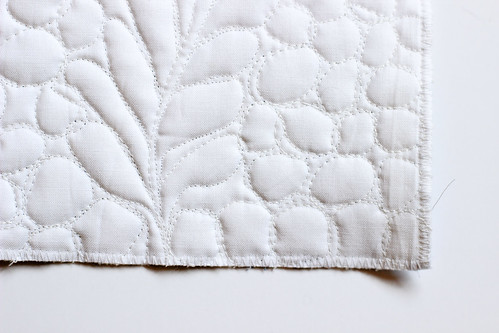
I wanted to talk a bit about the quilting that I did for last week's Quilted Grocery Bag Holder Tutorial. I don't remember what sparked it, but last week I got the itch to try something different with my quilting. The grocery bag holder seemed like the perfect guinea pig project and I knew just what I wanted to do, feathers! I remembered that Angela Walter's had a new Craftsy class, Free-motion Quilting with Feathers, and knew I had to take it. This was my first practice and I'm so happy with how it turned out. I'm not sure if I have the patience to do this on a big quilt yet, but it was a lot of fun! I still can't believe I actually quilted that! Angela makes it really approachable, and I'm excited to practice more!
A very fun package arrived in the mail from my friend Holly of Bijou Lovely! She made me this fabulous Color Me Retro pincushion! I am a big collector of pincushions and this one is just so darn cute! She took really beautiful photographs of it, you can find them on her blog, here. I love it so much! It even has one of her awesome leather tags on the back!
As if that wasn't enough Holly included lots of other sweet goodies, bunny fabric, chocolate, a beautiful scarf, and one of her Be Inspired prints! You can get your own in her shop, here!
Thank you Holly, your package was such a bright spot this week and today! You know me well! :)
I started a new embroidery this past weekend after seeing this print on Pinterest. This quote really resonated with me, I knew I had to have it on my sewing room wall. I'm using a vintage sheet for the background, I like how the embroidery sort of melts into it. Only a tiny bit is embroidered, so it will show up a bit more!
I was so excited to see the new Summer issue of Stitch Magazine on newsstands today! I have been itching for this issue to come out! There is a beautiful project by Berene Campbell of Happy Sew Lucky in it using Color Me Retro! Isn't it sweet? I love it! Makes me wish Summer was closer!
Berene sells super cute patterns and kits in her etsy shop, here. I made a blue Babushka ornament from one of her kits a few years ago, seen here on my tree! So fun and easy!
George! Always looking for treats!
Today I love the..
Smell of: Dumpling Haus!
Sound of: George running around
Taste of: Chocolate
Sight of: Sunshine
Feel of: A relaxing day
Good Things about Today:
- Having Michael home!
- Happy Mail!
- I didn't have to cook at all!
- Chocolate!

I plotted lots of fun new projects today! On Monday, my friend and new sponsor, Sara of Sew Sweetness Patterns launched her newest pattern, the Aeroplane Bag! She very kindly used Color Me Retro prints for the bags, which come in two sizes! I am so excited to sew one up! The larger size (in blue) is big enough to fit a mid-sized sewing machine, so I'm making one for my Featherweight!! I had to go with the red colorway for mine!

You can find the Aeroplane Bag Pattern in Sara's shop, along with her other bag patterns!
I also dove headfirst into The Staple Dress, a new pattern by April Rhodes! She has been posting photos of these dresses and the process of putting together this pattern for a while and I knew right away I wanted to make it! I've got my pieces taped together, a test fabric picked out (yay for thrifted chambray!), and fabric ordered for another! Amanda and I are going to tackle it tomorrow over Skype!

You can find The Staple Dress Pattern on April's blog, here.
Last week Amanda and I had a "skype and sew" date! It didn't start that way but we both ended up making laptop cases! We happen to have the same computer so that made it nice and easy! It's basically a giant zipper pouch with little gussets and extra padding. I used Color Me Retro and Pure Elements in Fresh Water for the outside and Floral Elements in Lapis Lazuli for the inside. It was so much fun! I'm looking forward to working on our dresses tomorrow!

I wanted to talk a bit about the quilting that I did for last week's Quilted Grocery Bag Holder Tutorial. I don't remember what sparked it, but last week I got the itch to try something different with my quilting. The grocery bag holder seemed like the perfect guinea pig project and I knew just what I wanted to do, feathers! I remembered that Angela Walter's had a new Craftsy class, Free-motion Quilting with Feathers, and knew I had to take it. This was my first practice and I'm so happy with how it turned out. I'm not sure if I have the patience to do this on a big quilt yet, but it was a lot of fun! I still can't believe I actually quilted that! Angela makes it really approachable, and I'm excited to practice more!

A very fun package arrived in the mail from my friend Holly of Bijou Lovely! She made me this fabulous Color Me Retro pincushion! I am a big collector of pincushions and this one is just so darn cute! She took really beautiful photographs of it, you can find them on her blog, here. I love it so much! It even has one of her awesome leather tags on the back!

As if that wasn't enough Holly included lots of other sweet goodies, bunny fabric, chocolate, a beautiful scarf, and one of her Be Inspired prints! You can get your own in her shop, here!

Thank you Holly, your package was such a bright spot this week and today! You know me well! :)
I started a new embroidery this past weekend after seeing this print on Pinterest. This quote really resonated with me, I knew I had to have it on my sewing room wall. I'm using a vintage sheet for the background, I like how the embroidery sort of melts into it. Only a tiny bit is embroidered, so it will show up a bit more!

I was so excited to see the new Summer issue of Stitch Magazine on newsstands today! I have been itching for this issue to come out! There is a beautiful project by Berene Campbell of Happy Sew Lucky in it using Color Me Retro! Isn't it sweet? I love it! Makes me wish Summer was closer!

Berene sells super cute patterns and kits in her etsy shop, here. I made a blue Babushka ornament from one of her kits a few years ago, seen here on my tree! So fun and easy!
George! Always looking for treats!

Today I love the..
Smell of: Dumpling Haus!
Sound of: George running around
Taste of: Chocolate
Sight of: Sunshine
Feel of: A relaxing day
Good Things about Today:
- Having Michael home!
- Happy Mail!
- I didn't have to cook at all!
- Chocolate!
Monday, March 18, 2013

Thanks to everyone who entered the Indygo Junction Fabric Flowers Giveaway! The winner is #79, Lisa!
Friday, March 15, 2013
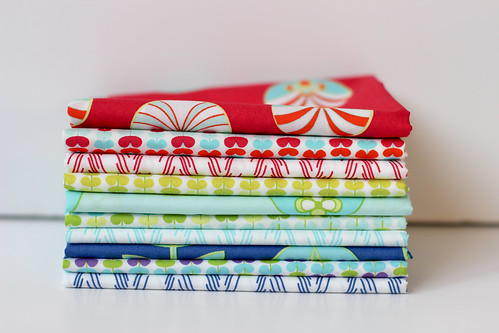
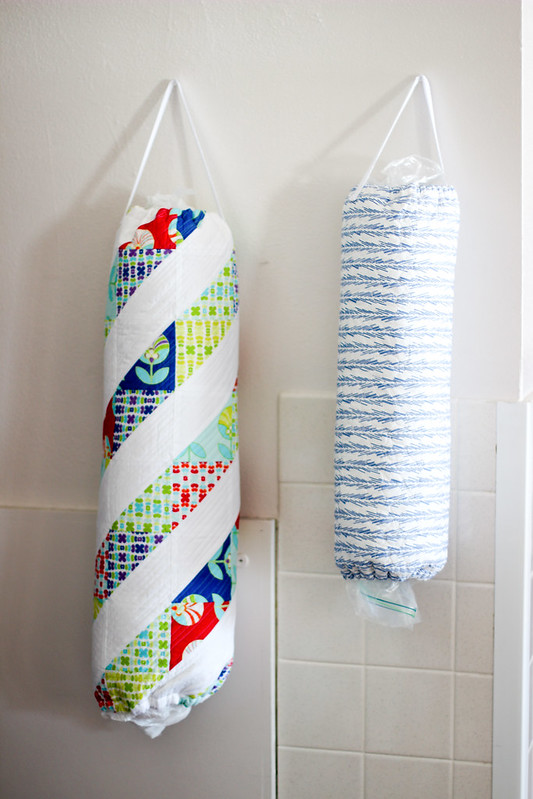
Happy Friday! How about a fun tutorial to start off your weekend? As promised, a grocery bag holder tutorial! I decided to share two different sizes which can be made with a single fabric or with half-square triangles. I didn't realize how large my first holder was until I made the second! The second can easily be made with a single fat quarter for the exterior. Both versions shown here feature Color Me Retro and Pure Element Snow by Art Gallery Fabrics.
Shown above large half-square triangle holder and small plain holder. The large holder measures 24" tall and 19" around. The small holder measures 18" tall and 17" around.
Sewing Level: Intermediate
Materials:
Large Grocery Bag Holder
- HST Option: (24) 4.25" print squares and (24) 4.25" background squares (3/8 yd)
- Plain Option: 5/8 yard exterior print
- 3/4 yard of interior fabric (solid or muslin)
- 24"x30" piece of cotton batting
- 1/2 yard of skinny elastic (1/4" or smaller)
- 14" piece of 1/2" twill tape
Small Grocery Bag Holder
- HST Option: (21) 4" print squares and (21) 4" background squares (1/3 yd)
- Plain Option: fat quarter exterior print
- 5/8 yard of interior fabric (solid or muslin)
- 22"x25" piece of cotton batting
- 1/2 yard of skinny elastic (1/4" or smaller)
- 14" piece of 1/2" twill tape
*1/4" seam allowance used unless otherwise noted
Quick Half-Square Triangle Construction:
Using a water-soluble marker or a pencil, mark a diagonal line across the wrong side of the background squares. Place one background square on top of a print square right sides together. Stitch 1/4” on either side of the marked line. Cut square in half on the line you marked. Press seams open. Repeat with remaining squares.
Large Grocery Bag Holder:
1. If using half-square triangles, make 48 and trim them to 3.75" square. Arrange half-square triangles using the diagram above. Sew half-square triangles into rows. Press seams in one direction, alternating directions every other row. Sew rows together. Press seams open. trim top to 20"x26.5" if necessary.
If using a single print, cut a rectangle 20"x26".
2. For either version, make a quilt sandwich with interior fabric, cotton batting, and top. Baste and quilt as desired.
3. Cut (2) pieces of elastic, one 10" long and one 8" long.
Small Grocery Bag Holder:
1. If using half-square triangles, make 42 and trim them to 3.5" square. Arrange half-square triangles using the diagram above. Sew half-square triangles into rows. Press seams in one direction, alternating directions every other row. Sew rows together. Press seams open. Trim top to 18.5"x21.5" if necessary.
If using a single print, cut a rectangle 18"x21".
2. For either version, make a quilt sandwich with interior fabric, cotton batting, and top. Baste and quilt as desired.
3. Cut (2) pieces of elastic, one 8" long and one 6" long.
The following instructions apply for solid and half-square triangle versions in both sizes.
Grocery Bag Holder Construction:
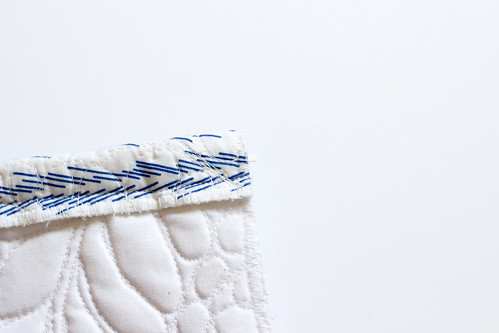
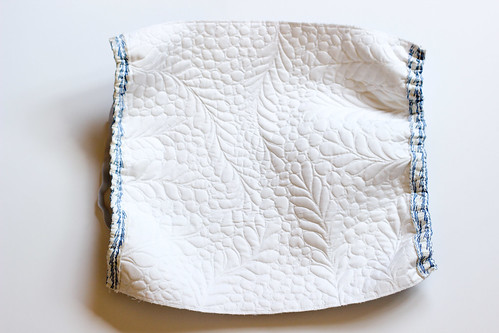
4. Trim away excess backing and batting. Serge or zig-zag stitch around all four edges.
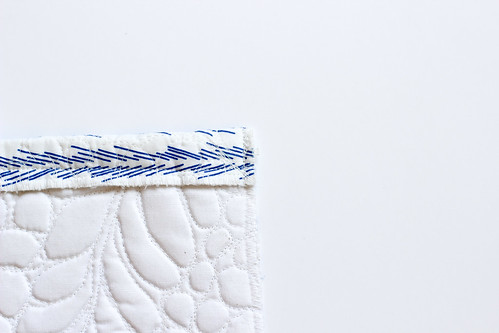
5. Turn down one of the short edges 1", press. Stitch down 1/4" from the raw edge. Repeat for the other end.
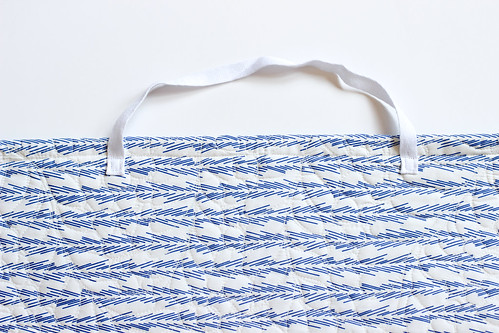
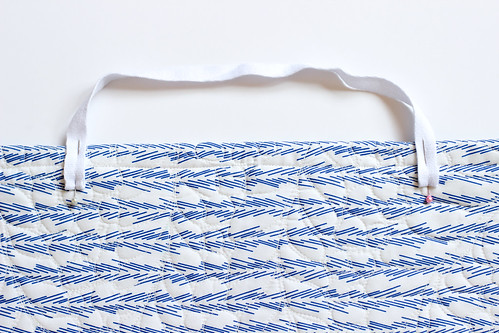
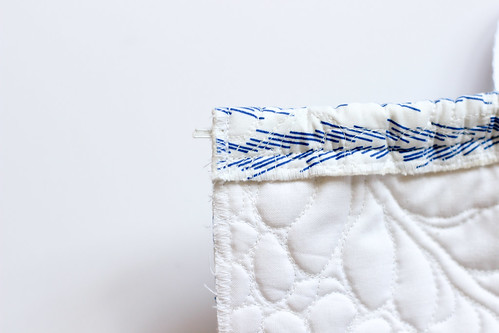
6. Fold under each end of the twill tape 1/2". Pin in place below the stitching line on one short edge, 4.5" from either edge.
9. Pull it through just far enough so that a small amount of the elastic sticks out. Pin in place.
10. Stitch with a 1/4" or less seam allowance over top of the elastic, securing it in place. Backstitch over top of it a few times.
11. Continuing pulling the safety pin through to the other side. Detach safety pin, and pin the elastic in place. Securing with stitching.
Repeat steps 8-11 with the remaining elastic piece for the other end of the holder.
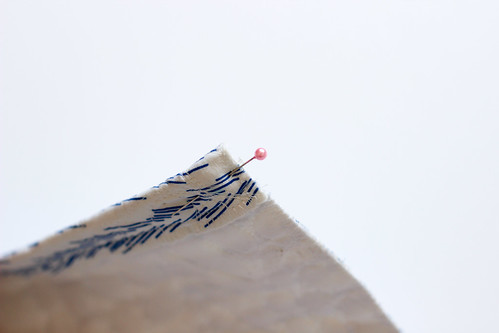
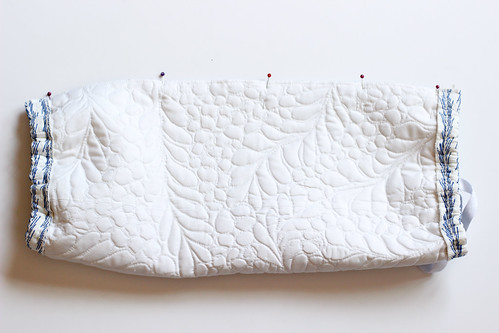
12. Fold your piece right sides together, matching up the long edges. Pin in place.
13. Sew along the entire edge using a 1/2" seam allowance. Press seam open.
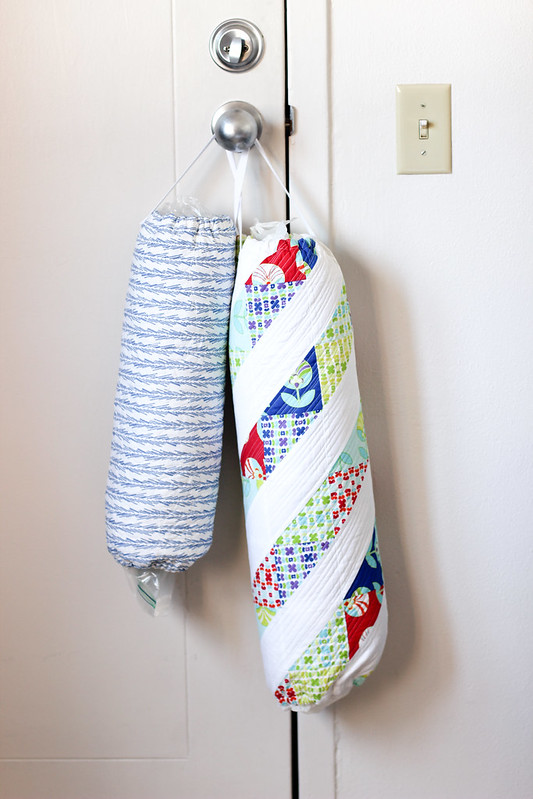
Turn right sides out and hang! If you make one, I hope you'll add a photo (or two!), to the In Color Order Flickr Group! I'd love to see it!
Enjoy!
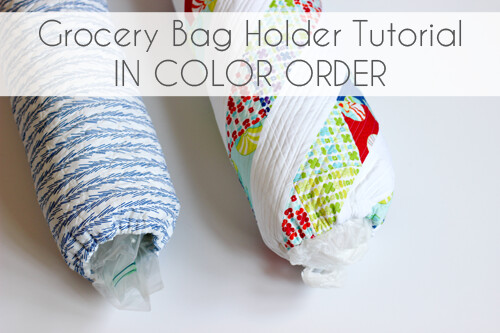
Shown above large half-square triangle holder and small plain holder. The large holder measures 24" tall and 19" around. The small holder measures 18" tall and 17" around.
Sewing Level: Intermediate
Materials:
Large Grocery Bag Holder
- HST Option: (24) 4.25" print squares and (24) 4.25" background squares (3/8 yd)
- Plain Option: 5/8 yard exterior print
- 3/4 yard of interior fabric (solid or muslin)
- 24"x30" piece of cotton batting
- 1/2 yard of skinny elastic (1/4" or smaller)
- 14" piece of 1/2" twill tape
Small Grocery Bag Holder
- HST Option: (21) 4" print squares and (21) 4" background squares (1/3 yd)
- Plain Option: fat quarter exterior print
- 5/8 yard of interior fabric (solid or muslin)
- 22"x25" piece of cotton batting
- 1/2 yard of skinny elastic (1/4" or smaller)
- 14" piece of 1/2" twill tape
*1/4" seam allowance used unless otherwise noted
Quick Half-Square Triangle Construction:
Using a water-soluble marker or a pencil, mark a diagonal line across the wrong side of the background squares. Place one background square on top of a print square right sides together. Stitch 1/4” on either side of the marked line. Cut square in half on the line you marked. Press seams open. Repeat with remaining squares.

Large Grocery Bag Holder:
1. If using half-square triangles, make 48 and trim them to 3.75" square. Arrange half-square triangles using the diagram above. Sew half-square triangles into rows. Press seams in one direction, alternating directions every other row. Sew rows together. Press seams open. trim top to 20"x26.5" if necessary.
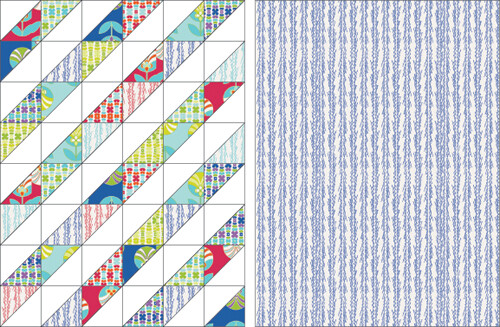
If using a single print, cut a rectangle 20"x26".
2. For either version, make a quilt sandwich with interior fabric, cotton batting, and top. Baste and quilt as desired.
3. Cut (2) pieces of elastic, one 10" long and one 8" long.
Small Grocery Bag Holder:
1. If using half-square triangles, make 42 and trim them to 3.5" square. Arrange half-square triangles using the diagram above. Sew half-square triangles into rows. Press seams in one direction, alternating directions every other row. Sew rows together. Press seams open. Trim top to 18.5"x21.5" if necessary.
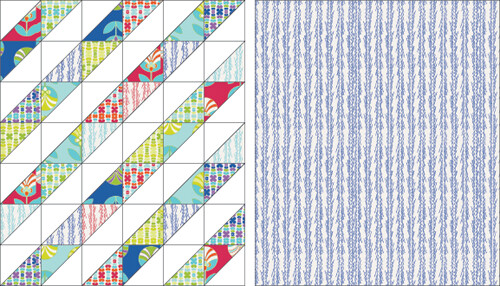
If using a single print, cut a rectangle 18"x21".
2. For either version, make a quilt sandwich with interior fabric, cotton batting, and top. Baste and quilt as desired.
3. Cut (2) pieces of elastic, one 8" long and one 6" long.
The following instructions apply for solid and half-square triangle versions in both sizes.
Grocery Bag Holder Construction:
4. Trim away excess backing and batting. Serge or zig-zag stitch around all four edges.
5. Turn down one of the short edges 1", press. Stitch down 1/4" from the raw edge. Repeat for the other end.
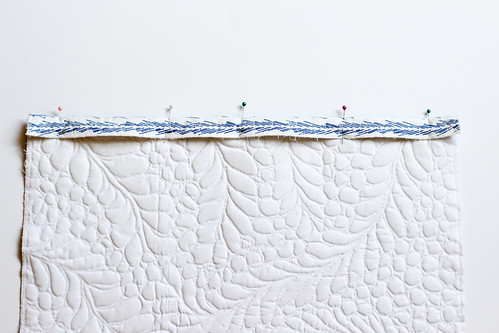

6. Fold under each end of the twill tape 1/2". Pin in place below the stitching line on one short edge, 4.5" from either edge.
Quilted Grocery Bag Holder Tutorial, a photo by Jeni Baker on Flickr.
7. Stitch both ends in place, making sure not to stitch on the tube you sewed.
Quilted Grocery Bag Holder Tutorial, a photo by Jeni Baker on Flickr.
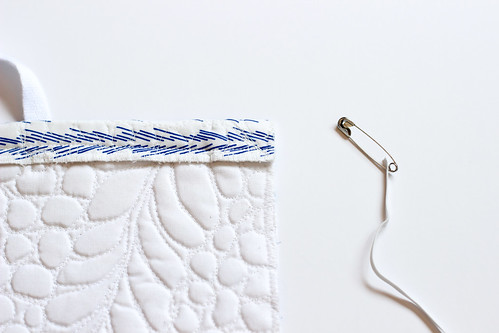
8. Attach one end of the longer elastic piece to a large safety pin.
Begin threading the safety pin into the end with the twill tape
attached.9. Pull it through just far enough so that a small amount of the elastic sticks out. Pin in place.
10. Stitch with a 1/4" or less seam allowance over top of the elastic, securing it in place. Backstitch over top of it a few times.
11. Continuing pulling the safety pin through to the other side. Detach safety pin, and pin the elastic in place. Securing with stitching.
Repeat steps 8-11 with the remaining elastic piece for the other end of the holder.
12. Fold your piece right sides together, matching up the long edges. Pin in place.
13. Sew along the entire edge using a 1/2" seam allowance. Press seam open.

Turn right sides out and hang! If you make one, I hope you'll add a photo (or two!), to the In Color Order Flickr Group! I'd love to see it!
Enjoy!
Subscribe to:
Posts
(
Atom
)