It's been a bit of an off week! Michael drove home today to go to the Tiger's home opener (MLB)! So, I'm here without transportation for a few days! So I've closed up the shop (only until Saturday!) and planned a few fun activities to keep me busy!
Today it was fabric dyeing! My current favorite fabric for dyeing is white-on-white prints! They are magical when dyed, because the printed pattern stays light! I dyed the Seed Catalouge print from Annie's Farm Stand and two prints from my local quilt shop, the dot has no selvedge info, the sketchy one is by Windham Fabrics.
I used Procion MX dyes again, they provide such rich color saturation. I used Peach, Avocado, and then mixed dyes for the purple and orange! Dyeing at home is not a perfect craft, but I am happy with the results! I follow the instructions in Malka Dubrawsky's first book, Color Your Cloth.
You can see my previous fabric dyeing adventures here and here!
I needed a little mindless sewing project this weekend, so I pulled out all my scraps from my Mendocino quilt (which is on it's way back to me right now!!), and just started sewing. I ended up with 9 blocks. This is now about 30" square. I'm letting it marinate for a bit, I think I'm going to sash it really big and make a throw quilt, since the real quilt will be giant!
Wanted to give you all a little sneak peek of my project for Megan's Festival of Half-Square Triangles! A two week bloggy party featuring tutorials and HST projects! :)
Fabrics: Miscellany by Julia Rothman, Quilter's Linen in Beige
I'm doing a little spring cleaning this week! Have four bags of clothes to be donated, and now I've moved on to the fabric stash! I'm destashing here on etsy if you're interested! I'll be shipping everything next Wednesday! Use coupon code "JENIDESTASH" for 10% off! :)
Today I made Megan's Fresh Bean Salsa! Gotta have easy eats so I don't have to cook this week, hehe! :)
PS - It fit perfectly in a 475 Pyrex Casserole! I used my Friendship one!
George
Today I love the..
Smell of: Daffodils
Sound of: Harry Potter 5
Taste of: Cadbury mini eggs
Sight of: Sunshine
Feel of: Relaxing on the couch
Good Things about Today:
- Fabric dyeing!
- Productive day
- My seeds are sprouting!

This Week


Giveaway Winner!
Thanks to all of you who entered the Nesting Fabric Bowls Pattern giveaway! Without further ado...

 Ms. Random.org choose #289! The winner is anonymous but included their email address! I'll be passing their information on to Nova! :)
I'll be back later today to catch up on what's been happening around here! Cheers!

I'll be back later today to catch up on what's been happening around here! Cheers!
Monday, April 2, 2012
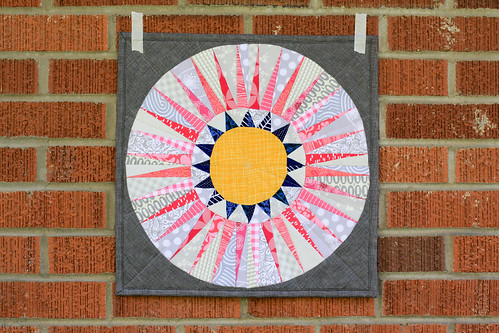
Hi Everybody! Today I'll be walking you through the basics of paper piecing using a New York Beauty Block! The template I used (Block 7) can be found and downloaded along with nine other blocks here: Free New York Beauty Block Patterns.
I feel like I'm still just getting my feet wet in terms of paper piecing, so if you've never paper pieced before, I'd recommend starting with something small to get the basics of it, like this simple square from Quilter's Cache! Definitely check out Faith's star tutorial too, her photos are awesome!
I hope you'll try this out! This block honestly is way easier than it looks! Everything is pieced together in sections, and paper piecing makes it a lot easier to be accurate. I won't lie, I was a little afraid of this block when I first started, but quickly realized it's doable! It even came together quickly too, once I got into a groove! So, let's get started!
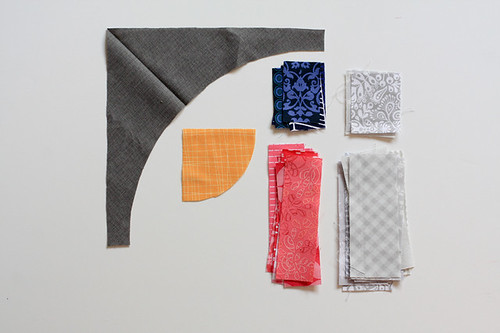
Materials for one block:
- (8) 5"x1.5" pink prints
- (5) 2.5"x1.5" navy prints
- (9) 5"x2" gray prints
- (4) 2.5"x2" gray prints
- (1) 3"x3" square of yellow print
- (1) 9"x9" square of background fabric
- Template found here. (Block 7)
*If you plan on making all four, you'll need four times the fabric. For the background, I got all four pieces out of a 1/4 yard.
Tools:

- Paper (I use Carol Doak's Foundation Paper)
- Acrylic ruler
- Add a Quarter Inch ruler (optional)
- Rotary cutting tools
- Note card
- Pins
- Scissors
- Rotary Cutter/Mat
*I like to use foundation paper over regular printer paper because it is slightly see-through, so you can see the printed pattern from the other side! It's also easier to tear off at the end!
1. Print off your templates. Make sure to print them without scaling! As you can see above, mine cut a bit of the corners off, so I just drew them in with pencil!
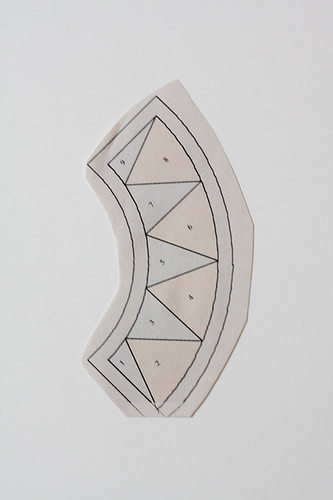
Before you start sewing, set your stitch length down a few notches. My machine's stitch is 2.4 normally and I set it down to 2.0 or smaller. This makes it easier to tear off the paper!
2. Starting with the small arc, take one 2.5"x1.5" navy piece and one 2.5"x2" gray piece. Place them navy piece on the back side of the paper, over top of the shape labeled "1". Make sure it overlaps 1/4" past the line between "1" and 2". Put the gray piece on top of the navy piece, right sides together.
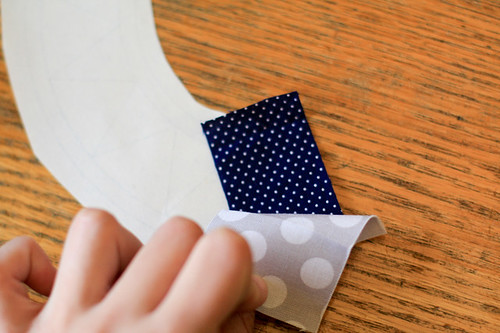
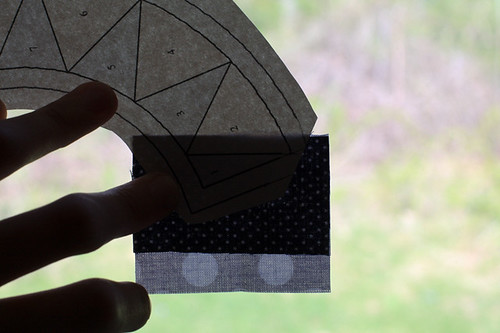
3. Carefully take your pieces to the machine. Stitch on line between "1" and "2". Finger press or iron the piece open.
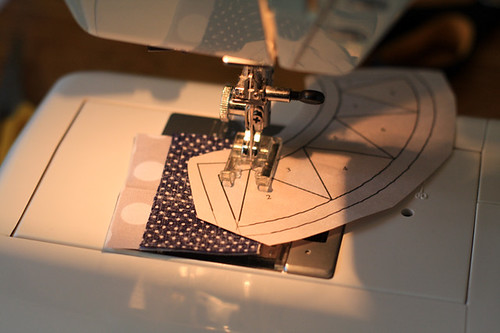
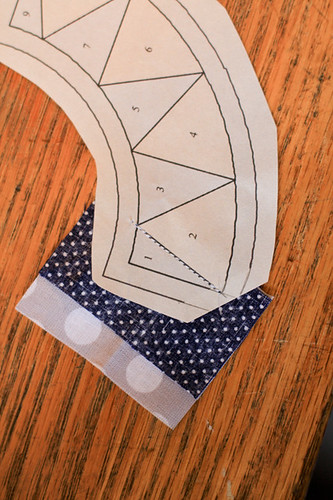
4. Flip your paper piece back over, paper side up. Grab your note card and place it on the line between shapes "2" and "3".
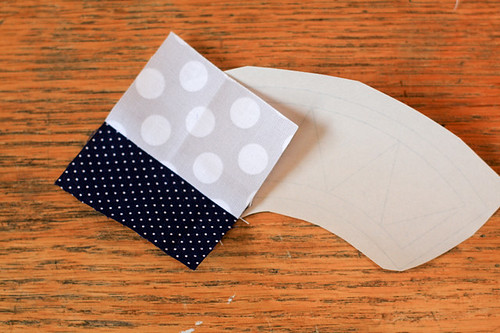
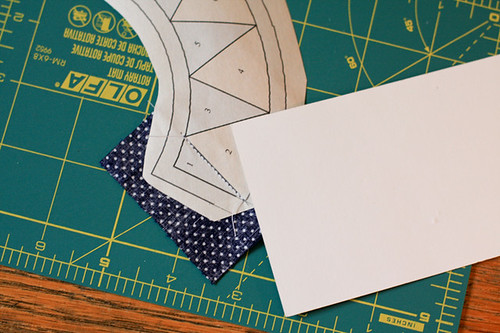
5. Fold the paper piece over the note card. Using a ruler, measure 1/4" and trim the excess.
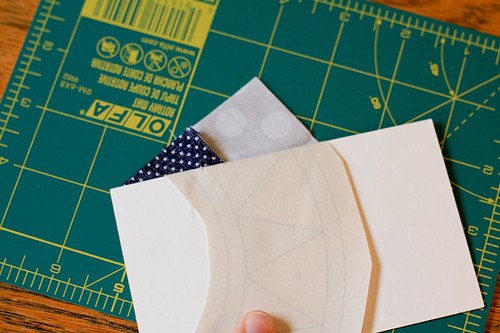
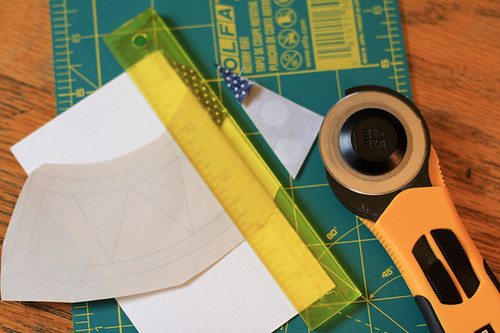
*This is where the add a quarter inch ruler really comes in handy. It has a groove on the edge that fits nicely up against the fold, so it doesn't slide around when you're cutting!
6. Grab the next navy piece and line it up, right sides down, against where you just trimmed. Center it so that it overlaps both side edges.

7. Stitch along the line between shapes "3" and "4".
Continue stitching the pieces across the arc, alternating navy and blue pieces.

8. When the full arc is pieced, flip over your work. From the back, trim along the outside seam allowance using scissors.
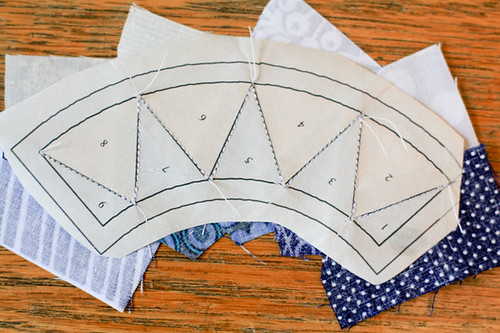

9. Carefully tear off the paper pieces. Fold and crease along the stitching to help loosen each piece.

Yay! Your first arc is pieced! :)
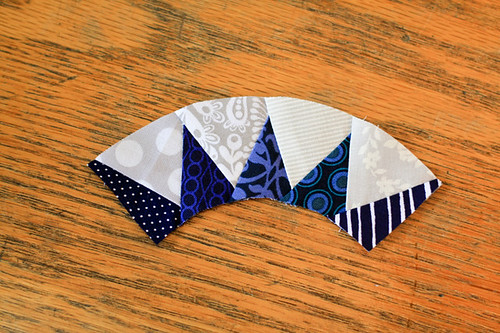
10. Next, piece the larger arc in the same manner, using the gray 5"x2" pieces and pink 5"x1.5" pieces, Starting with a gray piece.
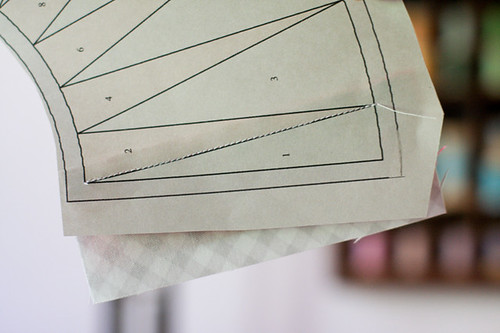
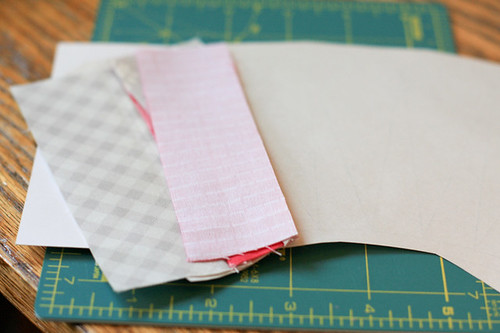
Once your second arc is finished, it's time to put everything together!
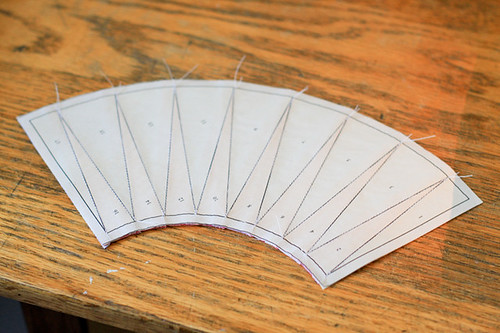
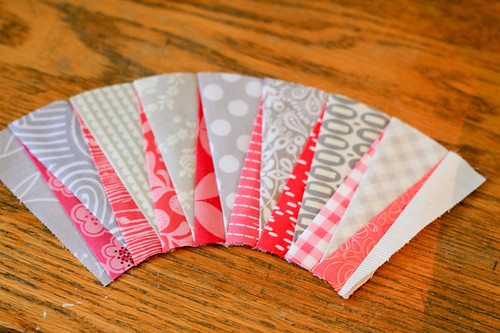
11. First, go ahead and cut out your yellow center and your outer background. I choose to use my background template on the fold, cutting out one piece. I did not cut off the extra seam allowance, so that I'd have some extra wiggle room, but do whatever you feel most comfortable with!
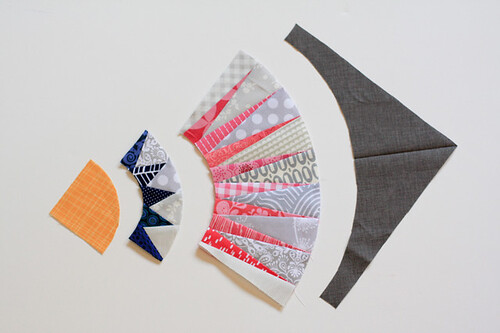
12. Take your background, center, and two arc pieces and fold them in half, pressing with your iron so you have a crease.
13. Starting with your large arc and background piece, match up the center creases, and slowly pin across the arc. Stitch slowly with a scant 1/4" seam allowance. Press towards the background piece.
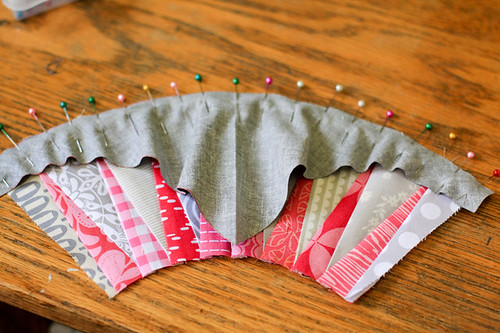
14. For your small arc and center piece, match up the center creases and pin. Pin the edges together, then pin in between, easing the pieces together. Stitch slowly with a scant 1/4" seam allowance. Press towards the center piece.
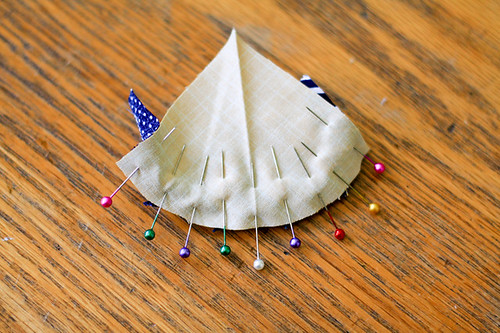
15. Pin your two pieces together, matching up the center creases and pin. Pin the edges together, then pin in between, easing the pieces together. Stitch slowly with a scant 1/4" seam allowance. Press towards the smaller arc piece.
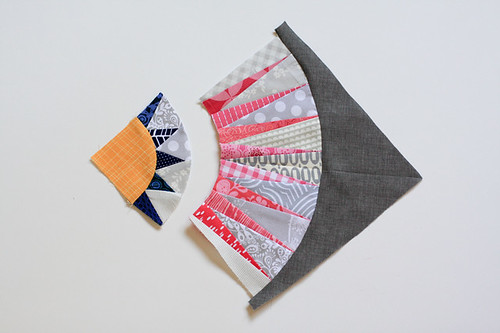
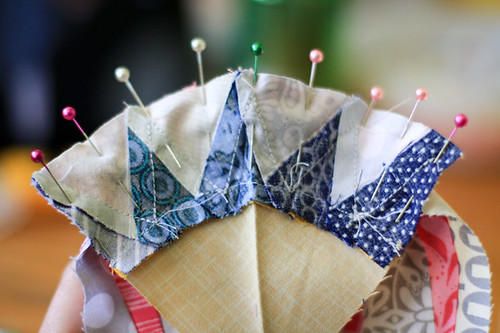
16. Press thoroughly and trim to 8.5" square. If you're making four blocks, I'd recommend waiting to trim until you've finished them all, that way if any one is a little scant, you can make sure they all trim to the same size! :)
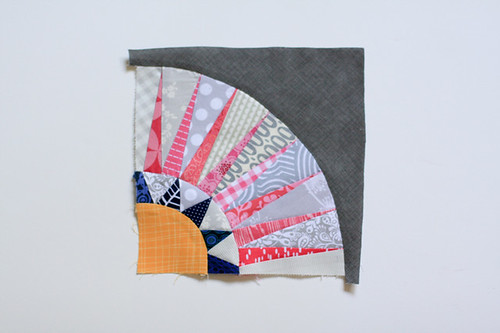
Do you want to know a little secret? My blocks were all a little smaller than 8.5", so I ended up trimming them down to 8.25". No harm done!
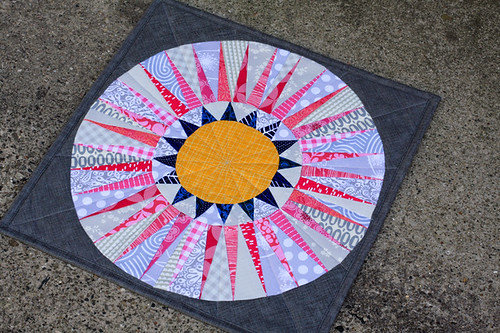
Voila, you're done! I made my four blocks into a mini quilt, you can read a bit more about it here!
Happy Sewing!
Sunday, April 1, 2012

Welcome to the Half-Square Triangle Block of the Month! For each month in 2012, I'll present a quick tutorial for a traditional quilt block using half-square triangles (HST)! It's going to be a lot of fun, feel free to join in at any time! For past posts see here.
Happy April! Today I'm sharing with you the fourth block of our block of the month series! This block is made up of pinwheels! Let's dive right in!
For my block I used prints from Modern Meadow by Joel Dewberry, Ruby by Bonnie & Camille, Oval Elements by Pat Bravo, and Outfoxed by Lizzy House.
Cutting

Traditional Method:
- (8) 4" squares from background fabric (white)
- (2) 4" squares from print fabric (green)
- (2) 4" squares from second print fabric (turquoise)
- (2) 4" squares from third print fabric (teal)
- (2) 4" squares from fourth print fabric (navy)
- (2) 4" squares from fourth print fabric (navy)
Alternative Method:
- (4) 6" squares from background fabric (white)
- (1) 6" squares from fourth print fabric (navy)
- (1) 6" squares from print fabric (green)
- (1) 6" squares from second print fabric (turquoise)
- (1) 6" squares from third print fabric (teal)- (1) 6" squares from fourth print fabric (navy)
1. Assemble your half-square triangles using either the traditional method, or the alternative method. Press seams open.

2. Trim your HSTs to 3.5" square.
3. Arrange your HSTs as shown in the image above.

4. Sew your HSTs into four rows. Press seams in alternating directions.
5. Sew your four rows together, pinning where the seams match up. Press seams open. Trim block to 12.5" if necessary.

Voila! You're done! :)
If you create a block using this tutorial I hope you'll add it to the flickr group!
Happy Sewing!
Subscribe to:
Posts
(
Atom
)