Showing posts with label HST Block of the Month. Show all posts

HST Block of the Month: Your Quilts!

Thursday, January 31, 2013

Happy Thursday! There have been so many finished quilts and quilt tops from our Half-Square Triangle Block of the Month popping up in the In Color Order Flickr Group! It makes me so excited to see them! I love everyone's take on the blocks! I wanted to share them here with you all. If you click on the photo it will take you over to Flickr. Make sure to check out the quilter's Flickr account by clicking their name too!

You can find all of the block tutorials and information on the BOM page here, which can be found through the Tutorials tab now! There is also a PDF Pattern available if you'd like everything in one place! :)

etchings quilt in the snow - pattern from in color order's half square triangle block of the month
mybricole

Modern Christmas HST
Federlily

HST BOM
ddSaab56

Completed In Color Order HST BOM quilt
Toohey Sews

HST quilt Along
Sew It Pretty

busy, busy!
SarahZ 85

HST In Color Order Quilt top
amira_ameruddin

quilt
melarafam

ICO BoM 20120004
frostpatterns

HST BOM Quilt top
Celtic Thistle

Untitled
Earlybird1976

If for any reason you do not want your quilt featured here, please email me and I'll remove it, no worries!

Thank you for quilting along with me!

Half-Square Triangle Block of the Month: Finishing and Quilt Reveal

Friday, December 14, 2012

Half-Square Triangle Block of the Month Quilt Tutorial - In Color Order
Welcome to the Half-Square Triangle Block of the Month! For each month in 2012, I'll present a quick tutorial for a traditional quilt block using half-square triangles (HST)! Feel free to join in at any time! For past posts see here.

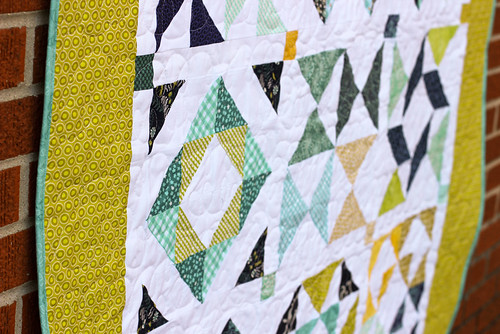
Yay! It's finally time for the reveal of our Half-Square Triangle Block of the Month Quilt! It's been a fun year, let's wrap this puppy up!

Finishing Instructions
You may of course choose to put your blocks together however you like! I'm provided instructions here to construct your quilt like mine.  It features sashing with cornerstones and large borders to give it a bit more size.  I choose to quilt mine with my signature free-motion loops! It has now been washed and it's crinkly soft goodness enjoyed! Now, let's finish your quilts!

Materials:
- 2/3 yard of sashing fabric
- Print scraps from your blocks
- 1 yard of border fabric
- 3.5 yards of backing fabric
- 62”x75” piece of batting
- 1/2 yard of binding fabric

Seam Allowances: 1/4" unless noted
Finished Size: 54"x67"

Cutting:
From sashing fabric:
- Cut 11 strips, 2” x WOF
- Subcut strips into 31 rectangles 2”x12.5”

From print fabric scraps:
- Cut 20 squares 2”x2”

From border fabric:
- Cut 6 strips, 6” x WOF
- Subcut 2 strips into rectangles 6”x25.5” (2 total)
- Trim remaining strips into 6”x42” rectangles

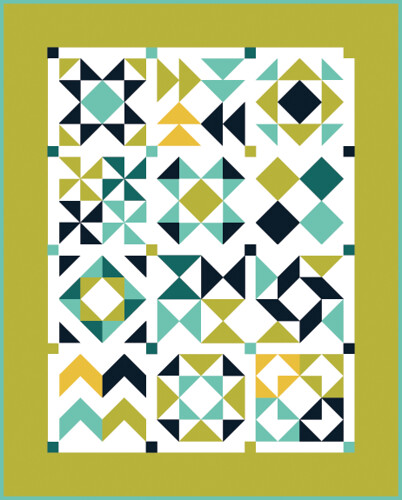
1. Press all your completed blocks and trim to 12.5" if needed.

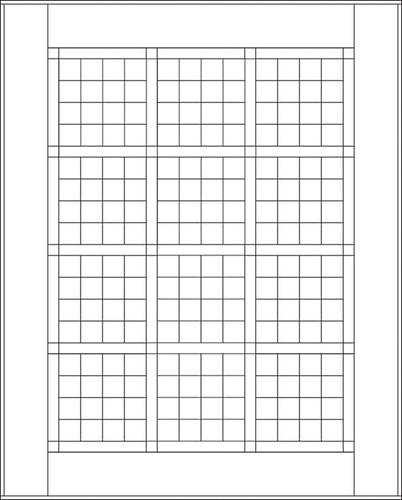
2. Lay your blocks out using the diagram above. There is a blank worksheet here (also seen below) that you can download and fill in with your own unique layout.  You’ll have four rows of three blocks each.

3. Sew a 2”x12.5” solid sashing piece to the left side of each block.  Press seams towards the sashing.

4. Sew your blocks together in each row, making sure there is a sashing strip between each block. Add an additional 2”x12.5” solid sashing piece to the end of each row. Press seams towards sashing.

5. Construct your horizontal sashing pieces by sewing a 2” print square to one end of each remaining 2”x12.5” solid piece. Press seams towards solid.

6. Sew these pieces together into five strips, each strip containing three solid pieces and four squares. Press seams towards solid.

7. Sew your rows together with a row of blocks between each pieced sashing strip. Press seams open.

8. Now it’s time to add the borders. Take two 6”x42” pieces and sew them to the top and bottom of your pieced top.  Press seams open.

9. Take two 6”x42” pieces and sew two 6”x25.5” pieces to the end of each one. Press seams open.  Strips should measure 6”x67”. Sew these two strips to either side of your quilt top. Press.

10. To make your backing, cut your yardage in half. Press. Trim off the selvedges and sew your pieces together lengthwise. Press seam open.

11. Baste (tutorial), quilt, and bind (tutorial) as desired. Binding yardage listed is for 2.5" strips, you'll need six.

Voila! You're done! I hope you'll be posting your blocks, finished quilts and projects made from this series in the In Color Order Flickr Group!

These tutorials will all remain available on the blog, they'll simply move to the 
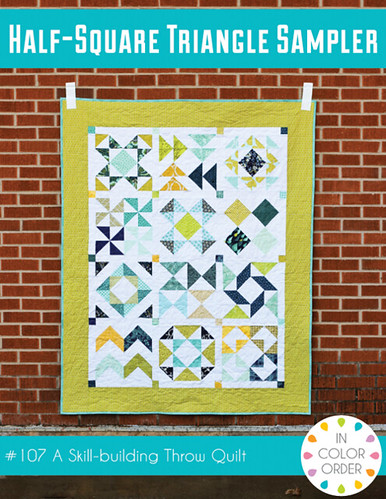
tutorials page after the first of the year! I've turned all of the information from our series, including both half-square triangle construction methods, all twelve blocks, and finishing instructions into a PDF pattern, for those that prefer having everything in one place! You can find the Half-Square Triangle Sampler Quilt pattern here.

Want to make extra blocks and a bigger quilt? Use the block patterns in this series and make any of these three free quilt settings:

https://www.incolororder.com/2016/04/over-and-above-quilt-setting-tutorial.html
Over And Above Quilt Setting Tutorial

https://www.incolororder.com/2016/05/blockade-quilt-setting-tutorial.html
Blockade Quilt Setting Tutorial

https://www.incolororder.com/2016/10/interlaced-quilt-setting-tutorial.html
Interlaced Quilt Setting Tutorial
I do hope you've enjoyed this series, and now feel comfortable using half-square triangles in your quilts. Thanks for playing along with me!

Happy Quilting!

Half-Square Triangle Block of the Month: December

Friday, November 30, 2012

Half-Square Triangle Block of the Month December Quilt Block Tutorial - In Color Order
Welcome to the Half-Square Triangle Block of the Month! For each month in 2012, I'll present a quick tutorial for a traditional quilt block using half-square triangles (HST)! Feel free to join in at any time! For past posts see here.

Happy December! (a day early, hehe) Today I'm sharing with you the LAST block of our block of the month series! Can you believe it? I hope you've enjoyed this series! I'll be sharing finishing instructions later in December. Let's tackle this final block.

Cutting
Traditional Method:
- (8) 4" squares from background fabric (white)
- (2) 4" squares from print fabric (yellow)
- (2) 4" squares from second print fabric (green)
- (2) 4" squares from third print fabric (turquoise)
- (2) 4" squares from fourth print fabric (navy)

Alternative Method:
- (4) 6" squares from background fabric (white)
- (1) 6" squares from print fabric (yellow)
- (1) 6" squares from second print fabric (green)
- (1) 6" squares from third print fabric (turquoise)
- (1) 6" squares from fourth print fabric (navy)

1. Assemble your half-square triangles using either the traditional method, or the alternative method. Press seams open.

2. Trim your HSTs to 3.5" square.

3. Arrange your HSTs as shown in the image above.

4. Sew your HSTs into four rows. Press seams in alternating directions.

5. Sew your four rows together, pinning where the seams match up. Press seams open. Trim block to 12.5" if necessary.

Voila! You're done! :)

If you create a block using this tutorial I hope you'll add it to the flickr group!

Happy Sewing!

Half-Square Triangle Block of the Month: November

Thursday, November 1, 2012

Half-Square Triangle Block of the Month November Quilt Block Tutorial - In Color Order
Welcome to the Half-Square Triangle Block of the Month! For each month in 2012, I'll present a quick tutorial for a traditional quilt block using half-square triangles (HST)! It's going to be a lot of fun, feel free to join in at any time! For past posts see here.

Happy November! Today I'm sharing with you the eleventh block of our block of the month series! One more block after this! Next month I'll share our final block as well as finishing instructions! But for now, let's get stitching!

Cutting
Traditional Method:
- (8) 4" squares from background fabric (white)
- (4) 4" squares from print fabric (green)
- (2) 4" squares from second print fabric (turquoise)
- (2) 4" squares from third print fabric (navy)

Alternative Method:
- (4) 6" squares from background fabric (white)
- (2) 6" squares from print fabric (green)
- (1) 6" squares from second print fabric (turquoise)
- (1) 6" squares from third print fabric (navy)

1. Assemble your half-square triangles using either the traditional method, or the alternative method. Press seams open.

2. Trim your HSTs to 3.5" square.

3. Arrange your HSTs as shown in the image above.

4. Sew your HSTs into four rows. Press seams in alternating directions.

5. Sew your four rows together, pinning where the seams match up. Press seams open. Trim block to 12.5" if necessary.

Voila! You're done! :)

If you create a block using this tutorial I hope you'll add it to the flickr group!

Happy Sewing!

Half-Square Triangle Block of the Month: October

Monday, October 1, 2012

Half-Square Triangle Block of the Month October Quilt Block Tutorial - In Color Order
Welcome to the Half-Square Triangle Block of the Month! For each month in 2012, I'll present a quick tutorial for a traditional quilt block using half-square triangles (HST)! It's going to be a lot of fun, feel free to join in at any time! For past posts see here.

Happy October! Today I'm sharing with you the tenth block of our block of the month series! Can you believe we only have two months left? This year has flown by!

Cutting
Traditional Method:
- (8) 4" squares from background fabric (white)
- (2) 4" squares from print fabric (yellow)
- (2) 4" squares from second print fabric (green)
- (2) 4" squares from third print fabric (turquoise)
- (2) 4" squares from fourth print fabric (navy)

Alternative Method:
- (4) 6" squares from background fabric (white)
- (1) 6" squares from print fabric (yellow)
- (1) 6" squares from second print fabric (green)
- (1) 6" squares from third print fabric (turquoise)
- (1) 6" squares from fourth print fabric (navy)

1. Assemble your half-square triangles using either the traditional method, or the alternative method. Press seams open.

2. Trim your HSTs to 3.5" square.

3. Arrange your HSTs as shown in the image above.

4. Sew your HSTs into four rows. Press seams in alternating directions.

5. Sew your four rows together, pinning where the seams match up. Press seams open. Trim block to 12.5" if necessary.

Voila! You're done! :)

If you create a block using this tutorial I hope you'll add it to the flickr group!

Happy Sewing!

Half-Square Triangle Block of the Month: September

Saturday, September 1, 2012

Half-Square Triangle Block of the Month September Quilt Block Tutorial - In Color Order
Welcome to the Half-Square Triangle Block of the Month! For each month in 2012, I'll present a quick tutorial for a traditional quilt block using half-square triangles (HST)! It's going to be a lot of fun, feel free to join in at any time! For past posts see here.

Happy September! Today I'm sharing with you the ninth block of our block of the month series!

Cutting
Traditional Method:
- (8) 4" squares from background fabric (white)
- (2) 4" squares from print fabric (green)
- (2) 4" squares from second print fabric (turquoise)
- (4) 4" squares from third print fabric (navy)

Alternative Method:
- (4) 6" squares from background fabric (white)
- (1) 6" squares from print fabric (green)
- (1) 6" squares from second print fabric (turquoise)
- (2) 6" squares from third print fabric (navy)

1. Assemble your half-square triangles using either the traditional method, or the alternative method. Press seams open.

2. Trim your HSTs to 3.5" square.

3. Arrange your HSTs as shown in the image above.

4. Sew your HSTs into four rows. Press seams in alternating directions.

5. Sew your four rows together, pinning where the seams match up. Press seams open. Trim block to 12.5" if necessary.

Voila! You're done! :)

If you create a block using this tutorial I hope you'll add it to the flickr group!

Happy Sewing!

HST Block of the Month: August

Wednesday, August 1, 2012

Half-Square Triangle Block of the Month August Quilt Block Tutorial - In Color Order
Welcome to the Half-Square Triangle Block of the Month! For each month in 2012, I'll present a quick tutorial for a traditional quilt block using half-square triangles (HST)! It's going to be a lot of fun, feel free to join in at any time! For past posts see here.

HappyAugust ! Today I'm sharing with you the eighth block of our block of the month series! We're now 3/4 of the way done! This block is a bit of twist (literally!) on February's block! 

Cutting
Traditional Method:
- (8) 4" squares from background fabric (white)
- (2) 4" squares from print fabric (green)
- (2) 4" squares from second print fabric (turquoise)
- (2) 4" squares from third print fabric (teal)
- (2) 4" squares from fourth print fabric (navy)

Alternative Method:
- (4) 6" squares from background fabric (white)
- (1) 6" squares from print fabric (green)
- (1) 6" squares from second print fabric (turquoise)
- (1) 6" squares from third print fabric (teal)
- (1) 6" squares from fourth print fabric (navy)

1. Assemble your half-square triangles using either the traditional method, or the alternative method. Press seams open.

2. Trim your HSTs to 3.5" square.

3. Arrange your HSTs as shown in the image above.

4. Sew your HSTs into four rows. Press seams in alternating directions.

5. Sew your four rows together, pinning where the seams match up. Press seams open. Trim block to 12.5" if necessary.

Voila! You're done! :)

If you create a block using this tutorial I hope you'll add it to the flickr group!

Happy Sewing!

HST Block of the Month: July

Sunday, July 1, 2012

Half-Square Triangle Block of the Month July Quilt Block Tutorial - In Color Order
Welcome to the Half-Square Triangle Block of the Month! For each month in 2012, I'll present a quick tutorial for a traditional quilt block using half-square triangles (HST)! It's going to be a lot of fun, feel free to join in at any time! For past posts see here.
 

Happy July! Today I'm sharing with you the seventh block of our block of the month series! A bit later than I intended, but it's still the first of the month! ;) Let's dive right in!

Cutting
Half-Square Triangle Block of the Month July Quilt Block Tutorial - In Color Order
HST Block of the Month: July, a photo by jenib320 on Flickr.
Traditional Method:
- (8) 4" squares from background fabric (white)
- (2) 4" squares from print fabric (green)
- (2) 4" squares from second print fabric (turquoise)
- (2) 4" squares from third print fabric (teal)
- (2) 4" squares from fourth print fabric (navy)

Alternative Method:
- (4) 6" squares from background fabric (white)
- (1) 6" squares from print fabric (green)
- (1) 6" squares from second print fabric (turquoise)
- (1) 6" squares from third print fabric (teal)
- (1) 6" squares from fourth print fabric (navy)

Half-Square Triangle Block of the Month July Quilt Block Tutorial - In Color Order
HST Block of the Month: July, a photo by jenib320 on Flickr.
1. Assemble your half-square triangles using either the traditional method, or the alternative method. Press seams open.

2. Trim your HSTs to 3.5" square.

Half-Square Triangle Block of the Month July Quilt Block Tutorial - In Color Order
HST Block of the Month: July, a photo by jenib320 on Flickr.
3. Arrange your HSTs as shown in the image above.

Half-Square Triangle Block of the Month July Quilt Block Tutorial - In Color Order
HST Block of the Month: July, a photo by jenib320 on Flickr.
4. Sew your HSTs into four rows. Press seams in alternating directions as shown above.

Half-Square Triangle Block of the Month July Quilt Block Tutorial - In Color Order
HST Block of the Month: July, a photo by jenib320 on Flickr.
5. Sew your four rows together, pinning where the seams match up. Press seams open. Trim block to 12.5" if necessary.

Voila! You're done! :)

If you create a block using this tutorial I hope you'll add it to the flickr group!

Happy Sewing!