I got a sudden surge of energy this week and finished up my Mendocino quilt top yesterday! It's exactly how I imagined it in my head, and I could not be more excited to finish it up! I am absolutely sending this one out to be long arm quilted, it's 96"x105"! Lindsay of Eileen Quilts will be working her quilty magic on it! We met at Sewing Summit last year and she's super sweet!
Today I sewed up the quilt backing! I wanted to focus on the giant octopi prints as well as use up some of the coordinating prints. I pulled solids from the octopus prints to help widen it. I think I need a break from big quilts for a bit! This backing is 106"x123"! A little much to wrestle with! Hehe!
After I made a Retro Flowers mini quilt last week, I started thinking about a larger quilt. I know I need to use some of my favorite fabrics to make sure I stick with a whole quilt, so I think I'm finally going to cut into my Park Slope by Erin McMorris! I ordered the custom acrylic templates for the pattern from Tabslot and am armed with a tiny rotary cutter! Retro Flowers Quilt Pattern by Christina Lane! :)
I did a little (Read: a lot!) online fabric shopping last week, and it's slowly been trickling in! I cannot resist good basics, and honestly I do use them a lot! I picked up these goodies at Fat Quarter Shop and Fresh Squeezed Fabrics! :)
From top to bottom: Oval Elements by Pat Bravo, Nursery Basics by Cloud 9, Fly a Kite by October Afternoon, Flea Market Fancy Reprint by Denyse Schmidt.
I actually found some vintage Pyrex over the weekend! It feels like it's been SO long since I've found anything I want! I actually already have both of these pink butterprint casseroles, but they are in perfect condition and were so, so, cheap. $3 total! They also happen to be one of my very favorite pieces!
George!
In other news, I'm happy to welcome Poppy Seed Fabrics as In Color Order's newest sponsor! :)
Today I love the..
Smell of: 70 degree weather!
Sound of: The Beach Boys
Taste of: Shamrock shake
Sight of: Sunshine!
Feel of: Relaxing on the couch
Good Things about Today:
- Lots of sewing today!
- Hung out with the neighbor cats!
- Sunny and warm weather
- Ran some errands
- Mike is home early!

Wednesday


Monday, March 12, 2012
I was excited to be able to try out another garment pattern this week. This time it was Simplicity #2147. I love tunic style tops, and from the photos, this one looked like a winner! I sewed up a practice using this gray print from Aunt Edna by Denyse Schmidt. The fit of it is pretty loose, so I think next time I'll go down a size, but otherwise it was easy and has great shape! Here's a photo of it on! Can't wait to make another!
Early next month I'll be sharing a step-by-step tutorial for this block as a part of the New York Beauty Quilt Along! You can find the pattern here, it's block #7. I made one of mine this weekend and it came together without much trouble!
This afternoon I played around with the Snapsetter Tool I got while at Sewing Summit. Made a coffee cozy (tutorial here), and a scrappy pouch using Amber's tutorial! Now I have an excuse to get some pretty colored snaps from Amy's shop!
I've slowly been collecting this square dance voile print by Anna Maria Horner. I bought one color on sale on a whim a few months ago, and soon fell in love! I'm planning to using them for a simple quilt top. For now I'm happy just staring at them stacked up! Pink Castle Fabrics still has all four colors!
I've been plugging away on my Honey Cowl. I put it down for a while, but I started working on it when I had to take my car in for service. It's going soooo slow! I just want to be done already so I can wear it and start something new, hehe! I'm using Madelinetosh in French Gray.
I checked out a local knitting event this weekend thanks to a blog reader (thanks Judith!), and picked up some sock yarn. Isn't is so pretty?! It was just so much prettier than all the other yarns! ;) (R-L) Madelinetosh Sock in Flashdance, Sophie's Toes Sock in Daffodils & Tulips.
Great sheet haul on Friday! They'll all be in the shop tonight!
George!
Today I love the..
Smell of: Fresh Air
Sound of: Monk
Taste of: Kix cereal
Sight of: George
Feel of: Relaxing on the couch
Good Things about Today:
- I got into the community garden!
- Short wait at the post office
- Sunshine
- It's still sunny and it's 6pm!

Early next month I'll be sharing a step-by-step tutorial for this block as a part of the New York Beauty Quilt Along! You can find the pattern here, it's block #7. I made one of mine this weekend and it came together without much trouble!

This afternoon I played around with the Snapsetter Tool I got while at Sewing Summit. Made a coffee cozy (tutorial here), and a scrappy pouch using Amber's tutorial! Now I have an excuse to get some pretty colored snaps from Amy's shop!

I've slowly been collecting this square dance voile print by Anna Maria Horner. I bought one color on sale on a whim a few months ago, and soon fell in love! I'm planning to using them for a simple quilt top. For now I'm happy just staring at them stacked up! Pink Castle Fabrics still has all four colors!

I've been plugging away on my Honey Cowl. I put it down for a while, but I started working on it when I had to take my car in for service. It's going soooo slow! I just want to be done already so I can wear it and start something new, hehe! I'm using Madelinetosh in French Gray.

I checked out a local knitting event this weekend thanks to a blog reader (thanks Judith!), and picked up some sock yarn. Isn't is so pretty?! It was just so much prettier than all the other yarns! ;) (R-L) Madelinetosh Sock in Flashdance, Sophie's Toes Sock in Daffodils & Tulips.

Great sheet haul on Friday! They'll all be in the shop tonight!

George!

Today I love the..
Smell of: Fresh Air
Sound of: Monk
Taste of: Kix cereal
Sight of: George
Feel of: Relaxing on the couch
Good Things about Today:
- I got into the community garden!
- Short wait at the post office
- Sunshine
- It's still sunny and it's 6pm!
Friday, March 9, 2012
Happy Friday! I'm excited to be sharing a tutorial for this Triangular Log Cabin Pincushion today! I love making pincushions and this one comes together really quickly.
Sewing Level: Intermediate
Materials:
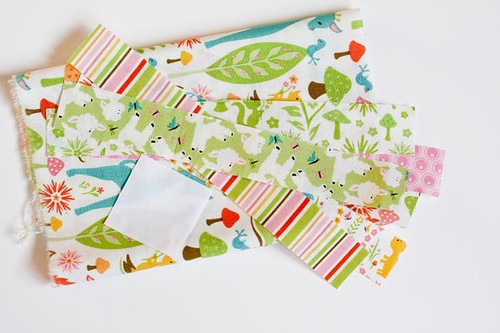
- 1.25"x10" strips of 6 print fabrics
- 2"x2" square solid white fabric
- 7x7" square print fabric
Seam Allowance: 1/4" unless noted
Finished Size: 6" per side
Looking for supplies? Check out my Pattern Supplies and Resources post.
1. Using an acrylic ruler and pencil, mark at 7/8" and 1 1/8" on one side of your 2"x2" white square.
2. Draw a line connecting one mark to the opposite corner.
3. Repeat with the other mark, forming a triangle. This gives you an equilateral triangle!
4. Cut along the two lines you just drew. This triangle is the center of your pincushion.
5. Grab one of your 1.25" strips, and line up your center triangle along one long edge, about 1" from the end.
6. Sew the triangle to the strip. Press seam open.
7. Line up your ruler along the edge of the center triangle and trim off the excess print strip.
8. Repeat on the other side. You should now have a new triangle made up of the white center and one print.
9. Turn your triangle and place it right sides together on the next strip, about 1" from the end.
10. Sew together. Press seam open. Trim off excess print strip on both sides.
11. Turn your triangle and place it right sides together on the next strip, about 1" from the end.
12. Sew together. Press seam open. Trim off excess print strip on both sides.
You have now completed one round of strips for your pincushion! Repeat the process to add another round, moving in the same direction.
13. Using your pieced triangle as a guide, trace a triangle on your 7"x7" square. Cut along the lines, this will be your pincushion's backing.
14. Place your pincushion top and backing right sides together. Pin together, making sure to leave an opening for turning. Sew around all three sides, backstitching a few extra times at the start and finish.
15. Carefully trim the corners close to (but not through!) the seam allowance.
16. Turn your pincushion right side out, pushing out the corners gently.
17. Fill with desired material and hand-stitch the opening closed!
Voila! You're done!
Happy Sewing!
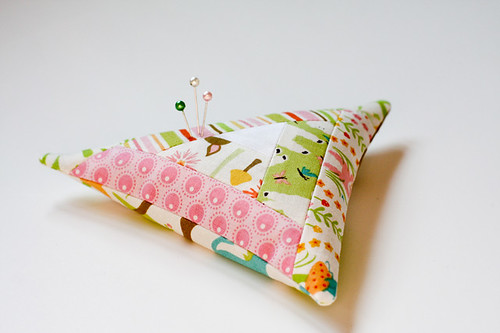
Sewing Level: Intermediate
Materials:
- 1.25"x10" strips of 6 print fabrics
- 2"x2" square solid white fabric
- 7x7" square print fabric
- Pincushion filling of choice (I use crushed walnut shells)
Seam Allowance: 1/4" unless noted
Finished Size: 6" per side
Looking for supplies? Check out my Pattern Supplies and Resources post.
1. Using an acrylic ruler and pencil, mark at 7/8" and 1 1/8" on one side of your 2"x2" white square.
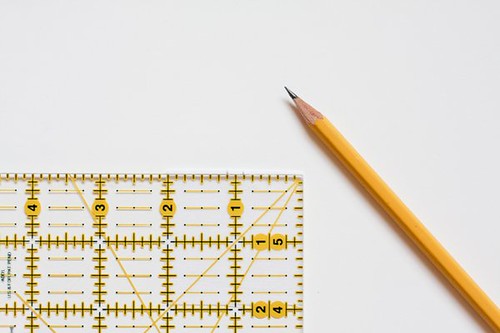
2. Draw a line connecting one mark to the opposite corner.
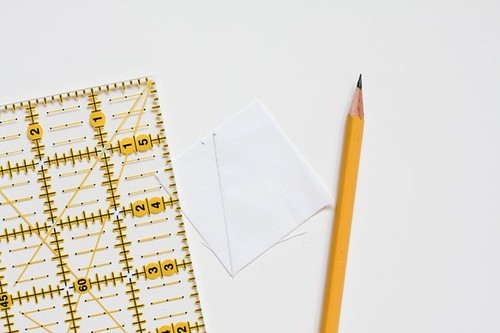
3. Repeat with the other mark, forming a triangle. This gives you an equilateral triangle!
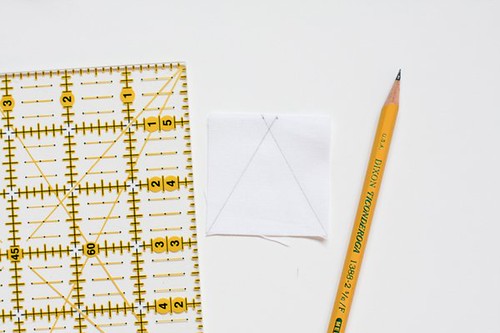
4. Cut along the two lines you just drew. This triangle is the center of your pincushion.
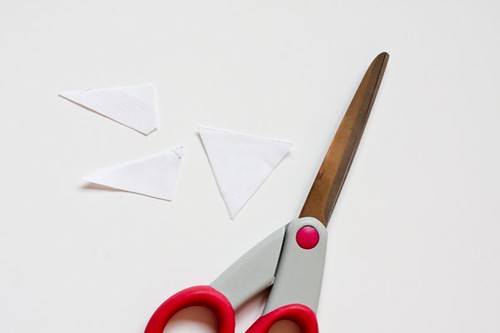
5. Grab one of your 1.25" strips, and line up your center triangle along one long edge, about 1" from the end.
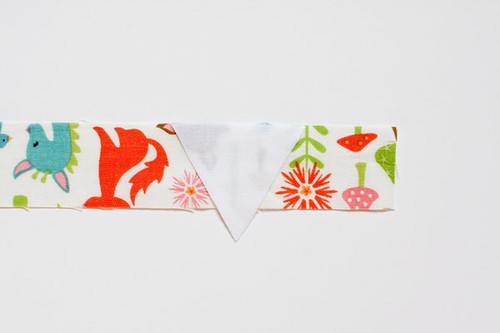
6. Sew the triangle to the strip. Press seam open.
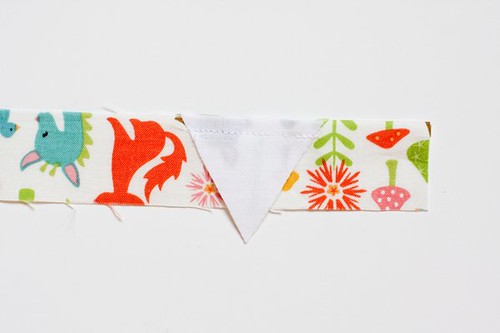
7. Line up your ruler along the edge of the center triangle and trim off the excess print strip.
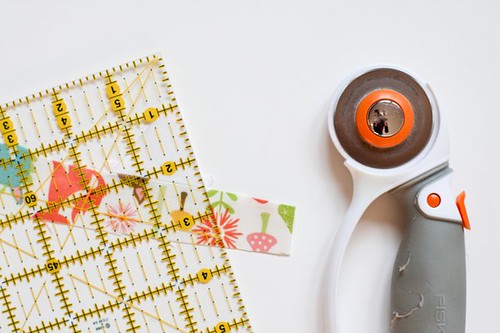
8. Repeat on the other side. You should now have a new triangle made up of the white center and one print.
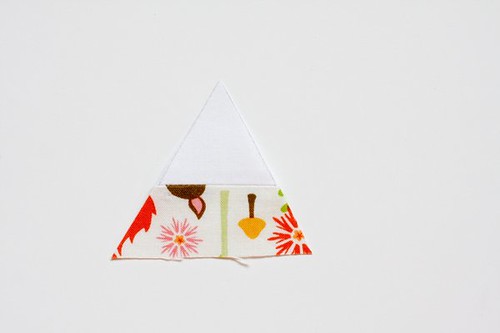
9. Turn your triangle and place it right sides together on the next strip, about 1" from the end.
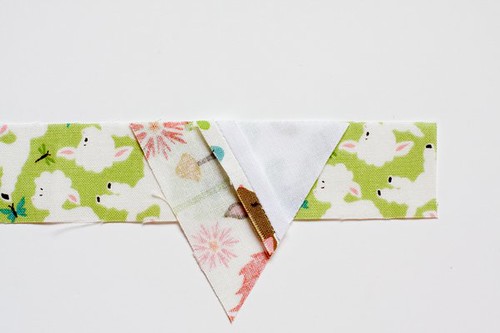
10. Sew together. Press seam open. Trim off excess print strip on both sides.
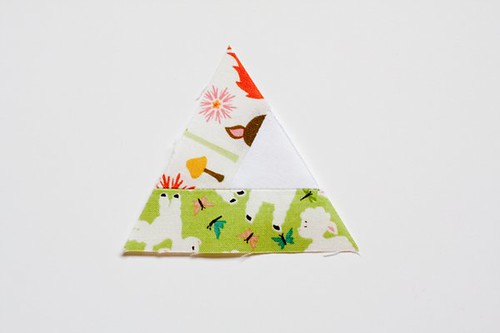
11. Turn your triangle and place it right sides together on the next strip, about 1" from the end.
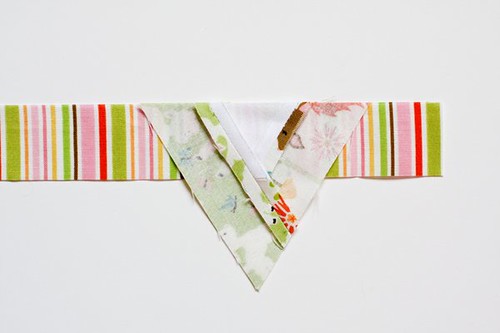
12. Sew together. Press seam open. Trim off excess print strip on both sides.
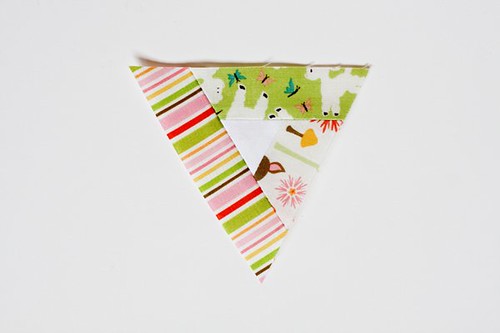
You have now completed one round of strips for your pincushion! Repeat the process to add another round, moving in the same direction.
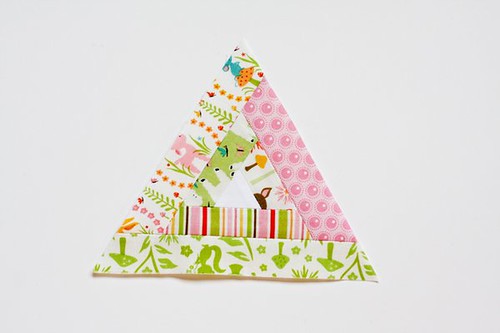
13. Using your pieced triangle as a guide, trace a triangle on your 7"x7" square. Cut along the lines, this will be your pincushion's backing.
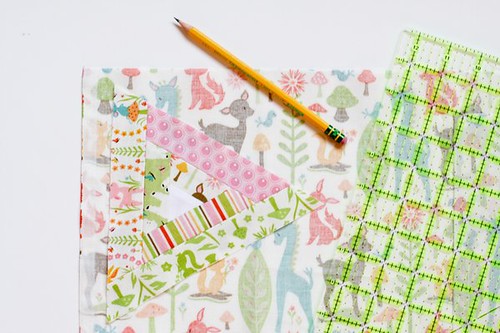
14. Place your pincushion top and backing right sides together. Pin together, making sure to leave an opening for turning. Sew around all three sides, backstitching a few extra times at the start and finish.

15. Carefully trim the corners close to (but not through!) the seam allowance.
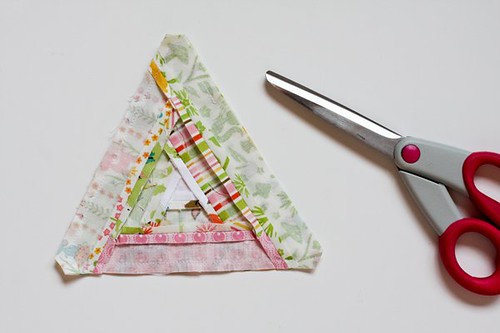
16. Turn your pincushion right side out, pushing out the corners gently.
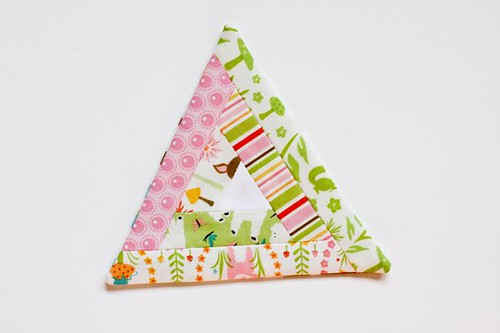
17. Fill with desired material and hand-stitch the opening closed!
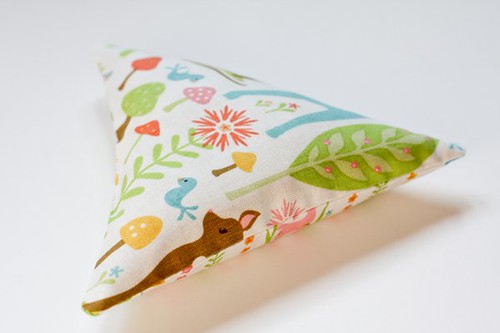
Voila! You're done!
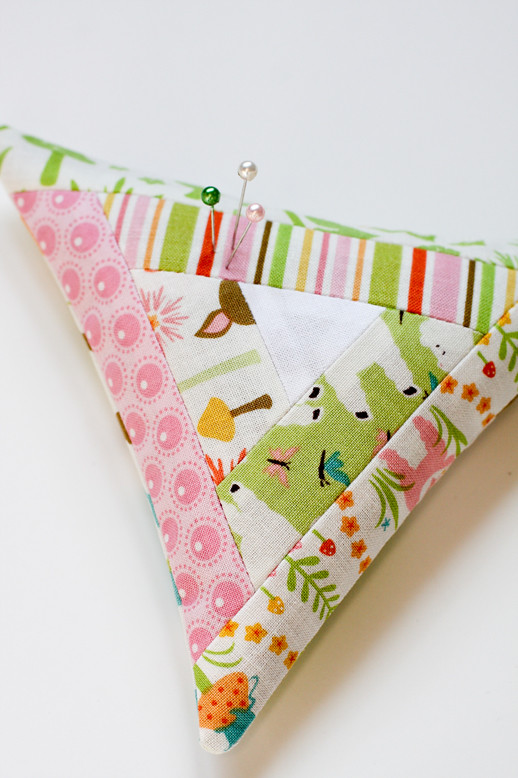
Happy Sewing!
Favorites
1. rainbow triangle mini quilt, 2. Jewel Tones, 3. Cathedral7, 4. Summerlove Stripe, 5. HK Actionshot# 5, 6. New York Beauty, 7. Hope Valley Filmstrip Quilt Top, 8. Queen Pixel Quilt, 9. Lone Starburst

Subscribe to:
Posts
(
Atom
)