
I love making bags! In my opinion, you can never have too many. Especially little bags, they are just so handy. I whipped up one of these bags right before traveling and thought you all might enjoy a little tutorial to make your own.

These bags are fat-quarter friendly, they only use three fat quarters (plus twill or fabric for ties), so even if your stash is small, you can make these bags! I use them for everything, they can hold a lot. They make a great gift, or the perfect eco-friendly, reusable wrapping. They're a great DIY gift bag!

Looking for other sizes? Check out the Lined Drawstring Bag Pattern which includes 8 sizes and instructions for creating your own custom size!

Customize your bags even further with the Lined Drawstring Bag Expansion Pattern!
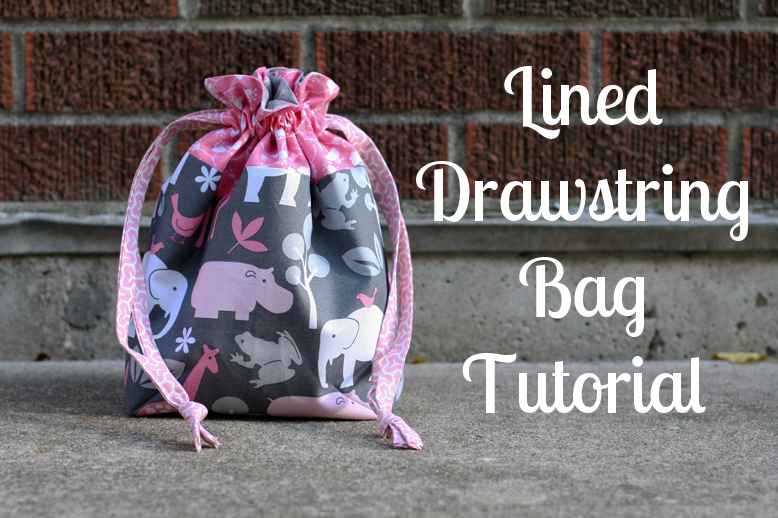
The best part for me of course, was choosing the fabrics! I chose a focus fabric (the animal print), for the exterior, and then pulled colors from there to use as the coordinating exterior accent, interior, and ties. Notice my focus fabric is directional (meaning it has a clear "top" and "bottom"). I've written the tutorial to work with directional prints.
Optional: For added structure, you may choose to add interfacing to your bags, but it is not necessary. I’d recommend using interfacing only on the Exterior Main pieces. Using it on the Exterior Accent could interfere with the drawstring.
I have a full video tutorial available for this bag in addition to the written tutorial here in this post. It covers the full process from cutting to finishing. Watch the video in this blog post, or watch it on YouTube, here: Lined Drawstring Bag Video Tutorial

Fabrics used (left to right): Zoology by Michael Miller, Modern Meadow by Joel Dewberry, Peacock Lane by Violet Craft, Grunge Basics by Moda
**Fabric Shops: Please don't teach classes using this tutorial. I have a paper pattern that includes this bag available for wholesale ordering. Order through this form.
Sewing Level: Beginner Friendly
Finished size: Approx. 10" tall, 7" wide, 3" deep
Lined Drawstring Bag Materials:
- 3 Fat quarters (18"x21")
- 2 yards of 1/2" twill tape, nylon paracord or 1/8 yd fabric
- Coordinating thread
- Acrylic ruler
- Large safety pin
- Water soluble pen
- Optional: decorative beads
Looking for supplies? Check out my Pattern Supplies and Resources post.
Lined Drawstring Bag Cutting:
From Exterior Main Fabric:
- Cut (1) 9”x21” strip
- Subcut into (2) 9”x10.5” pieces*
From Exterior Accent Fabric:
- Cut (1) 4”x21” strip
- Subcut into (2) 4”x10.5” pieces*
From Interior Fabric:
- Cut (1) 12.5”x21” strip
- Subcut into (2) 12.5”x10.5” pieces*
If using fabric for ties:
- Cut (2) 32”x2” strips
If using twill for ties:
- Cut (2) 32" pieces
*This tutorial uses subcutting. There may be scrap leftover from the strips after you've cut your pieces. It's written this way to ensure that any directional fabrics are cut correctly. The scraps will not be used in the final bag. The final measurements for each piece can be found on the second line of each cutting instruction if you’d rather cut from scraps. All piece dimensions are listed as height x width.
Lined Drawstring Bag Instructions:

*Use a 1/4” seam allowance unless otherwise noted*

1. Arrange your pieces as shown in the above diagram: Interior, Exterior Accent, Exterior Main, Exterior Main, Exterior Accent, Interior.

Be sure to arrange directional prints with the “top” of the print facing out, towards the interior pieces.

2. Sew all your pieces together in this order, creating one long strip. Backstitch when you start and finish each seam. Press your seams open.

3. Fold your sewn strip in half, right sides together, matching the interior ends. Pin along the raw edges, matching up each seam and pinning it to secure. Leave a 3" space at the center of the open end (interior), for turning later.

4. On both sides, mark a 1" opening in the center of the exterior accent piece. Measuring from one side of the exterior accent, mark at 1.25" and 2.25". These two smalls sections will be left unsewn, creating an opening for the drawstrings.

5. Sew along the three open sides, backstitching when you start and finish. Don’t sew between the 1” opening you marked on both sides or the the 3" opening on the end. Be sure to backstitch before and after each opening.

6. To create the flat bottom of your bag, we need to box all four corners (2 interior, 2 exterior).
Starting with an interior corner, wiggle both interior pieces apart, flattening the corner (where the seams meet). Line up the bottom and side seams, wiggling them between your fingers to feel that they are lined up. You may find this is easier if you first press the seams open a few inches in each direction.

7. Lay your acrylic ruler across the corner, lining up the diagonal edge of your piece with the 45˚ angle line. The stitching line should line up at 1.5" (as shown above). Draw a line 3" wide across the corner using a water soluble pen.


8. Sew on this line, across the corner. Backstitch when you start and stop. Trim off the corner, leaving a 1/4” seam.
Repeat steps 6-8 for the remaining interior corner and both exterior corners.
If you need additional help adding boxing the corners of your bag, watch this video I taped at Quilt Market with the Fat Quarter Shop!

9. Turn your piece right sides out, pulling through the opening in the interior. Gently push out the corners. Press the lining opening under 1/4” and stitch closed with a small seam allowance.

10. Nestle the interior into the exterior. Press along the top edge.
 11. Find the 1” opening on each side of the bag. Mark a small horizontal line at the top and bottom of the opening. Using your acrylic ruler, extend the lines around the entire bag.*
*Alternatively, slide the bag onto your machine bed, lining up the needle with the top mark. Place a piece of washi or masking tape on the machine bed to use as a guide. Repeat with the bottom mark. This technique is shown in the video above. (Some 1" wide masking tape is super helpful here!)
 12. Sew all the way around your piece on the lines you marked. Backstitch at the start and finish. You’ll have two stitch lines when you’re done, one above and one below the 1” openings. This is the casing for the drawstrings.
If you’re using a sewing machine without a free arm like mine, turn the bag inside out after marking the lines. Sew on the lines, “inside the bag”. This technique is shown in the video above.
Now it’s time to make your ties. If you’re using twill, skip to step 18.

13. Take your fabric strips and fold down 1/4” on each short edge, wrong sides together. Press. Topstitch to secure.

14. Fold in half lengthwise, wrong sides together. Press.

15. Unfold, and fold each raw edge into the crease you just created. Press.

16. Fold in half again and press.

17. Topstitch along the open edge to close with a very small seam allowance. Repeat steps 13-17 to create the second tie.


18. Attach a safety pin to one end of your ribbon or fabric tie. Insert the safety pin into one of the side openings.
I now sell these large safety pins in my shop! Find them here.


19. Wiggle it through, passing the other opening, pulling it all the way back around and out the opening where you started.
 20. Even out your the ends and tie together in a tight knot. Repeat with the remaining tie, starting at the other side opening.
*If you’re using twill instead of fabric ties, you may choose to treat the ends with Fray-Check or clear nail polish to prevent fraying. Or finish by turning each end under by 1/4" twice and topstitching to secure.
 Voila! You're done!
Ready to make some more? Check out the Lined Drawstring Bag Pattern which includes 8 sizes and instructions for creating your own custom size!

Don't forget you can easily customize your bags by incorporating patchwork! For three kinds of striped bags, see this tutorial. Find all the variations and tutorials here: Lined Drawstring Bag Tutorials and Variations.
Customize your bags even further with the Lined Drawstring Bag Expansion Pattern!

Enjoy! Share your finished bag photos using the #lineddrawstringbag hashtag on social media!
Happy Sewing!
Very cute!!! My girls would love a few of these to keep goodies in. :)
ReplyDeletePretty bag and great tutorial! Thanks!
ReplyDeletegreat tut .... love the fabric choices ... pink is me! (uh, as well as yellow, teal, gray, ... LOL) ... darlene
ReplyDeleteI like all colors :D I have no preference!! But I *DO* know what I'm doing this afternoon!!! :D
DeleteThank you for the tutorial! This bag is very cute:-)
ReplyDeletethese are perfect Jeni, thank you
ReplyDeleteThis is so pretty and your instructions are really clear - can't wait to try it out!
ReplyDeleteIt's so great Jeni - can't wait to make a few for us!!
ReplyDeleteFabulous bag! Thanks for the great tutorial!
ReplyDeleteI love it! I'm making a whole bunch! Thanks :-)
ReplyDeleteGreat looking tutorial! Thanks for the share.
ReplyDeleteQuestion though, what program do you use when you made the little diagram picture (http://www.flickr.com/photos/jenib/6249692017/)? Very curious! :) Thanks.
I use Adobe Illustrator to create all my diagrams!
DeleteСпасибо Вам большое за Ваши мастер-классы!!!
ReplyDeleteБольшое Вам спасибо за Ваши мастер-класс!!!
ReplyDeleteBeautiful bag and great tutorial.Thanks!!
ReplyDeleteI love this. Definitely going to make some soon! Thank you so much for the tutorial.
ReplyDeleteCute bag and very easy looking to make (an afternoon). Good idea for Christmas gifts. Thanks Sandra
ReplyDeleteThanks so much for this detailed tutorial. I can't wait to make them. I plan to make a series of them in various sizesfor my daughter for travel bags (shoes, delicates, electronics, hair stuff, etc.)
ReplyDeleteThanks for the tutorial, Jeni. I needed a little bag to make for my niece to go with the little birthday outfit I made her. I'll post to your flickr group tomorrow.
ReplyDeletexo di
This is a great bag for so many things, especially a little gift bag that would be used over and over by the recipient I'm sure.
ReplyDeleteThank you for the great tutorial.
beautiful jeni! I love it. can't have too many bags!
ReplyDeleteNow that's a bag I think I could make! Wish me luck!
ReplyDeleteHow cute it is! Thanks for the tutorial,
ReplyDeleteSilke
Super cute! I'm going to make these with K the next time she has a day off from school. :) Thanks!
ReplyDeleteso adorable! I love the pink and gray one. I want to make one of these for packing up all my chargers when I travel!
ReplyDeleteActually, after seeing your other bag post, I think I'm just really going to make bags for everything, and then put each bag in my suitcase!
:)
Love this, Jeni! So cute!
ReplyDeleteThis is awesome! I really need to make me one. You always think of such great ideas.
ReplyDeleteThank you for the tutorial! what a great bag! I think I'm going to make one to match a quilt I just made as a bonus gift!
ReplyDeleteLauraJ_Sews
Gee - Cute little bag, Jeni! I love your tutorials - they're very easy to follow. I also love your color sense and all the photo eye candy on your blog. Just wish I could sew up so much stuff as fast as you do!
ReplyDeleteBeth in Colorado
Jeni, such a fun tutorial! I made one tonight and plan to make more tomorrow! I will be sure to add them to the Flickr group!
ReplyDeleteI'm TOTALLY making some of these this week! Maybe Friday with the ILs take the kids off my hands. :)
ReplyDeleteThank you for this! I just made a Halloween version that will hold candy nicely. :-)
ReplyDeleteKris
Thank you for a great tutorial.
ReplyDeleteThe fabric combination is so lovely!
I'm so behind on blog reading! Your new tutorial is adorable, Jeni! I can think of a few purposes for these bags. Thanks for sharing!
ReplyDeleteYAY! That's going to be PERFECT for my knitting! Thanks for the how-to, I'll be linking.
ReplyDeleteThanks for such a great tutorial. I have just finished a couple of these bags and it was certainly the simplest way to make a great looking casing.
ReplyDeleteI will definitely make them again.
Your fabric print choices are just so pretty and the bags don't look very expensive to make. These will make great gifts this holiday! Thanks for the idea and the tutorial:-)
ReplyDeleteThis is such a fantastic way to make these. Thank you!
ReplyDeleteGostei...
ReplyDeletesuper fácil de ser feito, mas nunca tinha visto como fazer dessa maneira
Muito obrigada por compartilhar...
abraços de MF
Joined your tutorial following a link from Comfortstitching: lovely tutorial, the best I've seen! (and I've seen a few!!) x
ReplyDeleteHi Jeni! Your blog is so cut. Sorry my english, but i try to not use the google translation. I need to remember "my english school".
ReplyDeleteThe bag is so beautiful, and the tutorial is perfect. Thank you.
I have joined to your blog.
I have a blog too.
www.agulhas-soltas.blogspot.com
Great tut! I made 3 today! Thanks:)
ReplyDeleteOh my gosh that is so adorable! I will so be making one of these.
ReplyDeletethis tutorial was fabulous. I used it to make some lined 'santa sacks' for a friend's kids (they are pillow-case size). thanks again :) Lindsey
ReplyDeleteThank you - this is so clear, and beautiful pictures.
ReplyDeleteFab tutorial and wonderful colour choices! Just found your blog and am now following, love it!
ReplyDeleteA funtastic bag, thanks for the tutorial! It's so cute.
ReplyDeleteA clearly presented tutorial! Nice job, and thanx!
ReplyDeleteVery cute! I just finished one up and will upload it in a minute. Very simple directions! Thank you
ReplyDeleteI'm totally making this today Jeni! Thanks for the tutorial :)
ReplyDeleteHello, I've just arrived via Film in the Fridge, absolutely love the look of this tutorial :-) It will work perfectly with a piece of butterfly fabric I have had for a while, can't wait to get started, thank you.
ReplyDeleteThis is such a clear tutorial. thank you!
ReplyDeleteJust made one! Fabulous tutorial! :) Thank you!
ReplyDeleteThis bag is great! Now I know what I want to make next!
ReplyDeleteOh my goodness I can hardly wait to make one of these!! Adorable.
ReplyDeleteWONDERFUL tutorial!!! Super easy to follow and fast to make! Great project! Thank you!!!!
ReplyDeleteThank you so much for sharing this great tutorial! The bags are darling and I just finished making 2 to ship off to a little girl who is waiting for a heart and her brother. I made pillowcases to put inside. I know that I will be making many, many more! They are so fun and quick!
ReplyDeleteJust found your blog. Great tutorial. Will use some for Christmas gifts instead of paper.
ReplyDeleteYeah, whoopie, yippee yeah...... I just made one of these and it's fab!!! Thanks for a brilliant tutorial that even I could follow successfully (apart from getting the main fabric sideways on - but who cares - for a first go that's good). I am going to make another one right away xxx
ReplyDeleteOkay, I have to tell you. These are addictive!
ReplyDeleteSuch a cute little bag! Thanks so much for the wonderful tutorial. I am going to try to make a slightly bigger bag...any suggestions? :)
ReplyDeleteThanks!
Sabrina
I have a pattern version available with 7 additional sizes and instructions for making a custom sized bag! - http://incolororder.bigcartel.com/product/lined-drawstring-bag-pdf-pattern
DeleteIm making the first of a million of these today. Thanks Jeni!
ReplyDeleteThanks for such a great tutorial Jeni! I made a bag to send my #ssswap stuff in. I'll take a pic and post it to the group tomorrow. Looking forward to your pattern with different bag sizes.
ReplyDeleteThanks for sharing the tutorial. Just made the first of many I think :-)
ReplyDeleteI am making this darling little bag with fat quarters and am stumped on the interior dimensions.
ReplyDeleteHow are you able to get two interior pieces cut 12.5"x10.5" out of one fat quarter that is 18" x 22"?
Thank you for your help!
Jane
You'll want to cut a 12.5"x22" strip from your fat quarter, and then cut that strip down into (2) 10.5"x12.5" pieces!
DeleteHello.....
ReplyDeleteI have made three of these now, and just blogged about them with a link to your tutorial..
http://sewasecondchance.blogspot.com/2011/11/whats-been-made-in-november.html
Thanks again x
I made some fab ones using this pattern in halloween fabric as ToT bags and they were awesome. Thank you for a super easy tutorial and sharing your ideas. much appreciated
ReplyDeleteRaven UK
awesome tutorial!, just in time for Xmas too. everyones getting one!!. thanks Jeni.
ReplyDeleteJust finished the first of many of these drawstring bags (photo is on the Flikr group page) -- thanks for the tutorial, Jeni. I customized this one, it is quilted, and the next three will have name patches stitched on for my grandchildren. Fun!
ReplyDeleteI keep seeing the link to this post every where. I think I am gonna have to give it a try. Very cute.
ReplyDeleteThis is the best drawstring bag design, ever! I've been trying to get around that leaving-space-for-the-string problem and have yet to figure out an easy way. I'm going to give this a try for sure!
ReplyDeleteThank you so much for this tutorial.
ReplyDeleteThis is such a fantastic tutorial, thank you! I've just made 2 today and can see many more in my future!!
ReplyDeleteI've blogged about it (and you!) here:
http://charmaboutyou.blogspot.com/2011/12/making-last-minute-gifts.html
I am a new-ish sewer, largely self-taught, and I have been aching to make drawstring bags for myself and fellow knitters and as easy as they are *supposed* to be, they have left me mystified and disappointed until this tutorial. I really can't thank you enough!!!! It's so clearly written and the pictures are fantastic. It couldn't have been easier and I adore the result! I appreciate you sharing so much!!!!
ReplyDeleteI love your fabric choices!!! I made two. They are very cute! I'm going to make more.
ReplyDeleteJeni, I loved just quickly sewing three of these bags for wrapping gifts!! Thank you for this tutorial, they are so darling :) Bet I make a bunch more.
ReplyDeleteThank you for that lovely tutorial, here's my attempt at a drawstring bag for a sock knitting kit. http://judiknitsandsews.blogspot.com/2011/12/drawstring-bag.html
ReplyDeleteI love this tut! I have made a lot of bags but what really drew me into your tut was the colors you chose. So cute!
ReplyDeleteI love all the color on your blog and have had it up on my screen for several days so I can look through it all!
I totally have to make this. What size bag does this end up making?
ReplyDelete@pril
KoolBeenz-blog.blogspot.com
The finished bag is about 10" tall and 7" wide!
DeleteI love this bag and I'm making one for a Christmas gift. I didn't see anywhere in the pattern, but did you at any sort of stabilizer to the bag? I've used it in every bag I've made before and I wasn't sure how this one would turn out without it. Thanks! Great tutorial!
ReplyDeleteI didn't, but you could certainly add interfacing if you'd like! I'd only add it to the exterior main pieces so that it won't interfere with the drawstring!
DeleteVery lovely bags and tut...(gotta get used to inches metrical system, but i can handle it!!!) i was looking for a ROUND based sewn box (for sewing goodies yep!!!) and found this web site!!! i'll surely be back and check if you posted it.
ReplyDeletebye bye!
(good work, keep it up!)
Great tutorial and very clear pictures, thanks. I have a question: when you do the squaring for the bottoms with the exterior fabric, do you also do corners for the liner fabric? Thanks a lot!
ReplyDeleteCorrect! You'll square the bottoms of both interior corners and both exterior corners!
Deletethanks so much for this very well done tutorial! I just made one...no problem!!
ReplyDeleteJust finished making one , and I have to say this was the easiest tutorial , for the most part , for me to understand. I , like someone else posted, am pretty much beginning sewing and largely self taught , trial and error. I was confused at the squaring off part when I read "repeat this for the 3 remaining corners" .. I only had 1 corner left .. unless I misunderstood and was supposed to be doing the lining as well. It turned out really cute though! I will definitely be making more :) Thanks so much!
ReplyDeleteThis is a great tutorial--a keeper--especially for those of us who love making drawstring bags!
ReplyDeleteThanks for a great job.
How bizarre I just bought a fq of the animal print earlier today and now tonight I stumbled across this tutorial....karma or what? Great tute. Hugs Naomi
ReplyDeleteLove this, what a great tutorial.
ReplyDeleteThank you for the tutorial - very clear and easy to follow. I made a couple for Christmas wrapping this year, and they worked wonderfully!
ReplyDeleteThis is very helpful since I've been trying to make one and i did but it didn't last longer a month! Now i can try this and I'm pretty sure that It'll last long!
ReplyDeleteI love this bag! What a great easy tutorial, thank you!
ReplyDeletehttp://kateyz.blogspot.com/2012/01/im-probably-last-person-alive-to-make.html
I just found your tutorial a few days ago and was immidiaty in love. Here´s my bag: http://conibaer.blogspot.com/2012/01/retro-romantik-beutelchen-verlosung.html
ReplyDeleteThanks for your GREAT tutorial!!!
This is such a cute bag and great tutorial. I am pinning it! If I can't get it made, at least I can pin it, huh.
ReplyDeleteHi Jeni, Love the bag. I enjoyed making it. Hope you don't mind I added the link to my blog for others to enjoy :)Great tutorial & thankyou for sharing your knoweledge :)
ReplyDeleteFab tutorial - I have featured it on my Tuesday Tutorials after making one today :)
ReplyDeletehttp://jesshopkins.blogspot.com.au/2012/02/tuesday-tutorials-drawstring-bag.html
Wow What Beautiful Bags. i like it. Thanks a lot.........
ReplyDeleteJust want to say your article is as surprising. The clearness in your post is Just excellent and i could assume you're an expert on this subject. Fine with your permission let me to grab your RSS feed to keep updated with forthcoming post. Thanks a million and please continue the rewarding work.
ReplyDelete!#: Sorel Women's Helen Of Tundra Boot... The Cheapest
Thank you so much for the wonderful tutorial! I plan on making this w/my 11-year old daughter for gifts.
ReplyDeleteGreat tutorial, thank you! My niece & nephew asked me to make them marble bags, this will be terrific!
ReplyDeleteAwesome Thanks for nice Tutorial & sweet Bags.
ReplyDeleteThanks for this awesome tutorial. i just made one of these bags, its the first thing i have sewn in a couple of years and i really like it.
ReplyDeleteThis is hands down the best tutorial I have ever followed!! Thank you so much for the clear and detailed instruction with the diagrams and pictures - I got it!!
ReplyDeleteAmazing
thank you
Great post. You are so creative! I'm going to have to try and make some of these great custom drawstring backpacks. I really love the idea of making them my own. Keep up the good work.
ReplyDeleteThank you... thank you so much for the instruction. I just made it: http://chriskiki.blogspot.com/2012/03/dslr-bag.html Tried to upload it on your flickr but couldn't do it.
ReplyDeleteIt is Beautiful, Thank you very much, I'll tray to do it very soon. wilperez38@gmail.com
ReplyDeleteI am doing one for American Heritage Girls (kinda like girl scouts) and I love the bags! Planning to make some at home!
ReplyDeleteThanks so much for this tutorial...I just made one for my daughter out of some Tinkerbell fabric for her to carry her "treasures" and she loved it! Can't wait to make more for myself. :)
ReplyDeleteHello Jeni. Thanks for posting this tutorial. I'm trying to learn how to sew and I can't wait to try this!
ReplyDeleteI was just curious, where did you get these fabrics? They're so adorable. Thanks again. :)
Laura
Fantastic Tutorial! As a new-ish sewer, this project only took me about an hour, and has been one of my most successful attempts at making something presentable! Love it!
ReplyDeleteI love this bag! I posted about it in my blog as I used it for making swag bags for my son's wedding. Thank you so much for a great tutorial! http://suziesimaginarium.blogspot.com
ReplyDeleteI am going to make some of these for myself and get busy and make a couple for my two grandchildren to put their Easter surprises in for them. This is really a very good tutorial and a great little bag.
ReplyDeleteOh wow, I have just made this and it is fabulous! Can't believe how easy it is to make, feel extremely proud of myself. Thank you very much for the straightforward instructions
ReplyDeleteHi,
ReplyDeletehave just finished mine! Thanks for the tutorial.
Posted my photo with a link to the tutorial on a French forum. I hope you don't mind.
http://patchtopatch.superforum.fr/t28925-pochon-violet#415859
Beatrice (from France)
I finally made one of these tonight! The tutorial was so great and easy to follow, especially as I am basically a beginner. Thanks for your work in putting it together! I plan to post my picture to the Flickr group as soon as the weather is nice enough to get some good pictures. Thanks again :)
ReplyDeleteHave just made one of these for my kinds alphabet bricks but it's currently being used as a shopping bag lol. Lovely clear tutorial, thanks x
ReplyDeleteI wanted to say thanks for this tutorial, it was really easy to follow, made a few and wrote a small piece about them on my blog :D
ReplyDeletehttp://www.thecraftimaginarium.co.uk/2012/05/you-can-never-have-too-many-bags.html
Recently stumbled upon your blog. Great, clear tutorial! Would have to be the quickest and easiest drawstring bag I've made. Thank you :).
ReplyDeleteI used to make these bags years ago but lost the directions. Thanks so much for posting this tutorial. I'm looking through my fat quarters to get just the right fabrics. Thanks so much.
ReplyDeleteSo cute bag..... you do a great job and you explained everything in very detail so every one can easily made this kind of bag.
ReplyDeleteGifts To Pakistan
Thank you for the tutorial, it was super easy to follow! I made a bag using your tutorial and posted about it on my blog.
ReplyDeleteIn case you're curious how it turned out, here's a link to the post:
http://frogged-designs.blogspot.de/2012/05/echino-drawstring-project-bag.html
Just made a bag today inspired by this tutorial. Many thanks for such well written and photo enhanced instructions! I have made a few bags before but never tackled lining them. :-)
ReplyDeleteGreat tutorial. c:
ReplyDeleteWhere do you get these fabrics by the way?
I have made several of these bags now! I tried several different ones before I found yours and I wanted to tell you that yours is the best I have come across so far. I just finished a wool bag, modifying your instructions a wee bit. Thank you for generously sharing this.
ReplyDeleteThis little bag looks adorable! thanks for sharing the tutorial!
ReplyDeleteMade 2 of these today & it was so easy! Great tutorial - ill be checking out more! Very easy to follow!
ReplyDeleteThis tutorial was awesome! I just whipped one up this morning to use as a gift bag. I wish I would've taken a picture. It turned out beautifully! Thanks so much!
ReplyDeleteThank you for the great tutorial! I made a bag this weekend for my GPS.
ReplyDeletehttp://sewaddictedtoblogs.blogspot.com/2012/06/doll-bag-and-binding.html
Thanks for sharing this. I really like the way you pieced it (I have never thought to do it that way). I made my first one this evening... and pulled fabric to make 6 more for gift bags. Thanks again!
ReplyDeleteJust stumbled upon your blog for the first time. I love your version of this bag! Thanks for the great tutorial...
ReplyDeleteI hope it's okay if I post a link to your tutorial on my FB page to share with others.
www.Facebook.com/PinkSparkleAndLace
~ Tammy
Made two of them for birthday gifts today. The little girl who received one of them loved it! Very easy directions to follow. Thank you.
ReplyDeleteSuper cute! Love the print and the great visual tutorial. I pinned your link on Pinterest's website to share with all.
ReplyDeleteso i just made this (and bought the pattern), and i'm in love! planning on making another one tomorrow for my DSLR, and i'm thinking about making a ton in preparation for christmas presents - maybe in aneela hoey's new christmas line? oh, the possibilities! thanks so much. :)
ReplyDeleteThank you for sharing!
ReplyDeleteI just cut out fabric to make one of these....will 5/8" ribbon work since it's slightly wider than the 1/2" fabric strings you made? Thanks!
ReplyDeleteThat should work just fine!
DeleteJen, this is a great tutorial, and for once I feel like there is very little I do not completely understand, which is a great feeling for a sewing newbie. I look forward to trying it.
ReplyDeleteJeni - I love this tutorial and pattern. I made up two different sizes and blogged about you and your amazing tutorials. Thank you for sharing your talent and love of sewing with us!
ReplyDeletehttp://anaggiebug.blogspot.com/2012/07/attack-of-quilting-bug.html
Can't wait to make one of these for my dslr for vacation! So easy to follow! Just wondering if you felt like your camera was pretty well protected without batting. I was thinking about adding a fuse able fleece to the main exterior pieces....not sure if that would work??? Thanks for another amazing tutorial!!!
ReplyDeleteI think that would work just fine!
Deletei KNEW your blog sounded familiar! i used your drawstring bag tutorial a few months ago in my "NeedleReads" sewing class at the library. love it!
ReplyDeleteVery cute, I have just the fabric too.
ReplyDeleteJust finished making my first drawstring bag and your instructions were great! Love the end result! :D
ReplyDeleteMany thanks for this clear and easy-to-understand tutorial. Really enjoyed the sewing and will put a picture (or two) in the
ReplyDeleteflickr group.
Marion
Thank you so much for the easy to follow tutorial! I just finished making 5 of these awesome bags, they turned out so cute!! I am using these as a baby shower gift for "on-the-go diaper bags"!
ReplyDeleteThanks for this really great tutorial. I made one last night with a couple of changes:
ReplyDeleteI made the cords a bit longer and left two extra openings either side 2 inches from the bottom. Before sewing up the inside of the bag, I stitched two ends of the cords in at each side - and it makes a drawstring backpack. I made it a bit bigger too. Perfect for my daughter's gym kit! Thanks for the tutorial!
Thanks for putting together this terrific tutorial. I just added a link to this post on my blog.
ReplyDeleteYou can find me at http://valzcorner.blogspot.com/2012/09/drawstring-bag.html
Thanks again!
Muchas gracias, acabo de hacer una de Halloween, en cuanto la publique en mi blog te aviso.
ReplyDeleteBeautiful! Me too can't wait to do it :D
ReplyDeleteThank you Jeni, I just made such a bag for my mum and it went like a dream. :-)
ReplyDeleteSteffi
i just made one for christmas wrapping.. and i'm going to be making many more. it's a great tutorial even though i totally messed up my measuring and cutting.. i was happy to have ribbon on hand instead of making my own. and it goes together so nicely! thanks. =)
ReplyDeleteI loved making this... the tutorial was so clear and everything went together so nicely! Thank you. :)
ReplyDeleteGet a bodkin. So much better than using a safety pin. I made a couple of these at Easter for the grands' goodies. A lot nicer than the cheesy baskets available where I live. Love those pink fabrics. Added them to my growing list of must haves. N
ReplyDeleteJeni, I just finished a "thomas the Train" bag for Quilt it today, thanks for the pattern!! :-) I had bookmarked this a while ago anyways....
ReplyDeleteThank you...this is great!
ReplyDeleteAbsolutely love this idea! My little girl just got a toy with lots of pieces to it and I thought a little drawstring tote would be perfect to keep all the pieces together in her toybox! That brought me to you! Thanks so much! I will be doing this project soon!!!
ReplyDeleteoh, I love the bags. Can't wait to try out your tutorial and make one. I've always wanted to make gifts of shoe bags for my daughter and daughters-in-law to travel with. These would be really cute.
ReplyDeleteThanks for a great tutorial. I scanned through it and will try to do one tonight.
Jackie in San Antonio
Hi Jeni! I can't believe that I've been following your blog for almost a year and I just now got around to making one of these! The tutorial is so great, I'm almost done with my second one! I'll be sure to upload pictures to the flickr group.
ReplyDeleteWhat a great pattern - just finished my first attempt and I have to say it's pretty great. I had to redo a few seams because believe it or not I put it together wrong in step 1 :), but it was obvious right away what I'd done wrong. Thanks for such a great project!
ReplyDeletethis is an awesome bag. and a wonderful tutorial. a couple times i wasn't sure if it was going to work out, but i just followed exactly what you said and it worked out beautifully!
ReplyDeleteThe best tutorial for these bags I have ever seen, thank you so much
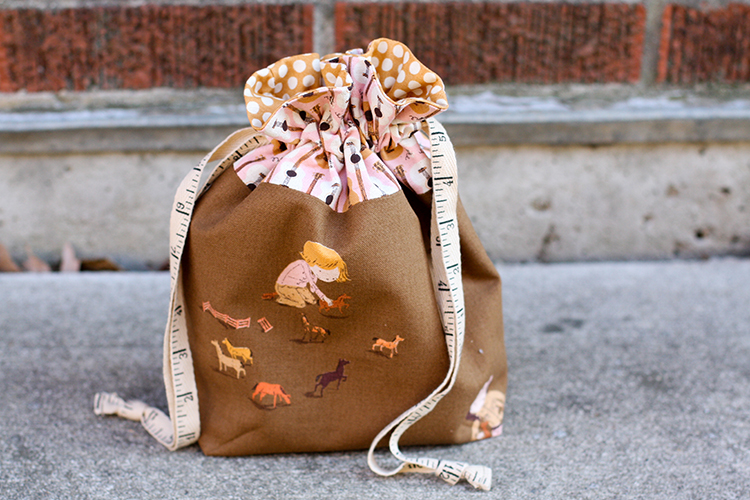
ReplyDeleteLove the picture you just added with the tape measure drawstrings! Where did you find it?
ReplyDeleteMerci pour ces explications. Je viens de terminer mon premier essai et je suis plutôt fière. Le résultat est superbe. Thanks a lot for this great tutorial. I have a new lunch bag now !!
ReplyDeleteGreat tutorial! Thank you for taking the time to post this. I found it today on Pinterest.
ReplyDeleteHappy sewing.
Great tutorial! Love my bag!
ReplyDeleteI just found this bag and whipped it up this afternoon. I love it. Thanks. Can't wait to make more.
ReplyDeleteThanks for the excellent tutorial. Everything went together easily and produced a cute - and functional - bag. Thank you!
ReplyDeleteYour bags are very cute. I made a similar a while ago. You can see them on:http://www.vmjesusferreira.blogspot.pt/2012/aula-aberta.html
ReplyDeleteI just made 2 more bags, size medium... love these
ReplyDeletehttp://www.beaquilter.com/2013/10/have-you-cleaned-your-machine-lately.html
Darling. I am planning on making a larger bag (12x12), and was wondering if I should modify the size of the gusset.
ReplyDeleteThank you for taking the time to make and share this tutorial! I've made a few and pictures are on my blog.
ReplyDeletehttp://knittypie.blogspot.ca/2014/01/project-bags.html
Made this today and I have to tell you what excellent directions you gave. I breezed right through, I'm just so proud of how it turned out. Thank you for sharing your talents with me and others, I appreciate your skills and ideas. I love how you put it together, your train of thought - really a fun concept. Bless your Heart!
ReplyDeleteI am very much a beginner sewer and I found your tutorial very easy to follow. I especially liked the video portion; I'm a visual learner and this was a huge help. Thank you for sharing your knowledge with everyone and doing so in such a precise, thorough way. I appreciate it more than you know! I spent an hour scouring the internet for the best drawstring bag tutorial and yours was the best by FAR! Thanks again!
ReplyDeletemy only question would be, where to buy those lovely fabrics?
ReplyDeleteThanks for a nice tutorial, it's fabulous!!! I lovely your work and learn very much,...thanks Jeni !!! :-)
ReplyDeleteI just made my first one! And now to sew some more. Thanks for this great tutorial. I love this bag!
ReplyDeleteIn regards to present day fashion, the fitness world has created a craze of certain items such as gym tank tops and yoga pants that are worn as casual wear by many people on a daily basis, whether they attend a gym or not.
ReplyDeletegym bag
Ha! So excited I finally made my first lined drawstring bag! The tutorial was, of course, clear and easy to follow! Thanks Jeni!!!
ReplyDeleteThank you, i loved this pattern. I made 3 styles of project bags today but this was, by far, the easiest and best looking! I do have one question - since i was using 3 fat quarters, how do you - Cut (1) 12.5”x22” strip
ReplyDelete- Subcut into (2) 12.5”x10.5” pieces for the interior? My fat quarter was only 9" wide so I had to piece it. Not a problem, but it did puzzle me for a few minutes!
I just finished reading through your instruction -- you did an incredible job! You've inspired me to give this a try -- fingers crossed :) Thanks for sharing your pattern and for taking the time to make such a helpful tutorial. Kind regards!
ReplyDeleteDrawstring bag is very comfortable and nice. i am use drawstring bag. very good information i am inspire. thanks for sharing.
ReplyDeletei made one of these a year ago for my camera and decided to make another one a bit bigger today. LOVE LOVE LOVE this. easy to make and very cute finished product!! Thank you so much for the tutorial!!!
ReplyDeleteLove it thank you.
ReplyDeleteElaine
Made 4 (with added internal pockets and a slight bit larger) - thanks for the clear walk through!
ReplyDeleteThis is exactly what I've been looking for! Now I can make a professional looking project bag for my sock knitting specifically using some autumn themed fabric!
ReplyDeleteThis was awesome! Thank you so much!
ReplyDeleteI used your tutorial here to make some dice bags, and dispite the fact that it took me 40 mins to figure out how to thread and use the sowing machine... your steps were really easy to follow and well laid out. Thank you!!
Thank you, lovely bags which I'm about to make. Excuse me if I've overlooked something but I'm puzzled about cutting the 22" into 2 pieces of 10½", what happens to the other inch?
ReplyDeleteMaureen
The other inch is scrap leftover!
DeleteOk, thank you, thought you might have a purpose, ribbon etc. I will just cut to 21 " on my fabric then.
DeleteThat's an interesting tutorial! I've read it from start to finish and will keep it in mind for when I wish to make a drawstring bag. Thank you!
ReplyDeleteI used it to make some lined 'santa sacks' for a friend's kids (they are ... cameraschildren.blogspot.com
ReplyDeleteThanks this is a quick and easy project. I highly recommend giving it a try. Great way to use up scraps.
ReplyDeleteThanks for the wonderful instructions on making this bag. I have made many drawstring bags but this made my latest project so much easier.
ReplyDeleteTook all the guesswork away.! I reduced the size to make a gymnastic grip bag for my Grandaughter.i know she will l��ve it!
Thank you for posting this cute and practical drawstring bag! I made one according to your specs then made two more, one with an front pocket, then another with both a front pocket and an interior pocket! Thank you for walking through the directions so carefully and explaining yourself very well.
ReplyDeleteThanks so much for a great tutorial! I'm totally addicted to making this cute easy bags!
ReplyDeleteThis is my favorite drawstring bag pattern. I have made at least six as gifts. One of my knitting buddy's made a bunch for her sock projects. I didn't even realize we used the same pattern. I recently went to a quilt retreat where I planned on making more and another quilter had the same pattern. She made me one for my birthday. I was thrilled. Thank you for the pattern.
ReplyDeleteThanks for this tutorial! I'm a total beginner and this is the third thing I've ever sewn, but you made it so easy! :) Here's a link to my process and thoughts on it: https://delightinstitches.wordpress.com/2015/11/20/adorable-japanese-style-drawstring-bag/
ReplyDelete<3