
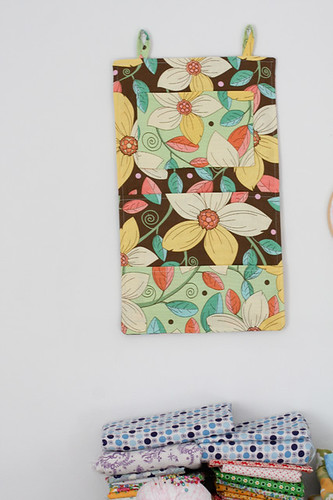
Here is my tutorial for a Pocket Wall Organizer. This past week I made one to organize my mail and realized I probably needed one for my sewing area! I took a few photos along the way, so that you can make one too. Enjoy :)
Sewing Level: Beginner Friendly
Materials:
- 1/2 yard of main fabric
- Fat quarter of a second fabric
- Some scrap cardboard around 10"x16"
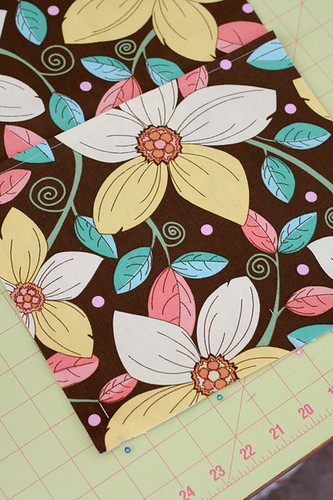
I choose to use Home Dec weight canvas for my wall organizer. It gives it a lot of stability. However, the seams where pretty thick at the end. I would suggest that if you're going to use a heavy fabric, use a regular cotton weight fabric for the back piece and back pocket.
Instructions
1. Iron your fabrics and cut the following pieces
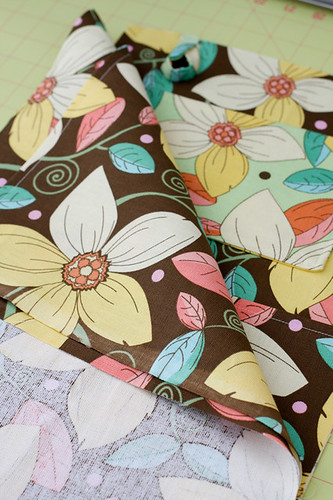
From the Main Fabric:
4 pieces 18"x11" - these are the front, back, back pocket, and large front pocket piece.
From the Secondary Fabric:
1 piece 5.25"x11" - this is the bottom pocket piece.
2 pieces 8"x5.5" - these are the small top pocket pieces
2 pieces 2"x5" - these are the hanger pieces.
2. First we are going to make the bottom pocket piece. You'll need to fold the long side over 1/4", iron it, fold it over 1/4" again and topstitch.
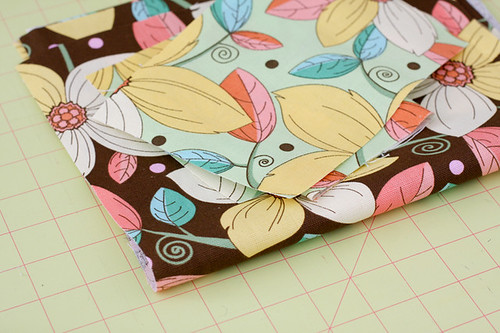
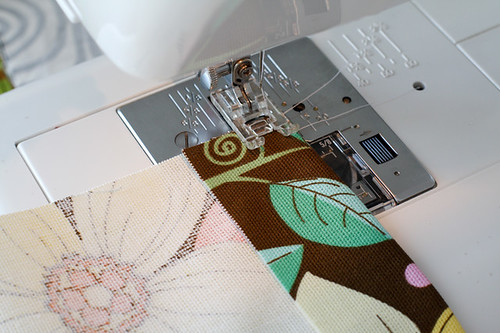
3. Next, take one of the large 18"x11" pocket pieces and fold it in half with the shorter ends together. Iron and topstich the folded side.
4. Take the 2 small top pocket pieces and lay them right sides together. Sew around all four sides leaving a 2" gap for turning. Clip the corners and turn right side out. Don't forget to use a turning tool or something pointy to poke out the corners.
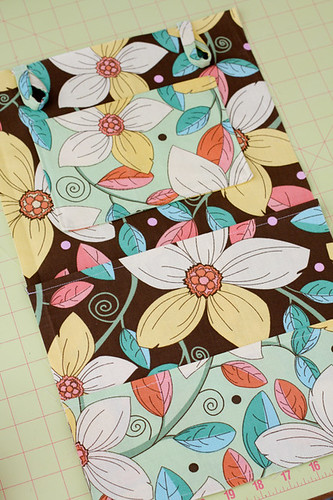
5. Now that all of the pockets are made, it's time to attach them to the front. Line the large pocket piece up with the bottom of the front piece. Stitch across around 1/2" from the bottom.
6. Line the bottom pocket piece up with the bottom of the front piece. Stitch across 1/4" from the bottom.
7. Place the small top pocket piece 2" above the large pocket. Center it widthwise. Pin in place and sew along the sides and bottom.
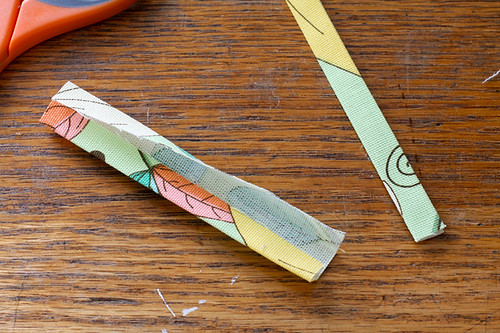
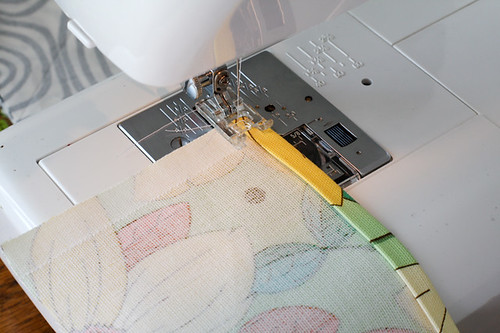
8. Now it's time to make the hangers. Take your hanger pieces and fold them in half length-wise. Iron. Unfold and fold both sides onto the center line created by your first fold. Iron again. Now fold in half length-wise again. Press and topstitch. Do this for both hanger pieces.
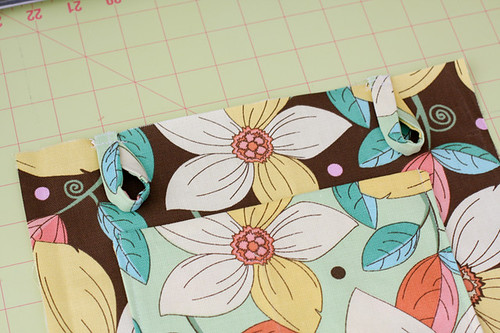
9. Bring the ends of the hanger pieces together and pin 2" from the side of the front piece. Stitch a line across it to secure. Do this for both hanger pieces.
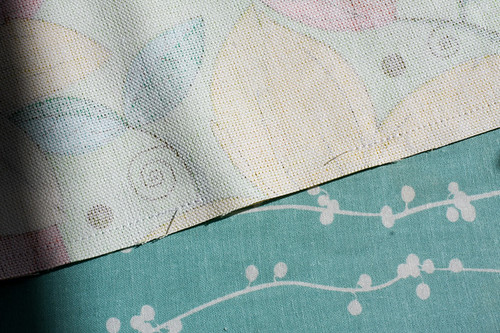
10. Now it's time to make the back pocket. Take one of the 18"x11" pieces and fold down 1.5"-2" on a shorter size. Topstitch.
11. Time to assemble all of the pieces. First, lay the front piece facing upward. Next lay the back pocket (lined up at the bottom) on top and finally the last 18"x11" piece. Pin and stitch around all four sides using a 1/2" seam allowance, leaving an opening for turning. Keep in mind, if you are using canvas like I did, it will be pretty bulky.
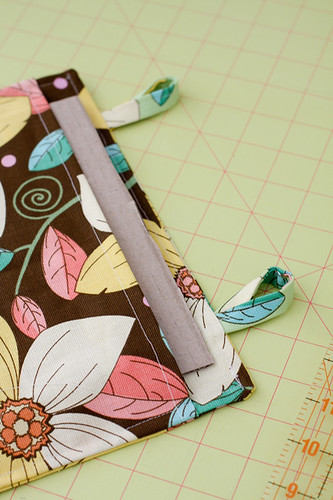
12. Iron well and topstitch on all four sides, closing your turning opening. Now, cut a piece of cardboard to fit into your back pocket, and you are done!
Enjoy!

too stinkin' easy and too stinkin' cute!
ReplyDeleteI love this! I'll have to give it a try!
ReplyDeleteThat is sooo cute! I just love your projects and directions. I might have to make this for my bathroom. Thanks so much! I'll be linking as well.
ReplyDeleteOff the precious meter! Love your choice of fabric! Easy to follow instructions too! Thanks :)
ReplyDeleteOff the precious meter! Great fabric choice and easy to follow instructions!!
ReplyDeleteLove it!!!! I could see other uses for it as well like hanging it by the door for mail, keys, ect...
ReplyDeleteThis is so cute, and also looks like it wouldn't take much to whip up! Great tutorial, thanks.
ReplyDeleteI just found this post--trying to figure out a wall organizer for the corkboard in my kitchen....just a few questions....what do you mean by "a little less than a fat quarters worth" of the second fabric, and are the pockets wide enough for a piece of regular 8.5x11 paper to go into it?
ReplyDeleteI like the embroidery hoops you have fabric in as a decoration! way cute!
ReplyDeleteI can't wait to show this to my granddaughter, she is 10 and we bought her a sewing machine for christmas. She made pillows mostly at first but the other night she made a pair of sleep pants, so she should be able to follow your instructions for this and it would be great for her room. Thank you so much.
ReplyDeleteThank you sososo much! I'm in 8th grade and just started sewing,so this was just right for me.Plus it was so simple, yet so beautiful! Thanks for the project!
ReplyDeleteThis is so easy to make and comes out beautifully! Thanks for the wonderful tutorial! I was very easy to follow!
ReplyDeleteHi, I've come via Aneela of Comfort Stitching's blog. I love your mail organiser!! Thank you for such a great tutorial!
ReplyDeleteI was just about to leave this page when I saw that "Comments make you smile", so I had to let you know that this is CUTE-CUTE-CUTE--Did I say this is SuperCute? Well, it is and as soon as I get a free moment, I am gonna try to make it. Thank you for sharing this great design!
ReplyDeleteI really think this such a good idea and great tutorial, but in the next tutorial could you use fabrics that contrast more?
ReplyDeleteJust made it! LOVED IT!!! THANK YOU VERY MUCH!
ReplyDeleteWall organizers were one of the choices in my Lovely Little's 4-H project. She used your tutorial, and took Champion! Thanks for sharing!
ReplyDeleteI bought the material for this eons ago but finally actually did it today! Thanks so much!
ReplyDeleteThank you for the inspiration. I love the fabric.
ReplyDeletesounds an easy DIY :-) Gotta try this. Thanks for the share
ReplyDeleteSomeone taught you well at sewing. Your idea is darling but your neatness in seams and pressing are a rare site. You should be proud to make tutorials. That extra minute of doing it right are a good lesson for newcomers to sewing.
ReplyDeleteIt is usefull to them because all of that discord enables them to focus on their own real agenda without anyone noticing it amid the din of the culture war. http://www.bestcustomwriting.com/blog/writing-in-general/peeling-back-the-onion-layers-of-meaning-in-academic-writing
ReplyDeleteI really enjoyed the quality information you offer to your visitors for this blog. I will bookmark your blog and have my friends check up here often. SunVPN
ReplyDeleteKeep up the excellent work , I read few blog posts on this web site and I conceive that your website is rattling interesting and holds bands of great info . rocky military boots
ReplyDeleteI just stumbled upon your blog and wanted to say that I have really enjoyed reading your blog posts. Any way I'll be subscribing to your feed and I hope you post again soon. Big thanks for the useful info. agence location voiture casablanca
ReplyDeleteIts wonderful blog really very nice site and blog facility.every title is very nice and very fatastic concept. Thanks for sharing the information.
ReplyDeletekeramiek terrazzo
It is awesome list.I wasn't aware of this feature of this article.thanks!
ReplyDeleteDublin plumbers
First of all let me tell you, you have got a great blog .I am interested in looking for more of such topics and would like to have more information. Hope to see the next blog soon. Prescott AZ Real Estate
ReplyDeleteHere is the worthy reading articles I have to recommend to you. You would earn much useful information like me.
ReplyDeletethe rich resources in their territories, a few reflections emerge. The first is a more than passing resemblance to the actual reality of Indigenous Peoples in Canada and beyond, the bounty of whose land rc shop
ReplyDeleteGood work! I always like to leave comments whenever I see something unusual or impressive. I think we must appreciate those who do something especial. Keep it up, thanks Wooden Door Frames
ReplyDeleteThis particular post is really very interesting. It has a really great peace of Data, I enjoyed very well with this particular blog it has very useful information I like to much the style of this Article. Pleasure thanks for the share and stuff
ReplyDeletehttp://byebra.com/
This blog post really grabbed my attention. With that said I am going to subscribe. Therefore I will get more updates on what you have to say. Please keep writing as I want to learn more.
ReplyDeletedoorzichtige beha
Hello, how’s it going? Just shared this post with a colleague, we had a good laugh.
ReplyDeletepush up adhesif
Thank you for the work you have put into your nice blog. We will bookmark to your blog because it is very informational. We love the site and will come back to see your new posts.
ReplyDeleteneviditelná podprsenka
I’m delighted that I’ve observed this weblog. Finally something not a junk, which we go through incredibly frequently. The web site is lovingly serviced and saved as much as date. So it should be, thanks for sharing this with us.
ReplyDeleterelatiegeschenk telefoon
Very informative post. I was looking for information about this topic and this post really helped me a lot.
ReplyDeleteadesivo elevador de seio
Very efficiently written post. It will be supportive to everyone who utilizes it, including yours truly :). Keep up the good work - i will definitely read more posts....
ReplyDeletepruhledna podprsenka
Thanks a lot for such a wonderful post, the stuff posted were really interesting and useful. The quality of the content was good and clear. Reverse Osmosis Indonesia
ReplyDeleteIt's great to hear from you again. After watching such stuff I am really impressed. Keep up the good work from now on-wards & I will be returning to you for my queries.
ReplyDeletebra tape
Nice blog~
ReplyDeleteSan Diego Hills | Parfum
This is a great idea to organize your things and keep them handy. I was
ReplyDeletesearching for articles to buy hanging mail organizer when i came across your post. Very creative! Keep posting similar stuff. Many thanks once again :)
Hi, really love with that pattern and your creativity. :D
ReplyDeleteLike it!
ReplyDeleteI could see other uses for it as well like hanging it by the door for mail, keys, ect...
inspirations.. good
ReplyDeleteso cute, very good design..
ReplyDeleteI LIKE THE DESIGN. Could IT BE USED TO STORE ACRYLIC PAINT Tubes/
ReplyDeleteSure!
DeleteI love it, just like I love all your tutorials!
ReplyDelete