

The Modern Plus Quilt is finally finished! I've cooked up a tutorial if you're interested in making your own! It's a fun alternative to regular patchwork, but the piecing is just as easy since you're still using squares! I can definitely see myself making more plus quilts in the future!


If you’d rather have this tutorial in downloadable/printed form, check out my Arithmetic Quilt Pattern. It features six different quilt sizes in three different square sizes. That adds up to eighteen different quilt options to customize your project!
Find the pattern in my online shop here: Arithmetic Quilt Pattern.
Fabric Shops: If you'd like to teach classes on this design, I ask that you order paper copies of my pattern for each student. You can order patterns wholesale through this form. Please refrain from teaching directly from this tutorial, thanks!
 I used Castle Peeps by Lizzy House* to make my quilt. I added some coordinating Kona Cotton Solids* for the backing and binding. There is also an optional scrappy pieced backing included in this tutorial. It's a great way to use up the leftover scraps from the front of the quilt!
Sewing Level: Beginner Friendly
Finished Size: 64"x75"
Modern Plus Quilt Materials:
- 20 fat quarters of print fabrics
- 2 yards of 90" wide cotton batting
- 4 yards of backing fabric**
- 1/2 yard of binding fabric
- Coordinating thread
**Optional pieced backing: 3 3/4 yards solid fabric + scraps from fat quarters
Modern Plus Quilt Cutting:
From 20 fat quarters:
- Cut (4) 4.5"x21" strips
- Subcut each strip into (4) 4.5" squares for a grand total of 320 squares.
Modern Plus Quilt Instructions:
 Use a 1/4" seam allowance unless otherwise noted.
 1. Lay out your quilt according to the diagram, you'll have 19 rows of 16 squares each. The process for laying out the pluses is easiest to explain in a diagram! Here is a diagram showing the process below:
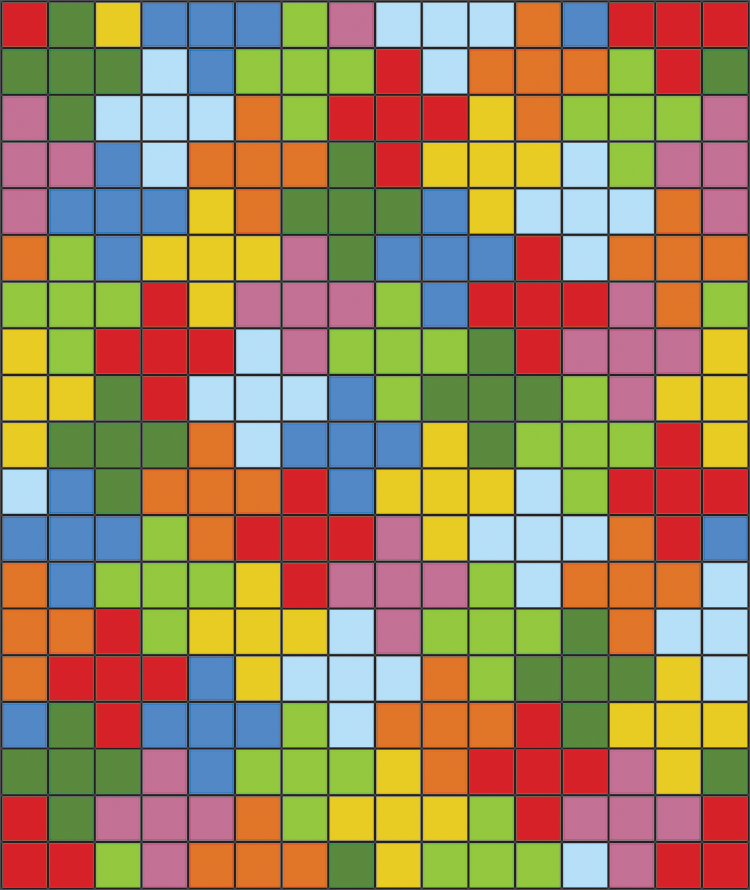
(48) - Full 5 square pluses
(11) - 4 square partial pluses
(2) - 3 square partial pluses
(14) - Single squares
Note: The diagram above has eight colors, simply to show the way the plus design is laid out. You'll likely have more than 8 different fabrics in your quilt so it is not meant to show exact fabric placement.
Once you’re happy with your layout, you’ll want to stack up your rows so that you sew them up in the correct order. I choose to stack the squares moving from left to right. Label the top of each row with a small slip of paper attached with a safety pin.
 2. Sew your squares together in each row. I recommend pressing seams to one side, alternating direction every other row. I like to sew a few rows and then press 2 or 3 at a time. This breaks up the sewing a bit and doesn’t leave you with a ton of ironing at the end!
 3. Now it’s time to sew your rows together. I suggest sewing your rows together in pairs, 1+2, 3+4, etc. You can then sew your pairs together and continue until you’ve finished. This system helps minimize the amount of bulky sewing you’ll have to do. Just like with your rows, don’t forget to press your seams. Your top is done, congrats!
4. Prepare Backing: It’s good practice to cut your backing and batting at least 4” larger than your top on all four sides. I’ve included this overage in the backing yardage requirements. Cut your backing yardage in half. Press. Trim off the selvedges and sew your pieces together lengthwise. Press seam open.
Optional pieced backing instructions can be found at the end of this tutorial.
 5. Basting: Using masking or painter’s tape, tape the backing to a clean, hard surface, right side down. Spread out your batting on top of the backing. Smooth out any wrinkles. Carefully spread out your quilt top on top of the batting, right side up. Pin your top, I like to use curved safety pins, spacing the pins a few inches apart. Make sure that your pins are going through all three layers.
 6. Quilting: Quilt as desired, by machine or by hand. For my quilting I choose to do straight lines 1/4" on both sides of the seams going vertically and horizontally. Trim away excess batting and backing fabric.
 7. Binding: Cut yardage listed for binding into 2.5” strips. Trim off selvedges and sew your strips together to form one long strip, press seams open. Fold in half lengthwise, pressing with your iron as you fold. Attach binding using your preferred method. Find my detailed tutorial on attaching your binding to both sides by machine here: Machine Quilt Binding Tutorial
Optional Pieced Backing:

Pieced Backing Cutting:
From solid backing fabric:
- Cut (4) 33.5"x39.5" rectangles
Pieced Backing Instructions:
Use a 1/4" seam allowance unless otherwise noted.
1. To make the pieced plus, you’ll need the leftover scraps from cutting your fat quarters. You should have pieces that are 18" long and varying widths of 3"-4". Take all your strips and sew them together on the long side (18"). You'll end up with a big piece 18" wide and around 60" long. Once sewn, press all the seams. Cut this long strip into (3) 6" wide strips.
2. Sew all 3 strips together end to end so that you have one giant strip that is approximately 6"x180". From this large strip, cut (1) 84" long piece and (2) 33.5" long pieces.
3. Take one of your backing pieces (33.5"x39.5") and sew one of the 33.5" scrappy strips to one of the short sides of the backing piece. Repeat with the other 33.5" scrappy strip.
4. Sew the remaining backing piece to the other side of the short scrappy strip for both sides, resulting in two large backing pieces that have two solid pieces with a scrappy strip in the middle. Press seams.
5. Sew one of the large pieced backing pieces to one side of the long scrappy strip. Sew the other large pieced backing piece to the other side of the scrappy strip. Press seams. You’re finished with the backing!
 I hope you've enjoyed this free pattern! I have lots of other free tutorials for everything from quilts, pillows, bags, and holiday items to informational series and techniques. Find all my tutorials here: Tutorials. My online shop is filled with patterns for quilts and bags. Find my patterns here: Jeni Baker Patterns
If you make something using one of my tutorials or patterns, I hope you'll tag me @jenib320 and use my hashtag #jenibaker on instagram!

Double Gauze Plus Quilt

Sugar Plus Quilt

Nordika Plus Quilt

Geometric Bliss Baby Plus Quilt

Dreamin' Vintage Baby Plus Quilt

Imprint Plus Quilt

Folksy Flannels Plus Quilt
*Note: Any links marked with an asterisk in this post are affiliate links. This means if you click through and buy something, I make a small commission, at no extra cost to you.
your quilt turned out so awesomely! I love it
ReplyDeleteawesome work jeni!! your quilt is so fun!
ReplyDeleteThanks so much for the tutorials -- it's a stunning quilt! Also, for the record, I would have happily paid for this pattern. :)
ReplyDeleteThanks a million for the tutorial!!!!
ReplyDeleteI loved it!
Hugs from Brasil.
LOVE this! Now I need to figure out when to make it! :)
ReplyDeleteLove the saturation of color the front has by using only the prints! It came out just wonderful!! You did a great job on the quilting, congrats! Thanks for the tutorial, adding it to my 'quilts to make' list ;)
ReplyDeleteWhat a nice picture of your quilt. The sun makes it fairly sparkle. Well done on the quilting. Someday...
ReplyDeleteThanks for the tutorial, can't wait to take a peak. Love how your quilt turned out. :)
ReplyDeletewhat a beautiful quilt. plus i love to see how you quilted it - thanks for showing the back too
ReplyDeleteI found you via One Pretty Thing today. That is the cutest quilt using Castle Peeps that I've seen! And I've seen some great quilts. I need to buy the blue fabric from that collection so I can make this! Thank you!
ReplyDeleteThank you for these directions. On the Lap size the directions go from #1-4 and then jump to #7. :S They also don't give the cutting directions (strips? squares? size of squares?). I see that the small quilt does but not sure if they are the same size.
ReplyDeleteI am SO going to make this! Now to decide on fabric. :D
ReplyDeleteSo...does the small size require 20 or 18 fat quarters? you say 20 here in the post (which I assume is correct...) but the pdf says 18...
ReplyDeletethanks so much for this tutorial! it will be my first quilt! i'm very excited. <3
June - You can choose to either use 18 fat quarters + two additional pieces of fabric that are minimum 18"x4.5" Or, 20 fat quarters and you'll just have a little extra unused fabric from two of the fat quarters!
ReplyDeleteThis makes sense in my head but sounds totally weird in writing, so I've changed the pattern to simply read 20 fat quarters to help with any confusion!
Ooh, thankyou Jenni, I really wanted a pattern I can use for a table runner, so happy to find this!
ReplyDeletethank you so much!! this is is what ive been looking for for ages!!
ReplyDeleteWhat a fabulous quilt. Thank you ever so much for sharing the pattern!
ReplyDeleteOh mercy! I don't know how you can call that quilt "small". I layed out all of my blocks tonight and it is HUGE! I was laughing at your idea of small. Thanks for the great tutorial!
ReplyDeleteKaitlyn
Do you have lap-size instructions for this? Would love to have those requirements - thank you!
ReplyDeleteps. this is one of my favorite fabric lines - love what you've done with it. I have all of the pink/green/white fabrics from "rainy days and mondays" and might use this pattern for a large size quilt for myself - a great way to showcase pretty fabric and still have an interesting quilt pattern as well! Thanks for sharing the tutorial with us!
ReplyDeleteyour diagram of the layout is so helpful! thank you for sharing~i have plans for a plus tessalation quilt done in AMH's garden party--so far I've just bought the fabric however :)
ReplyDeleteAhhhh...this is making me want to make another quilt! So easy (and fairly inexpensive) using fat quarters!!! Thanks for the tute. Bookmarking!
ReplyDeletegenial ma belle j ai mis ton lien sur mon blog bises jojo
ReplyDeleteKayla from Idaho, Darling Darling Quilt. Thanks for all the info!!
ReplyDeleteI really love this quilt! I can't decide if I like the pattern of the fabric better, haha.
ReplyDeleteI think I will have to make a few of these!!
I love this! I can't wait to make this for one of my boys! Love your blog!
ReplyDeleteThis looks like a project for me, I have not made a quilt yet but am itching to do so. Thank you for sharing this, it looks brilliant.
ReplyDeleteMy only suggestion would be to NOT prewash fabric. I did and now all my pieces are 17.5 x 20......not sure what to do because I really want to make this and spent $60 on 20 fat quarters of Innocent crush. It was going to be beautiful!! :(
ReplyDeletethanks for the tutorial. i love this layout!!
ReplyDeleteI have been wanting to make one of these quilts for awhile and this is the first tutorial I have seen on the subject. Thank you for sharing it. Your quilt is adorable!
ReplyDeletecan't wait to make a mini version of this!! so glad I found the tutorial {thanks, Pinterest!}
ReplyDeleteThanks!
ReplyDeleteThis looks like a throw that is fun and easy. I really love to piece squares together and see what comes of it. Thank you for the steps to do this one. I am going to try it soon as I get my sewing room together, I just moved so I am not up and running yet.
ReplyDeleteI've had some fabric sitting beside my sewing table waiting to be made into a quilt for my son. I was blog surfing today and found this, it's going to be PERFECT for his quilt! Thank you so much for the tutorial!!
ReplyDeleteI love love love your quilt and plan to make
ReplyDeleteit my next project. I have a question as to your very perfect straight line quilting.
I have tried several times to do it, but was
dreadfully unsuccessful! I had blocks pulling up and down regardless of how I tried to stitch.
I did use my walking foot.
Do you have any special tips for me?
Thanks so much!
Terri Shuffield
sewterri@suddenlink.net
I'm so happy I found this...I had a stack of fabric I've been waiting to use until I found the right pattern...and this is it! 6 rows done already!
ReplyDeletePerfect tutorial thank you so much. Do you know I spent the afternoon playing with my boy's Duplo trying to work out how to do the blocks!
ReplyDeleteThanks again.
Love it! I can't wait to do THIS! Thank you do much for the tutorial. Now to make it crib or twin size..... Decisions decisions :)
ReplyDeleteI'm not do good when it comes to the maths of quilting… any suggestions on dq requirements for a crib / toddler & twin size quilts?
Thanks so much for sharing your pattern! :)
ronacameron@live.com
I finally got my front all lived together and now I'm ready to do the back!!!! Just wondering if you had any tips for cutting the larger back pieces? I have a decent size mat and ruler, is that the best way? Thanks for an amazing pattern! I used Innocent Crush for mine :)
ReplyDeleteI LOVE this! I think I am going to make this quilt next. Thanks for sharing!!
ReplyDeleteWhat type of batting do you recommend?
ReplyDeleteHey there...Thanks so much...This makes an excellent PATCH AS YOU GO type of quilt to use up your scraps while you are doing other quilts....another words a quilt in the making. When you have leftovers, just cut into the squares and keep adding them row by row....pinning the needed coordinating squares to the row you just sewed....saving those squares for their rightful place on the next row and so on.....as you keep adding squares each row....the PLUSES keep APPEARING and by the time you get to the proper size of quilt top you want...VOALA!!! you are done....I cannot wait to get this started...I don't have to wait and buy up all of the material at once if I am not in a hurry for it....just keep adding squares...always knowing I need 5 (five) of each square in order to complete an entire PLUS design if need be, saving all leftover EDGE squares for the remaining part of the quilt like the backing or just save for another quilt project. This will be ALOT OF FUN....another way NOT TO GET BORED from all the SQUARE BUILDING at one time LOL....HOT DIGGITY....Thanks LADIES....and GOOD LUCK!!!.
ReplyDeleteThe Irish Lad from Orlando, FL
This is a really great idea. A little bit of planning (besides needing 5 squares of any color) must be needed to get the pluses to appear, but I think I can work it out. Thanks for your ideas.
DeleteI absolutely LOVE this pattern! What a wonderful way to use and showcase all your favorite fabrics. The fact that it only takes a maximum of five squares of any given color opens it up to so many possibilities! I think the pattern would also lend itself well to gradiated or rainbow colors, from corner to corner, top to bottom, or side to side. I can't wait to get started! Thanks so much!
ReplyDeleteI know that I am late to the party, but I am planning on making this quilt for my little sister using Sweetwater's reunion. Do you have a flickr group where people post items made from your tutorials? Thanks for sharing.
ReplyDeleteAfter reading Ken's comment, I realized this pattern would also be great for charm squares! The pluses would be slightly bigger, but the fabric is already cut. Plus!
ReplyDeleteLindsay, here's a link to Jeni's flickr group: http://www.flickr.com/groups/1667554@N23/
Love it times 5! Will definitely make. I wonder how it would look as a 2 color batik using mult-hued batiks?
ReplyDeleteLove it. I am getting ideas in order to mak a quilt out of my son's baby clothes (just my favorites but there are a lot)! Have never quilted but have sewn a lot of different things. Eflan003@gmail.com
ReplyDeleteI LOVE this! It was an awesome Pintrest find:-) I saw under "Quilts" on your header, a "Giant Plus" quilt, what size did you cut those squares? I think it would work a little better for the fabric I have in mind. Thanks so much!
ReplyDeleteJeni, I love this tutorial. Just started my Plus Quilt over the weekend. I hope you don't mind that I linked to it in my Blog. It's one of the best tutorials I've seen so far!
ReplyDeleteHI - I saw this quilt made with "H" shaped blocks which require "filler" blocks. It was called "Jigsaw." I thought, why not just use squares??? This is so much better, I just ground up the directions for the "H" block quilt. Very pretty...a very "DOable." So, I will DO! These tutorials and pictures are so helpful. Thank you. Nancy
ReplyDeleteI made mine in red, white & blue. Some patriotic and some only those colors. Not sure how or I would post it for you. thanks for the fun !! P. jaco
ReplyDeleteGood tutorial, loved it. Easy way to use left over pieces as you only need 5 squares of each material. Will definitely make this one. Thank you . Pat
ReplyDeleteLast message came from a quilter in England. Forgot to mention that. Pat
ReplyDeleteGreat tutorial! I'm working on a quilt top using your tips right now. :) I also wanted to let you know that I featured it on my blog here:
ReplyDeletehttp://echinopsaster.blogspot.com/2012/07/what-can-you-sew-with-charm-pack.html
Thanks Jeni!
I am a Patchworker from England and I posted on June 21st. Well I have made a Baby Playmat from your instructions and it has turned out beautiful. Thank you for your tutorial. Pat
ReplyDeleteI really want to make this quilt...thanks!
ReplyDeleteI have made 2 of these, both in wovens with flannel backing. They both were twin size and the first bed quilts I have made.
ReplyDeleteI'm so excited. I just got all my squares cut out and just started laying them out! Love this pattern!
ReplyDeleteHi, I am very new to learning the whole sewing thing. What is a bind? Most of the lingo you were saying I didn't know what you were saying. I love the blanket and would love to try and make a few for gifts and my children!
ReplyDeleteWonderful for me and the Seven Wonders Fabric..PileOFabric sent me. I am trying to make a Value Quilt. Thank you
ReplyDeleteThank you! I just finished a quilt using your tutorial. :)
ReplyDeleteThank you for the tutorial, I really enjoyed making a quilt for my son, which you can see here: http://sparrowlanequilts.blogspot.com/2012/10/plus-quilt-finished.html
ReplyDeleteI really like this quilt and have lots of scraps I would like to use. Is there any way to print these instructions so I can save them for when I'm ready to make one?
ReplyDeleteThis comment has been removed by the author.
ReplyDeleteWonderful! A great graduation quilt idea for 2014. I will try to clean out a bin just for the squaresx5 sets gleaned from scraps from throughout the year.
ReplyDeleteI am so excited! I just finished the Modern Plus quilt from your tutorial. I love how it turned out. You can see my version here: http://sunshinesews.blogspot.com/2013/05/modern-plus-quilt-completed.html
ReplyDeleteThank you so much for the great tutorial.
Kathy
When I first saw this quilt I saw "Crosses" not Pluses. My nephew is going to be a minster and I am going to make this quilt for him as a gift for all his dedication to the lord and church. Thanks for your awesome ideal.
ReplyDeleteI'm so anxious to make this quilt. Even though you so generously provided measurements and instructions, I just purchased the paper patten from your site.
ReplyDeleteLove this quilt! Thanks for the tutorial. Pin it now for must do quilt :)
ReplyDeleteI made a Valentine's version and blogged about it today... thanks so much your fantastic pattern!
ReplyDeletehttp://asimplelifequilts.blogspot.com/2014/02/valentines-plus.html
Oh, I just love this quilt! I have some Bonnie & Camille fat quarters and I think I'm going to make this my next quilt, although I may make it just a bit smaller. I love your awesome back! That technique would be so wonderful to use on other quilts. I hate working with huge pieces of fabric, and this breaks it up so nicely, staying in the "plus" theme, too. Thanks so much!!
ReplyDeleteI'm making this as a scrap(ish) quilt for my boyfriend's graduation, but I'm using Star Wars fabric as the centers for some of the pluses! And also, I'm mixing cotton and flannel. I'm so excited! Thank you for this amazing tutorial!!!
ReplyDeleteI love this pattern! Thank you so much for posting it. I saw on another blog that she had made this quilt using vintage sheets. I'm off to do the same now.
ReplyDeleteLove it. 80 % done with my front. Great way to use all those 5" squares and practice even seams and matching the squares.
ReplyDeleteI've wanted to do this quilt for years! Love th epattern and your color choices. Is there any way I can view the missing pics? Looks like it's a castle peeps plus quilt that won't load. Thanks!
ReplyDeleteHi Kimberley--They're all loading fine on this end, I'd recommend refreshing the page, or trying it on a different browser or device!
DeleteLove this too! I'm going to make this real soon with all my scraps. Thanks for your thoughtfulness for sharing from NL, Canada.
ReplyDeleteThis just popped up in my pinterest feed and I LOVE it!! Can't wait to use my recently purchased Sandra Clemons Front Yard fabrics for this quilt. So beautiful and simple in design.
ReplyDeleteThe link to download the pattern is no longer working. I would love to give it a try!
ReplyDeleteWhoops! Here is the link: https://incolororder.bigcartel.com/product/simple-addition-quilt-pdf-pattern
DeleteYou are so generous! I love this quilt so much❣️❣️❣️❣️❣️
ReplyDelete